Mobile testing on a real Android device
Learn how to create and execute a simple mobile test on an Android device.
When following the mobile testing workflow, testing on a real Android device is the easiest approach in Katalon Studio. This process involves several key steps:
Connect your device: Connect your Android device to your computer and enable USB debugging. You will learn about this later.
Create a test case: Create a new mobile test case and use the Mobile Recorder to capture actions on your device. This tool allows you to interact with the mobile application, generating automated test scripts based on your actions.
Enhance your script: Once the test case is created, you can enhance the script with additional validations and logic by editing the test case in Manual or Script view.
Execute the test: Execute the test case directly on your connected Android device. Katalon Studio will display the test results, allowing you to analyze the application's behavior and identify any issues.
Before you begin recording, ensure your testing environment is properly set up. Proceed to the next step in the mobile testing workflow: Set up your mobile testing environment.
Set up your mobile testing environment
Creating a conducive testing environment is essential for conducting a thorough and accurate mobile testing on your real Android device.
For real Android devices, setting up your mobile testing environment requires performing the following tasks: Install the Appium server and set up the UIAutomator2 webdriver.
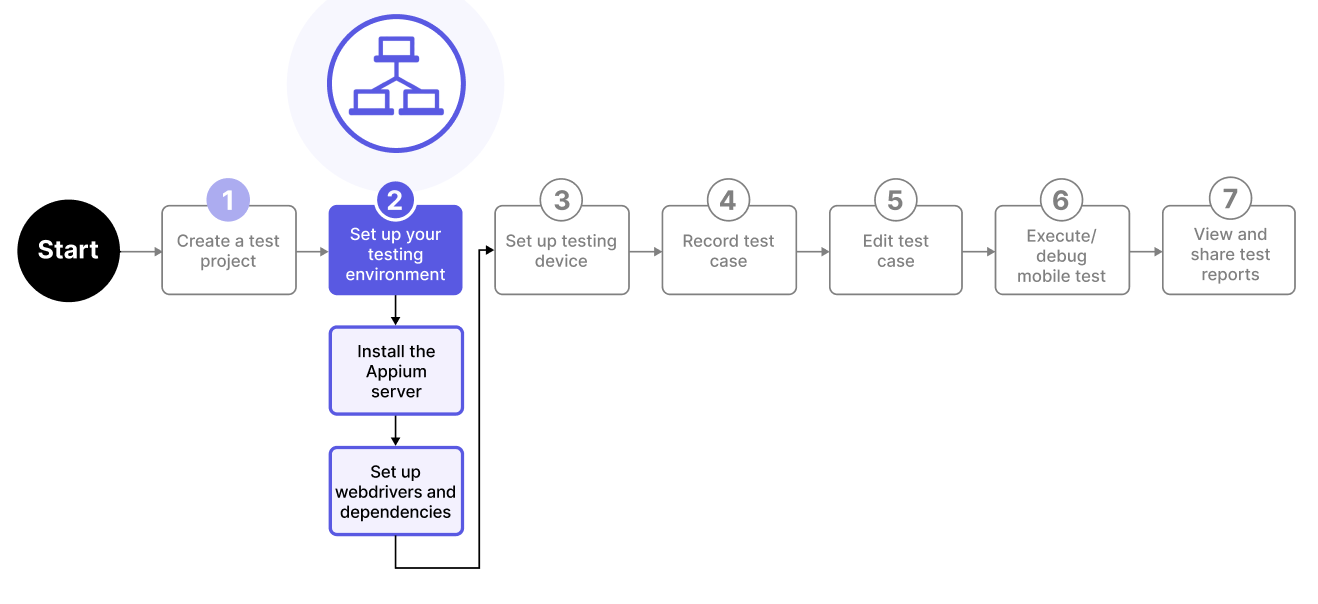
Scroll down or click on the link to continue learning how to set up your mobile testing environment: Install the Appium server.
Install the Appium server
To set up your mobile testing environment for your real Android device, you need to install the Appium server.
Appium is an open-source test automation framework designed for native, hybrid, and mobile web applications. It utilizes the webdriver protocol to control iOS, Android, and Windows apps. The framework supports automation of mobile applications using various programming languages including Ruby, Python, Java, JavaScript, PHP, and C#. It also integrates seamlessly with any test framework, providing comprehensive access to backend APIs and databases.
Katalon Studio 9.1.0 and later versions support the latest version of Appium (Appium 2.0).
Follow the steps to install Appium 2.0 for an Android mobile testing environment.
Install and set up the UIAutomator2 webdriver
Installing and setting up the UIAutomator webdriver is the second task you need to do to complete setting up your Android mobile testing environment.
Webdrivers are essential in mobile testing because they serve as intermediaries between test scripts and mobile browsers or apps, enabling automated tests to mimic user actions accurately. They support cross-platform testing, ensuring consistency across diverse devices and operating systems, and allow for testing on both real devices and emulators.
Appium 2.0 now separates tools and processes of building and using drivers for different platforms. This ability to install and work with decoupled web drivers based on your application platform (iOS, Android, etc.) reduces your setup time and improve mobile testing performance. As such,
For Android testing, you need to install the Appium UiAutomator2 Driver. Follow the steps to install the Appium UiAutomator2 Driver:
appium driver install uiautomator2@2.45.1
Set up your real Android device
To set up your Android real device on a Windows, macOS, or Linux machine, you need to configure the device into developer mode and install the appropriate Android SDK. This ensures the device can successfully connect with Katalon Studio.
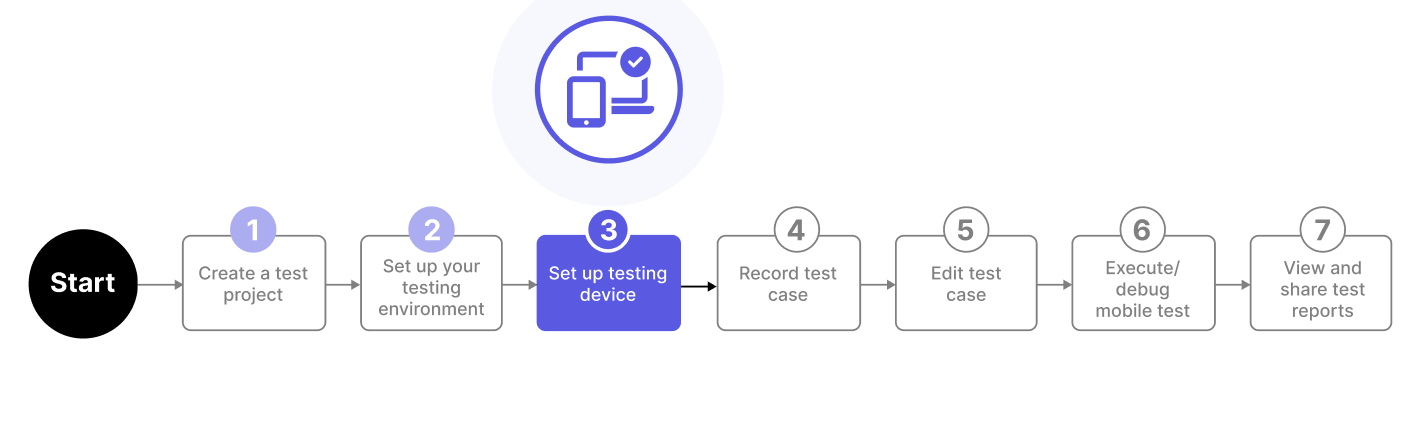
Follow the instructions below to set up your real Android device:
-
On your real Android device, go to to turn on Developer mode.
Note:In some devices, you need to activate the Developer mode first. Here's how:-
Find the Build number entry (or Version) and tap it seven times.
You may need to enter your device's PIN, password, or pattern to confirm. You should receive a notification that the Developer mode is enabled.
To verify if Developer mode is turned on, go back to Settings (or go to Additional Settings in some devices) and then tap on Developer Options.
- If you are using a Windows machine as your development machine, you need to enable the following additional features in Developer Options:
-
USB debugging – This turns the device into debug mode when it is connected to your machine via USB.
-
Install via USB – This allows your device to install apps via USB.
-
USB debugging (Security Setting) – This grants permissions and simulates input via USB debugging.
-
-
- Connect your real Android device to your computer via a USB cable. Once connected, confirm on your computer to accept or trust the device.
-
Install Android SDK.
-
If Katalon Studio does not detect your Android SDK, find the Android SDK for your Android device in Android Studio. Go to the Downloads tab of Android Studio and scroll down until the Command line tools only section. Select the SDK for your computer, click to download and follow the installation prompts.
-
-
Verify the device connection.
-
Open a sample Android project in .
-
On the main toolbar, open the dropdown list next to Run and select the Android device.
-
Your real device should be on the list of connected devices in the Android Devices window. Select your real Android device from the list and click OK.

-
You have successfully set up your real Android device with Katalon Studio. You are now ready for the next step in the mobile testing workflow: Playback a test case.
Before you proceed, let's get acquainted with this Katalon Studio feature that allows you to record your test scenario and generate test scripts for your mobile test case. See: The Mobile Recorder utility.
The Mobile Recorder utility
Here is a quick tutorial on what a Mobile Recorder utility is and how to use it for mobile testing in Katalon Studio.
Components
The Mobile Recorder utility is a tool used in Katalon Studio to record user interactions with a mobile device and converts them into automated test scripts. It enables you to view and edit recorded user interactions, test objects, and configurations, all within a single, user-friendly interface. This allows you to create and manage test scripts effortlessly, without requiring extensive programming knowledge.
-
The Action bar located on the top left corner of the dialog allows you to start and stop recording, and capture test objects on an AUT page.

-
The Configurations section is where you choose a connected mobile device (which you have learned to set up earlier) and AUT for the recording session.
-
The Device View and All Objects section provides you an interactive view of the device screen and the test objects captured. You use the Device View to interact with the AUT as All Objects organizes the captured objects in the recorded AUT screen.
-
The Available Actions section contains buttons for interacting with your mobile AUT. includes object actions (of which you need to select a test object first before an applicable action is allowed) and application actions (which do not require a test object to be selected).
-
The Recorded Actions and Captured Objects tabs shows all actions and test objects captured during the recording session, in the order you interacted with the device.
-
In Captured Objects, double-click an object to open the Object Properties table and view its detailed properties, including the locator strategy and value. The default locator is a unique value for detecting that object. Katalon Studio supports all Appium selector strategies except for Android Data Matcher.
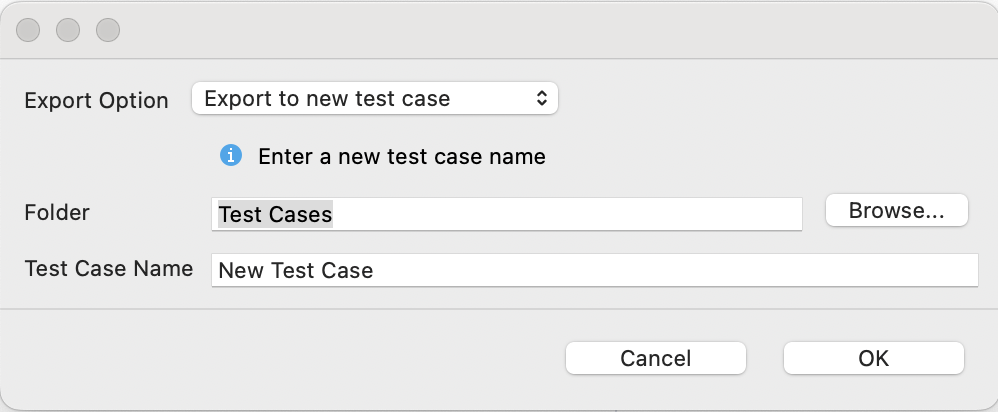
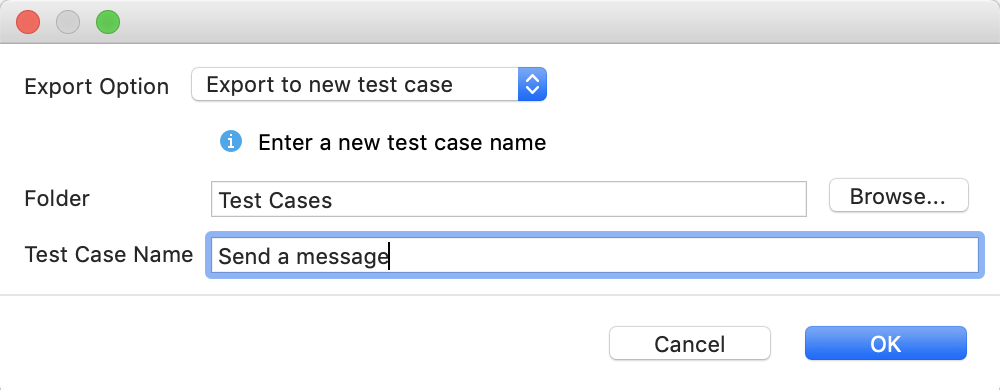
After finishing recording your interactions, click Stop, then click Save Script. A dialog will appear with Export to new test case selected by default, indicating that your recorded actions will be saved as a new test case in the Test Cases folder. You can enter a label or title for your new test case in the Test Case Name field, and then click OK to create and save it.
How it works
Perform actions on your preferred mobile device, emulator, or simulator, and Mobile Recorder will capture these actions.
The recorded actions are converted into automated test scripts, which you can view in the Test Case Editor in Manual view or Script view, which you will learn later on.
Mobile Recorder integrates with Katalon Studio's Object Repository, where all UI elements interacted with during the recording are stored. This will be discussed later.
Users can playback the recorded test cases to ensure that the scripts work as expected.
The utility also supports debugging, enabling users to step through the test execution and identify any issues.
To better understand how Mobile Recorder works, use it to record your first mobile test case. See: Record a mobile test case.
Record a mobile test case
Learn how to record and create your first mobile test case using the Mobile Recorder utility.
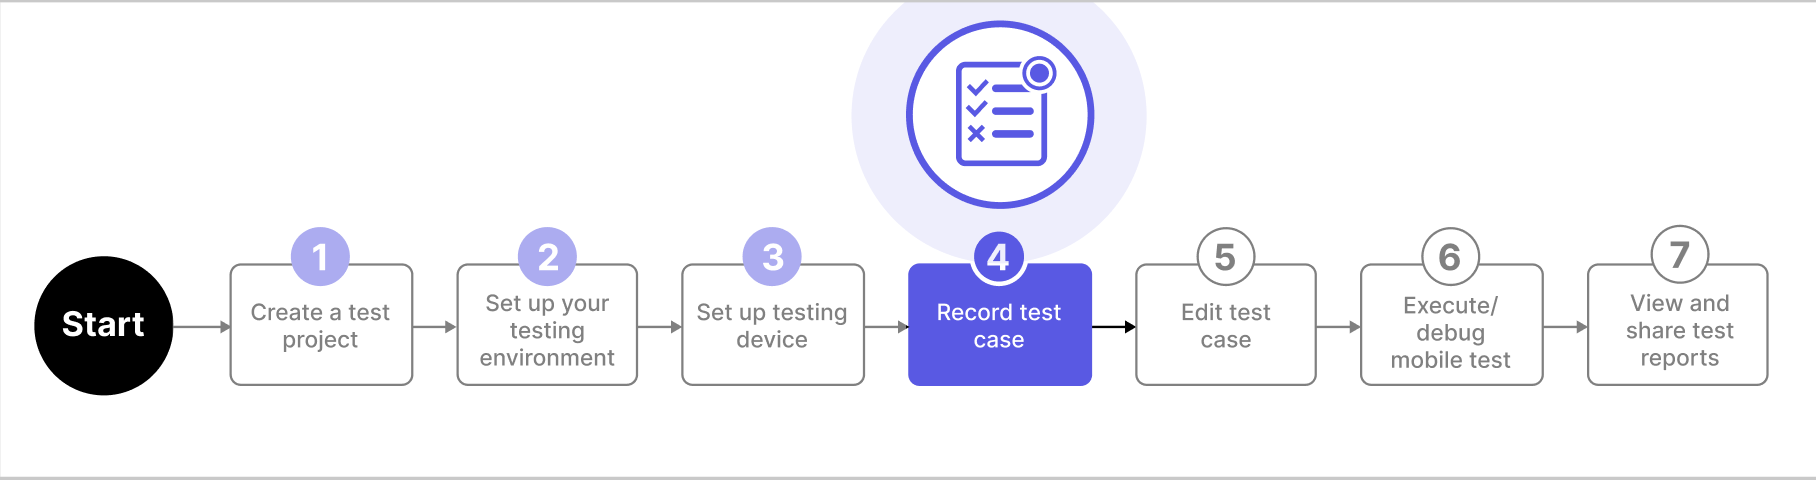
After setting up your testing device, we can now perform the fourth step in the mobile testing workflow: Recording a mobile test case.
Follow the steps below how to record a mobile test case using the Mobile Recorder utility.
- On the main toolbar, click Record Mobile and then select Android Devices:

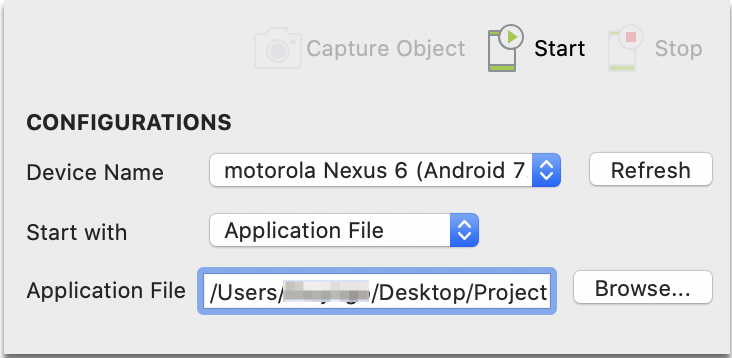
- In the Configurations section in the Mobile Recorder window, select the device and browse the application file (AUT) from your local for the recording session.
- Use the Mobile Recorder interface to interact with your AUT. You may either perform the action in Device View or select a test object and apply any of the supported actions under the Available Actions to simulate an action.
- Some of the supported actions in the Available Actions section may be grayed out according to your AUT.
- When selecting a specific object in the Device View section, Katalon Studio also selects the corresponding object in the All Objects section.
- To view recorded actions, check the Recorded Actions tab under the Configurations section.
- To view all test objects captured and their properties, check the Captured Objects tab under the Configurations section.
- Add the recorded test steps to a new test case (from the Export Option), select the Folder location, provide a label or title of your new test case and click OK.
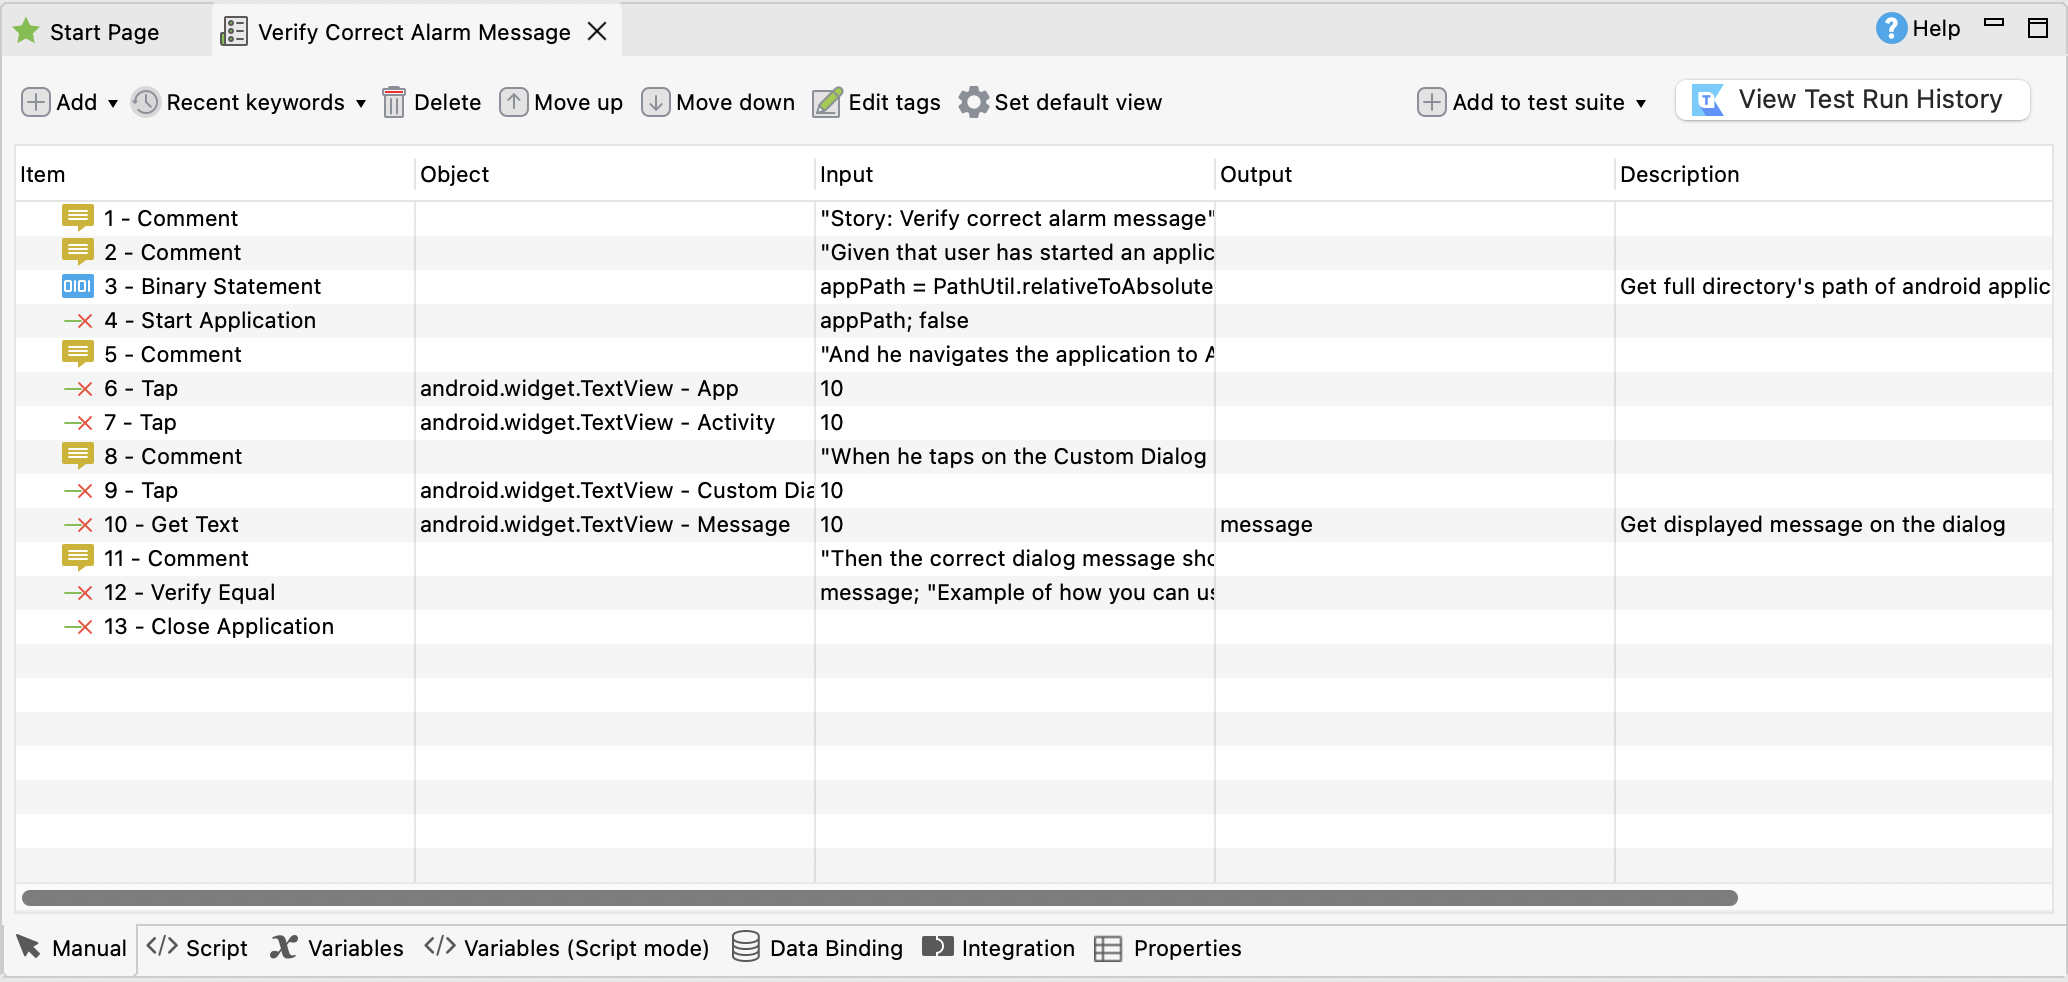
When you open your mobile test case, the Test Case Editor in Manual view is opened by default. Use the menu actions above or inline actions (by clicking on a line item or field) This view allows you to create automated tests with little programming skills required.
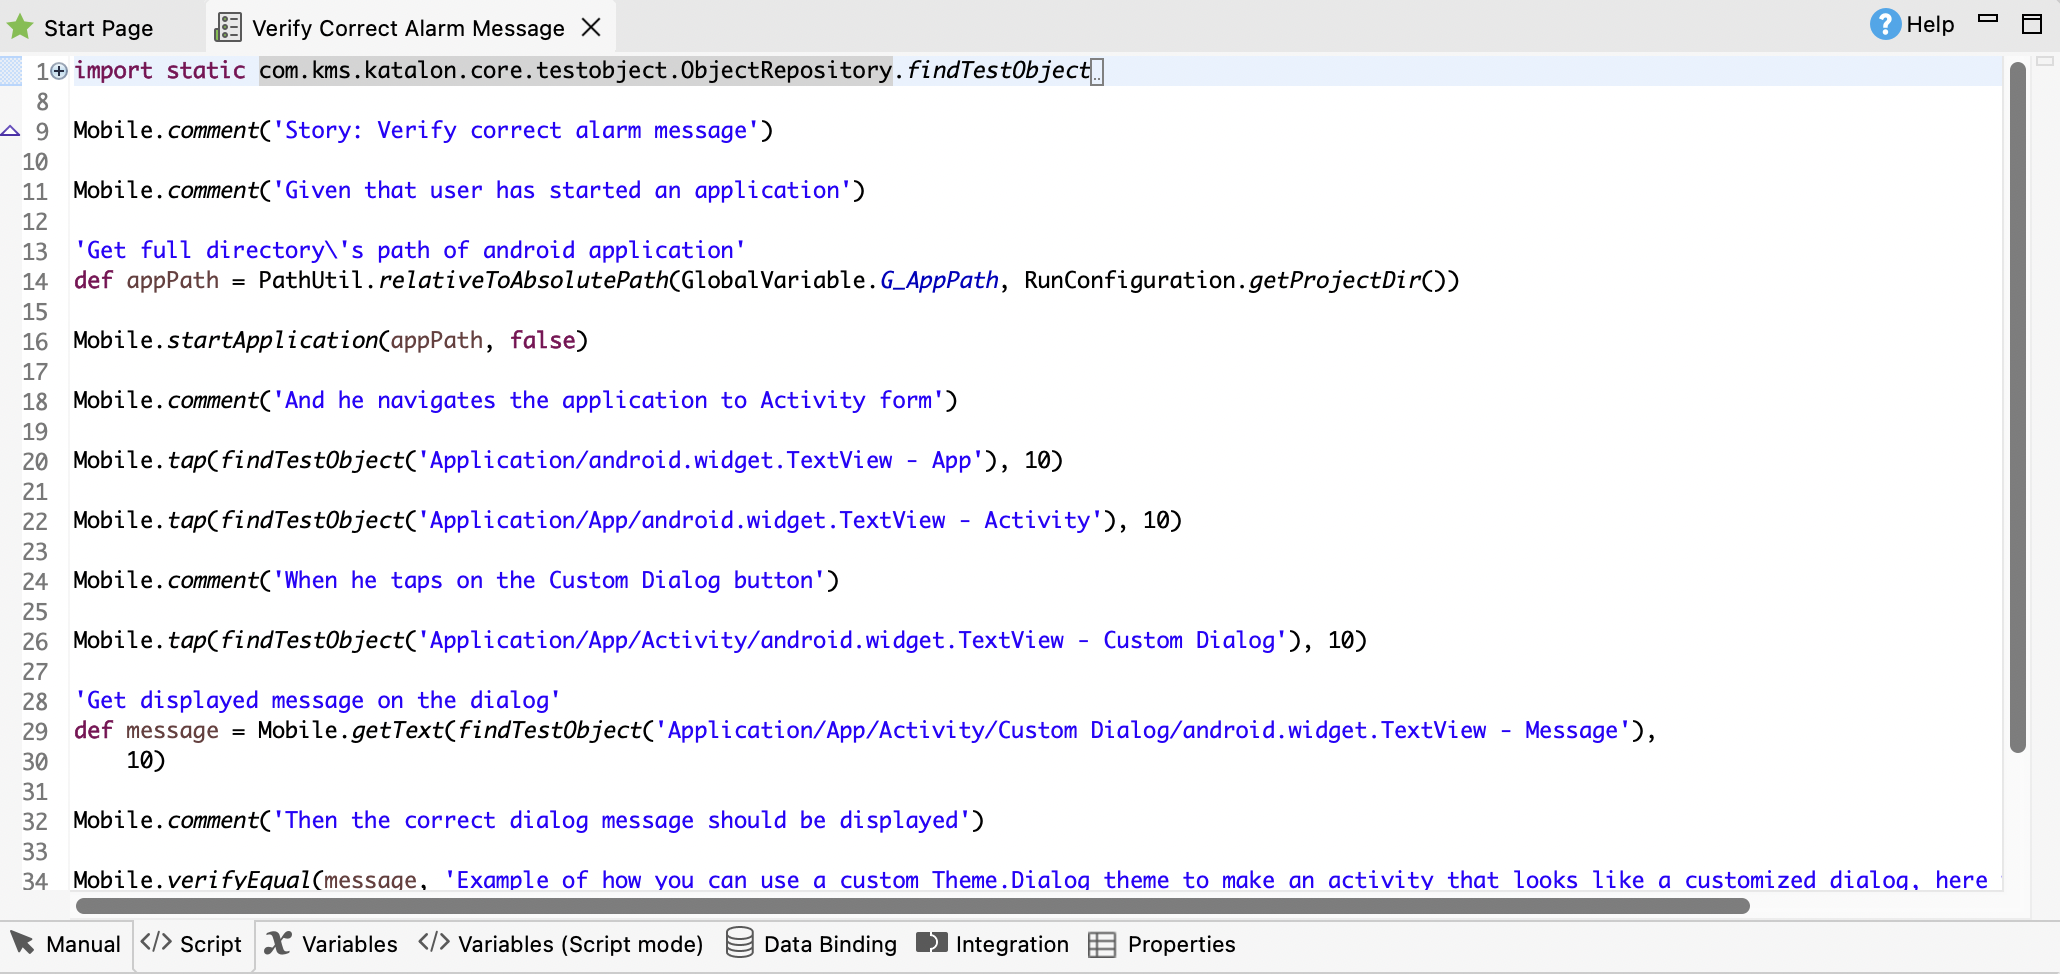
Click Script to switch from Manual view to Script view. Your mobile test case is translated into a Groovy script. However, we recommend using Script view only if you are familiar with Groovy and understand how to use import statements with supported keywords. For now, we will stick to Manual view in the Test Case Editor to view and edit your mobile test case.
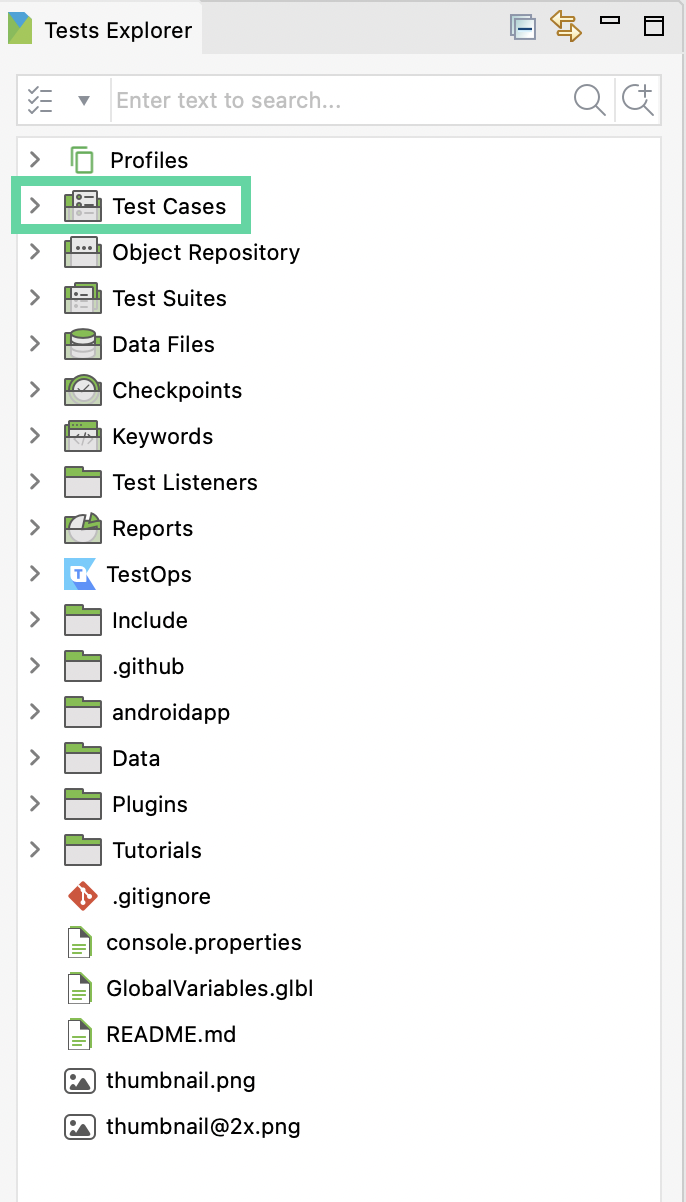
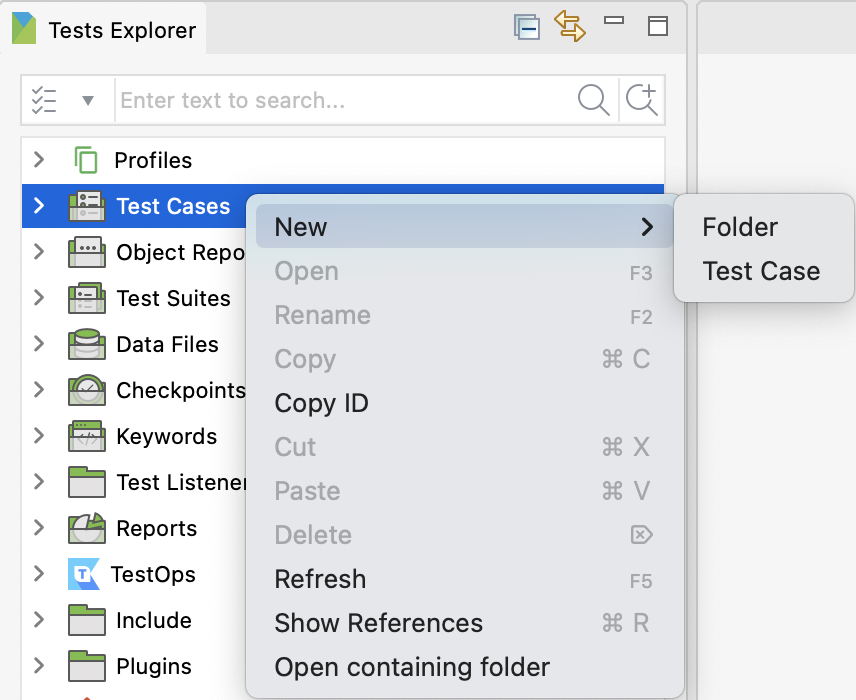
If you wish to create another new mobile test case using the same real device and AUT, simply click on Create new Test Case from the main toolbar or in the Tests Explorer panel, right-click on the Test Case folder and select . Alternatively, you can also go to the main menu and select .

Then you can utilize the Mobile Recorder utility to interact with the mobile AUT using a different test scenario.
Otherwise, refer to the following topic to learn how to edit your newly created mobile test case: Edit your mobile test case.
Edit your mobile test case
Learn how to edit your mobile test case using the Test Case Editor in Manual view.
Editing your mobile test case is the next logical step after recording interactions with your mobile AUT.
As previously discussed, you can view test steps in two ways. These two views were designed based on user preference and the complexity of the test steps users want to define:
-
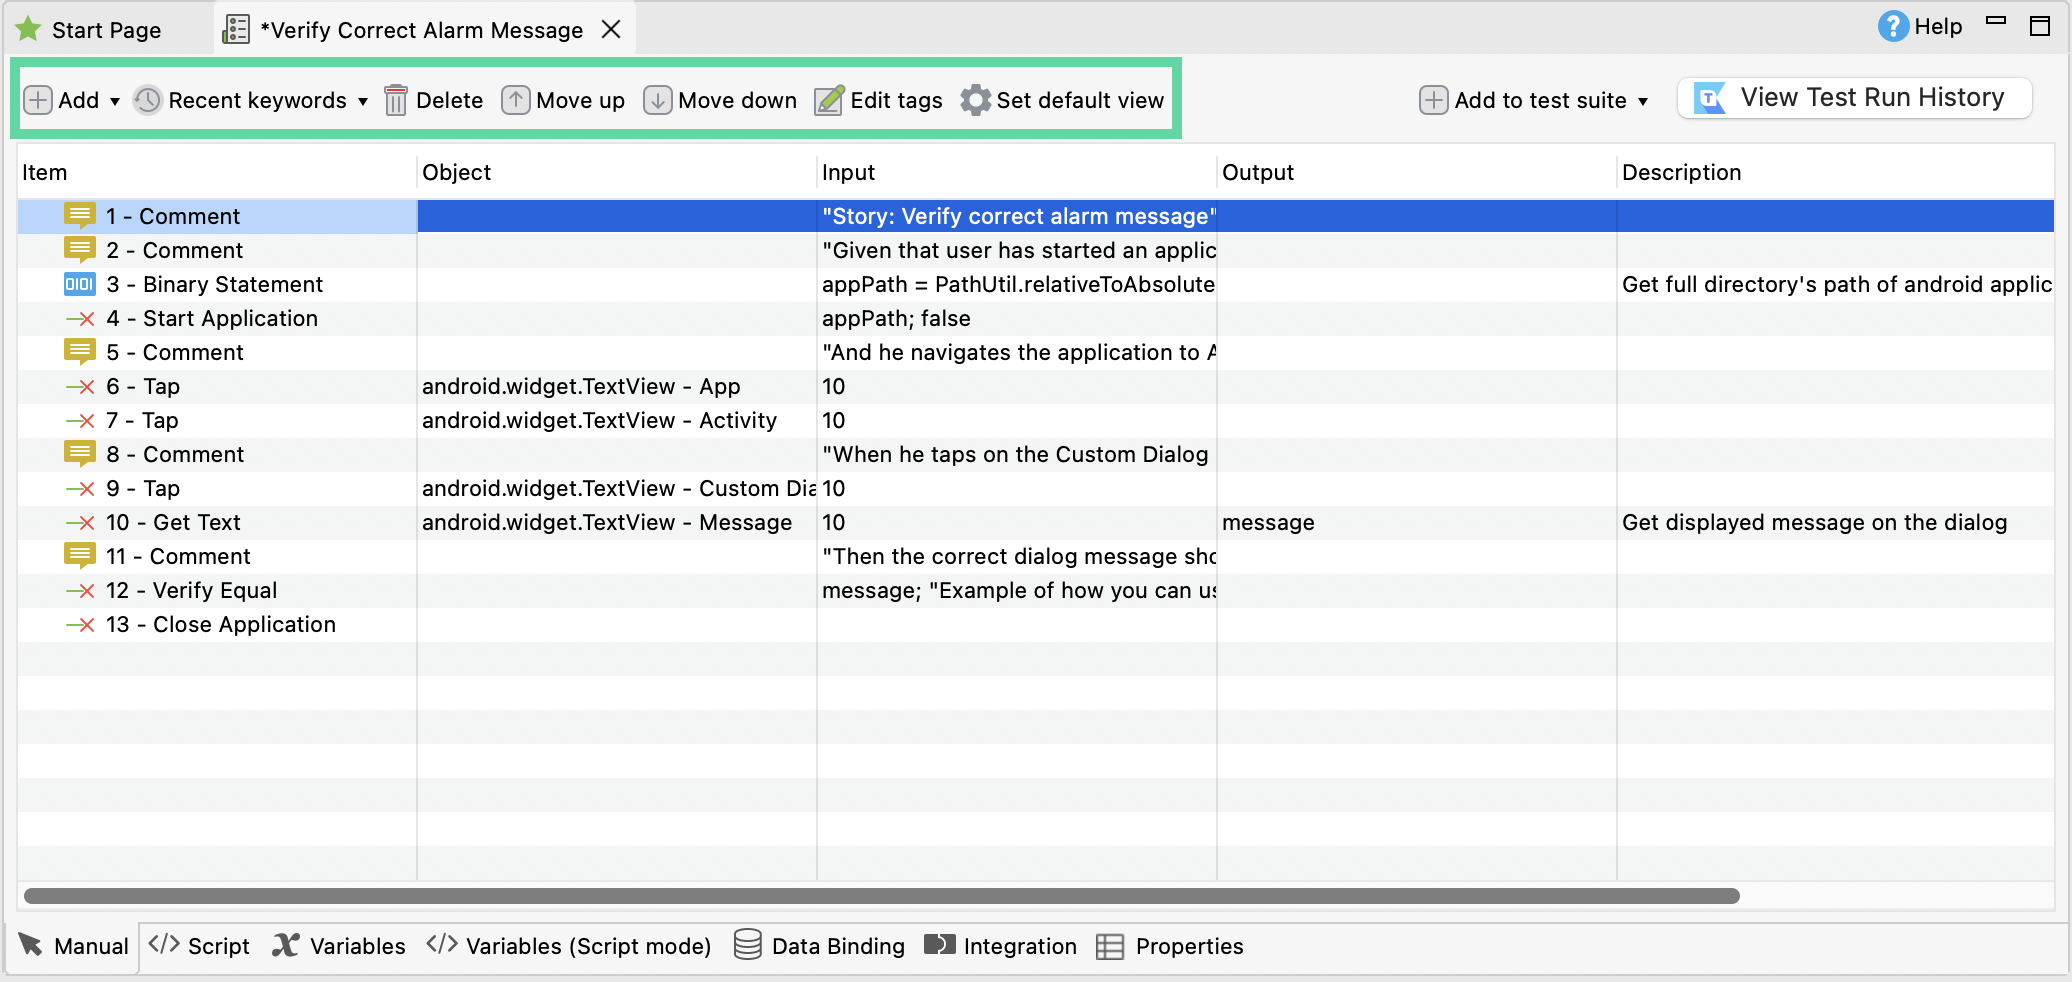
Manual view - This recommended view displays the test steps in a keyword-driven format, allowing you to create automated tests without coding. It is suitable for users with little programming skills who prefer a more visual and intuitive way of defining test steps.
Click Add, then select a keyword action from the dropdown and provide the rest of the parameters (such as Object, Input, Output, and Description). Selecting a keyword also allows you to get more information about the keyword you selected without needing to move away from the Test Case Editor.
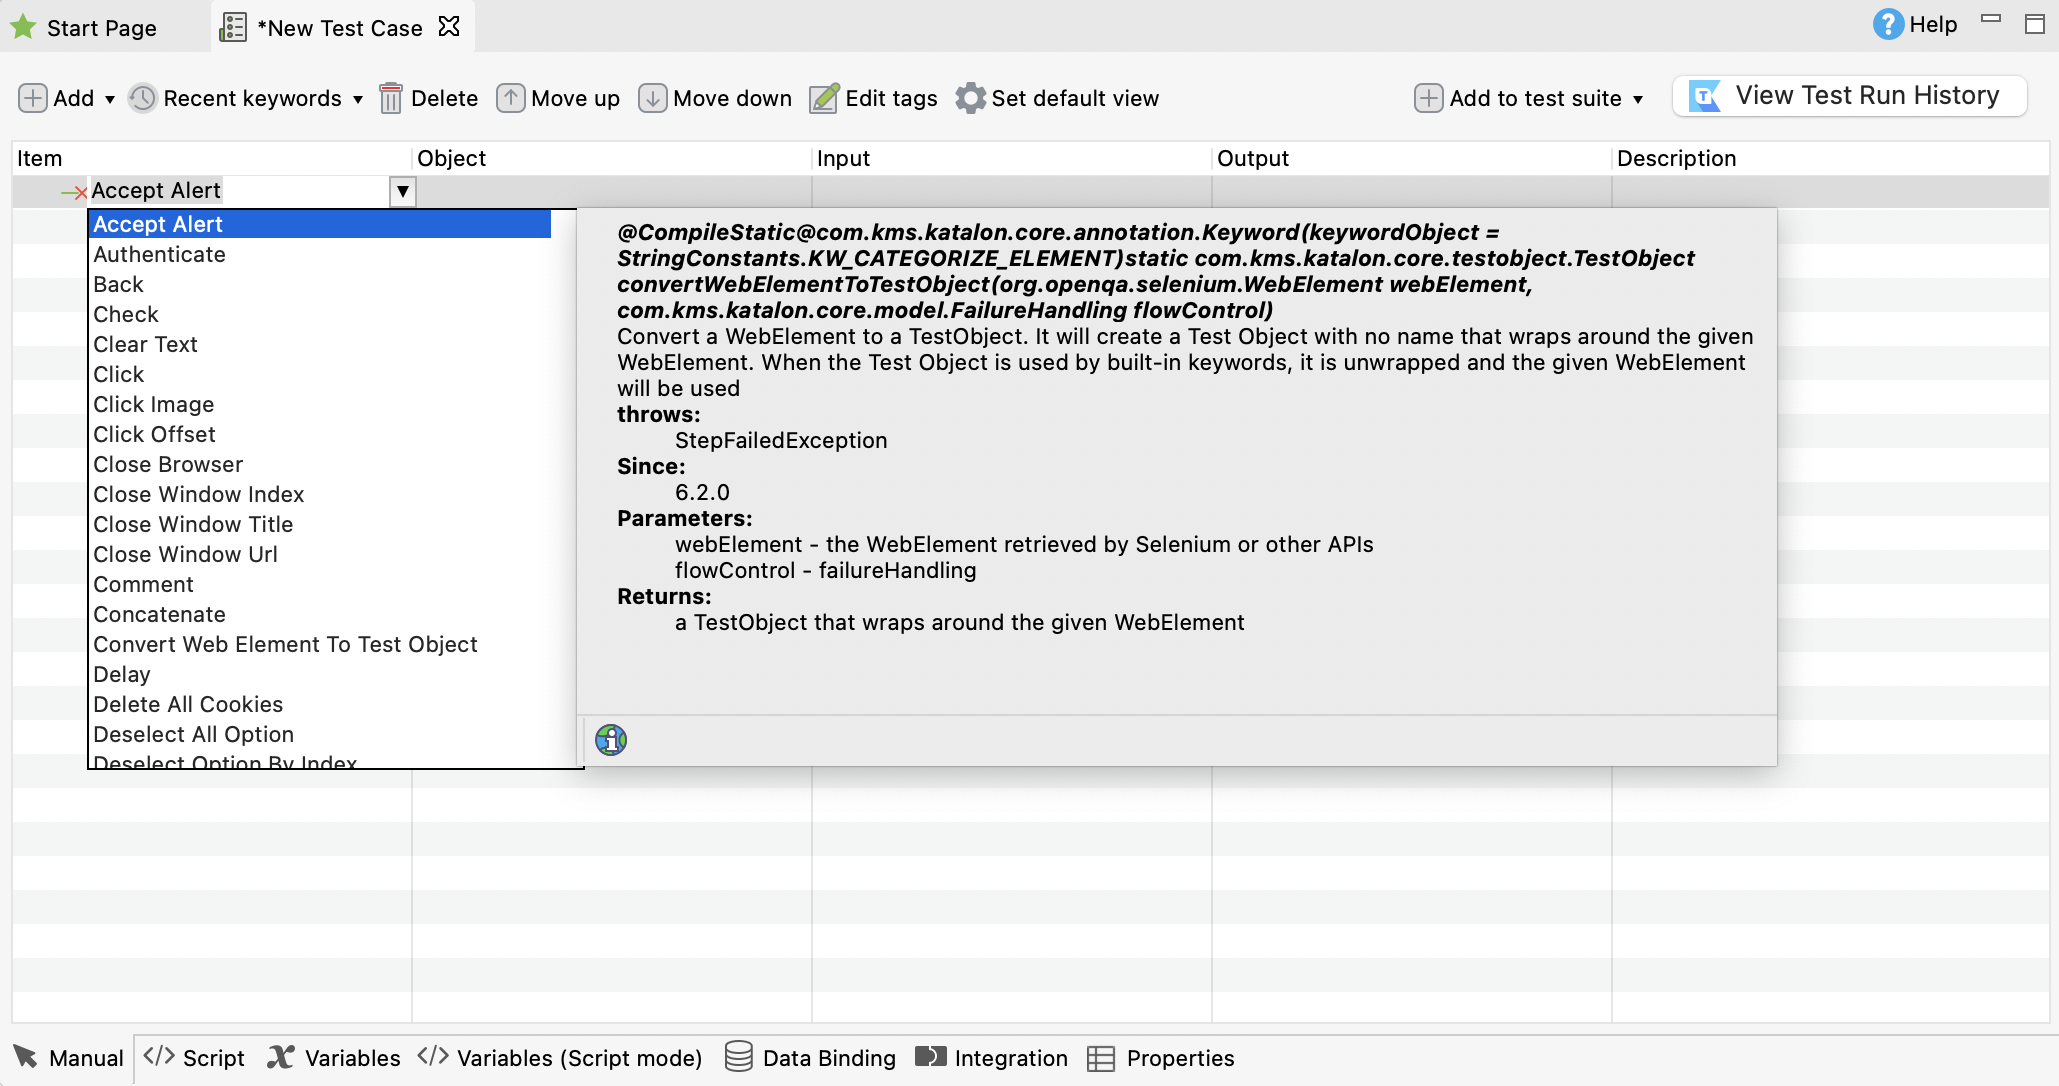
You can also use the Test Case Editor menu to add a new test step, use recent keywords, move up or down a test step. edit tags, and even delete a test step if it no longer follows the test scenario you wish to simulate.
-
Script view - This view presents the test steps in a Groovy script format, where you can write and edit test steps using the scripting language. We only recommend this option if you want more flexibility and control and if you are comfortable with coding and prefer a text-based approach to defining test steps.
Katalon Studio has a ContentAssist function that provides intelligent code completion suggestions as you type in the script editor. It helps you write automation test scripts more efficiently by offering context-aware suggestions for keywords, variables, methods, and other elements based on the current context of your script.
See how to activate the ContentAssist function in Script view:
On a new line, type in Ctrl or Command + space bar on your keyboard to open all keyword packages. Or you can type or select Mobile from the dropdown.
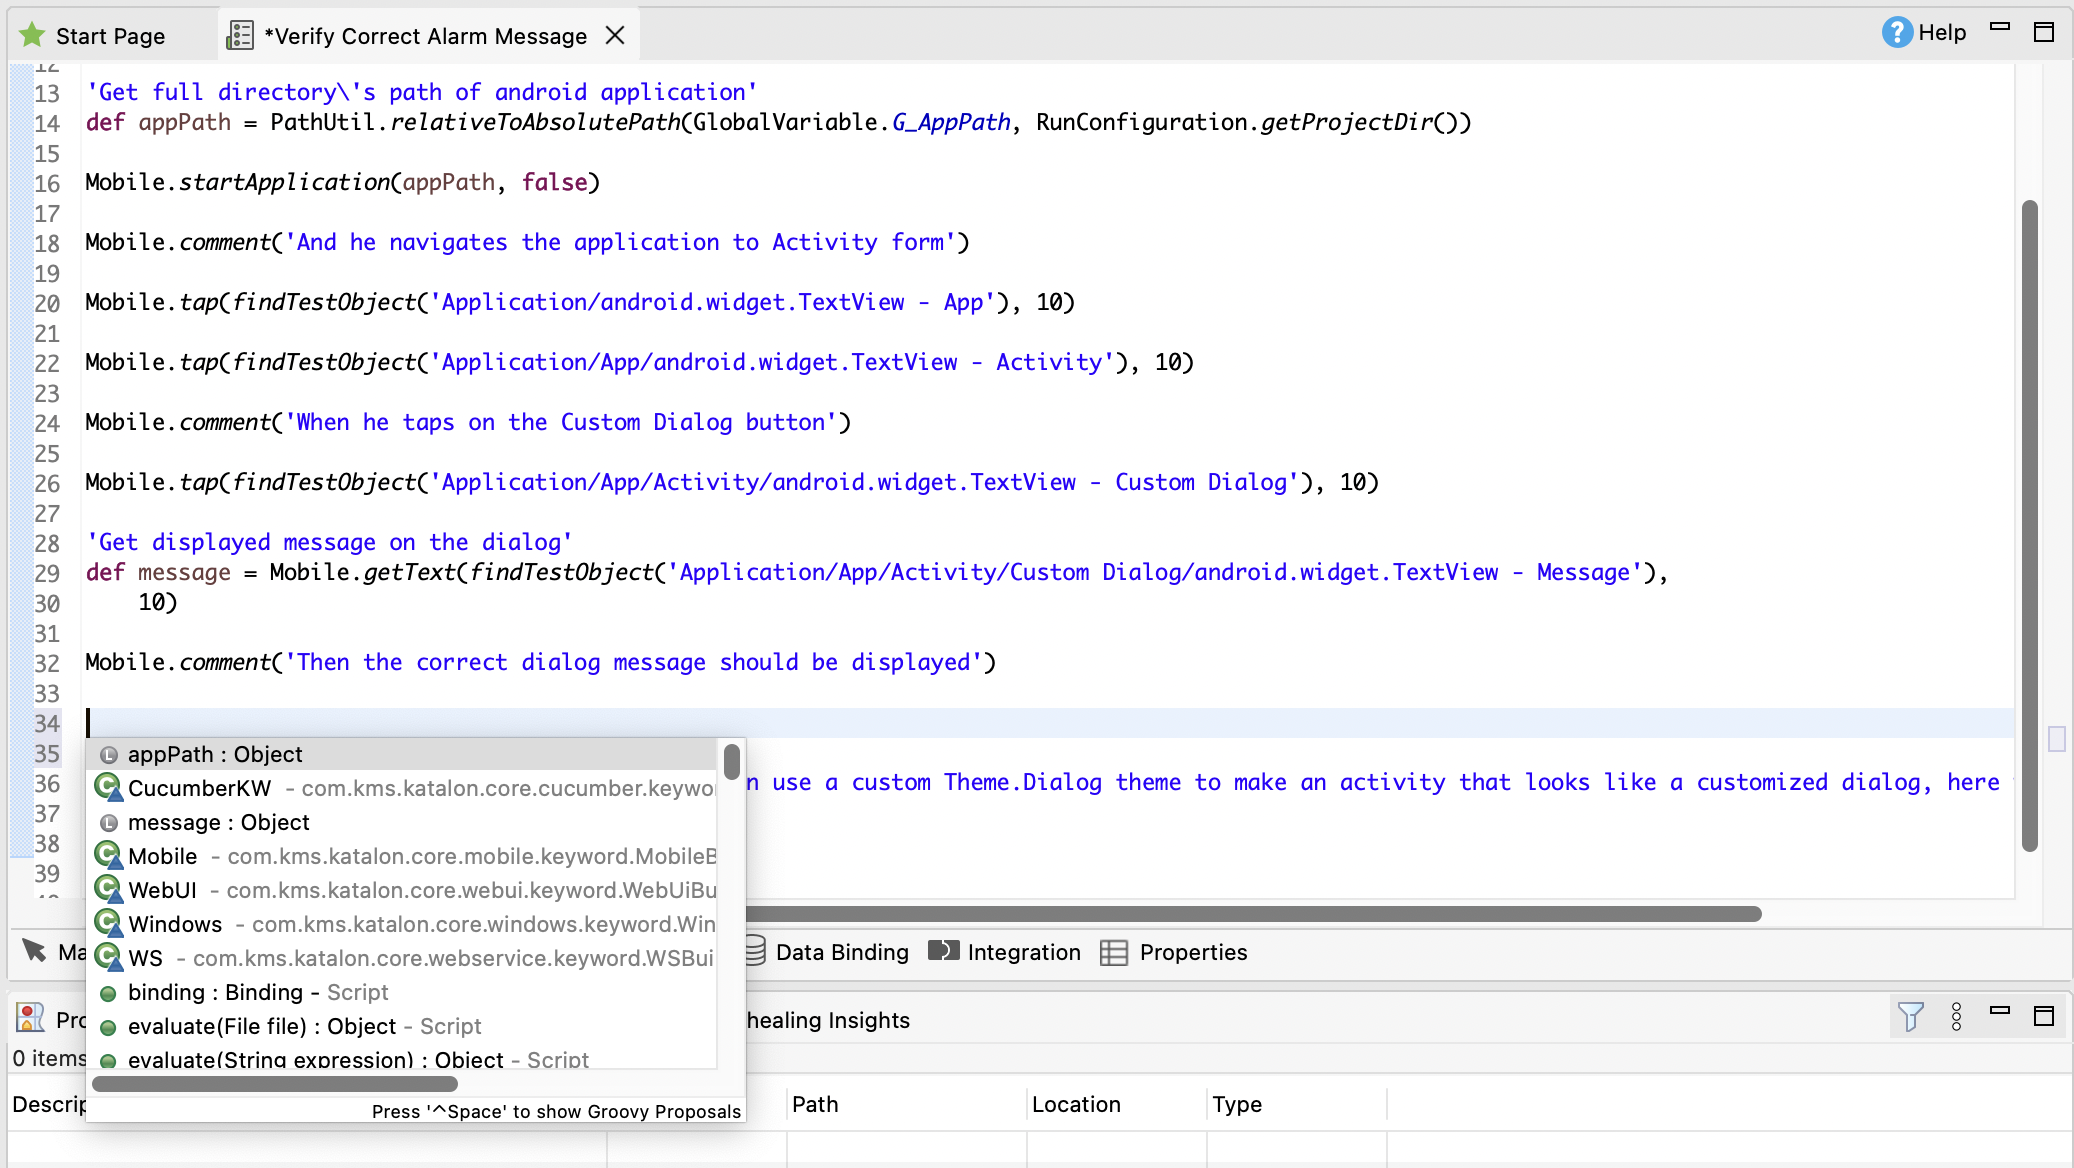
Katalon Studio has a list of supported built-in keywords that you can use to create your test step. To use a built-in keyword for mobile testing, type a period after Mobile and all the built-in keywords for mobile testing will be displayed as a dropdown. From there, select the action you wish to add as a test step.
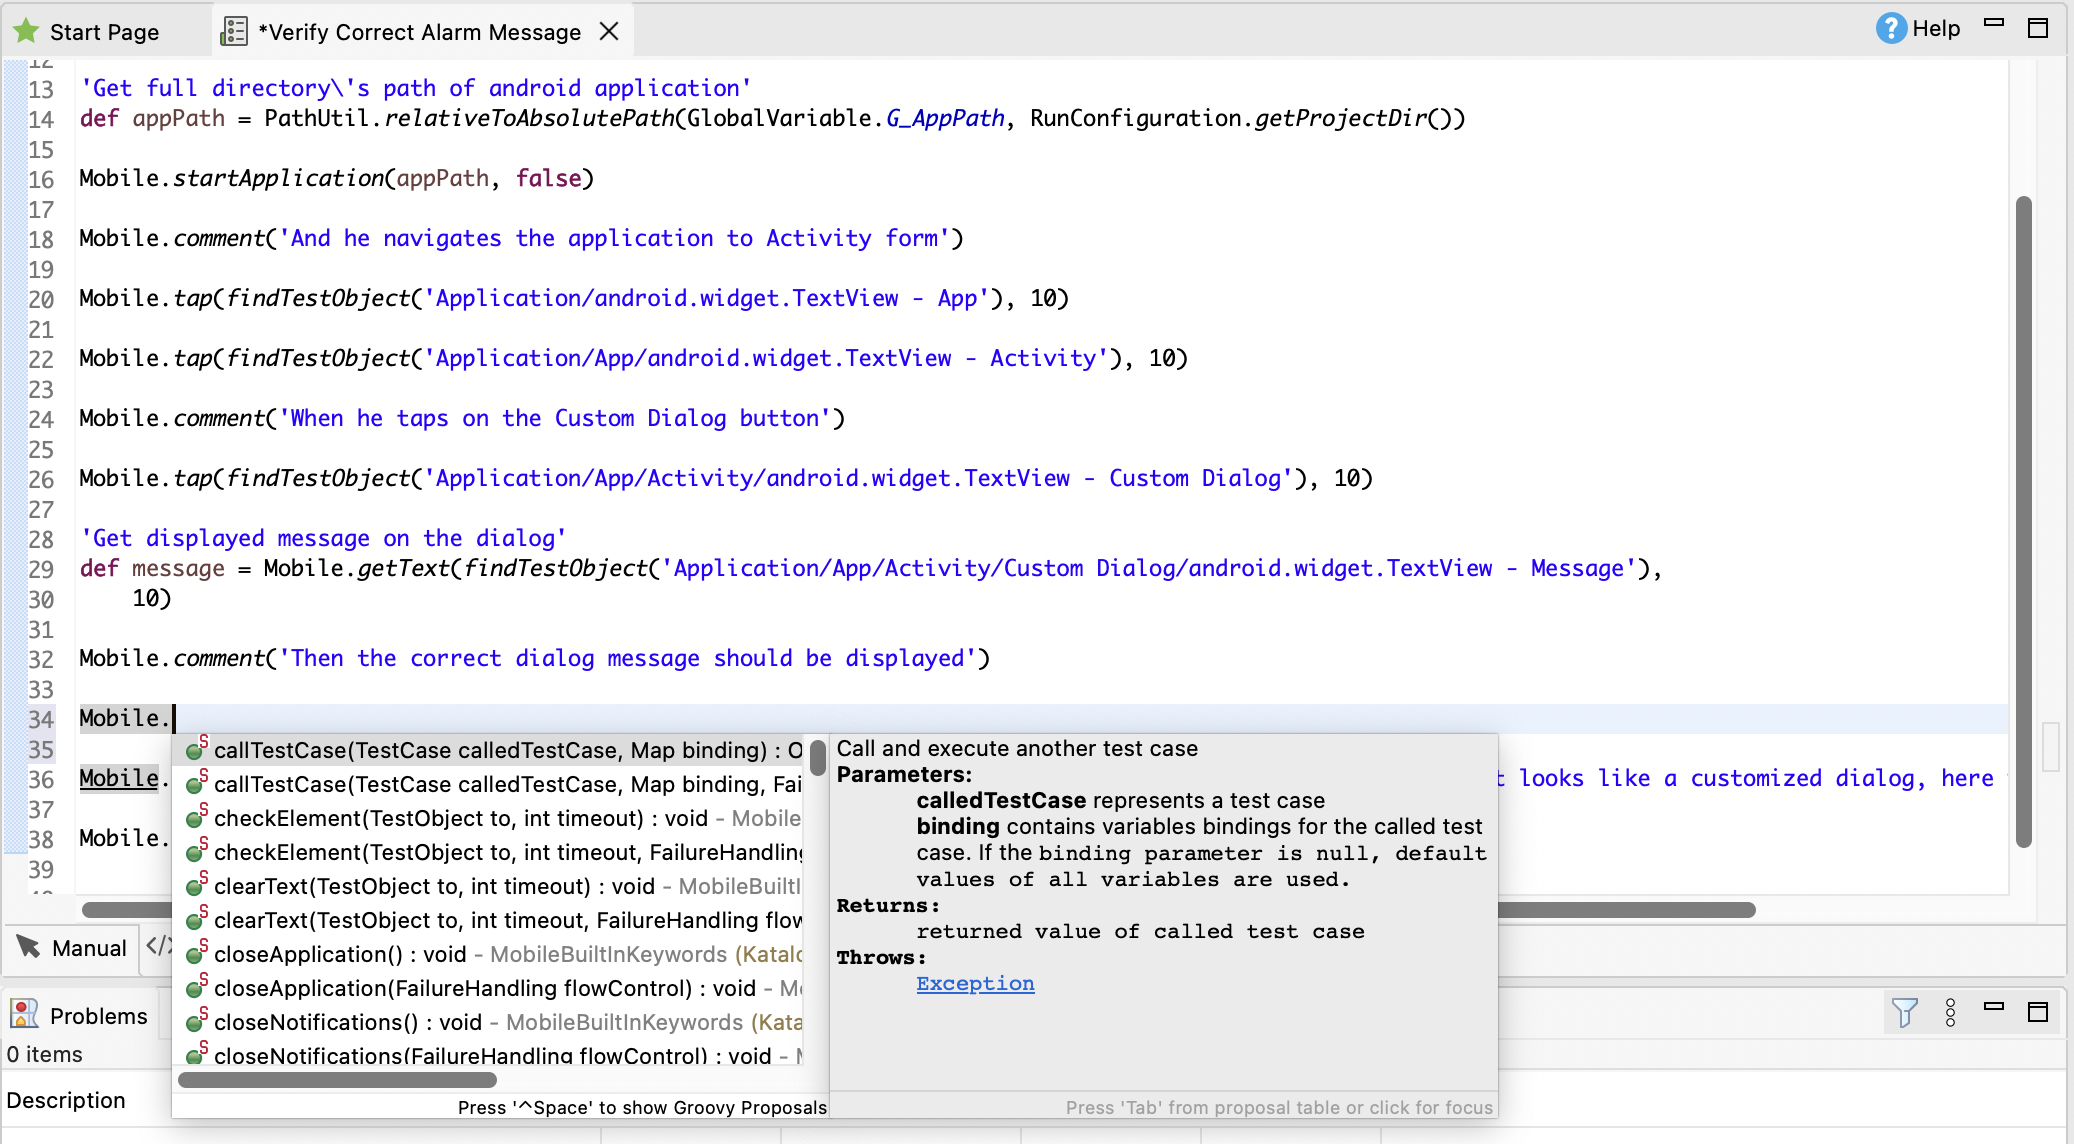
If your test step calls for a test object ID, use
findTestObject('{Object ID}'), in which Object ID is the ID of that object in Katalon Studio. You can also drag and drop the object into the test case editor to generate this syntax.
To know more about how to edit your test cases using keywords, see: Test using mobile keywords.
Playback a test case
Playback allows you to check if your chosen test steps are accurate and in order.
Test case playback refers to the process of running a test case in Katalon Studio to simulate the actions defined in the test script. During test case playback, Katalon Studio executes the test steps sequentially and generates a playback log that provides information about the test run environment, test step execution status, test case status, and playback session status. The playback log helps verify the accuracy of the chosen test steps and their order.
To run a playback of your new mobile test case:
- In Tests Explorer, Select the test case from your test case folder where you saved the recorded actions.
- On the main toolbar, select Android on the drop-down list next to Run.
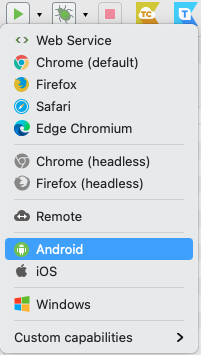
- In the displayed Android Devices dialog, select your preferred device and then click OK.

The following things happen in quick succession when you playback your mobile test case:
Your test case is played back in the mobile device of your choosing.
Katalon Studio runs the mobile test with the recorded steps accordingly.
When you are satisfied with the playback of your mobile test case, you can now perform a test execution. See: Execute and debug mobile test case.
Execute and debug mobile test case
Learn how to execute and debug your newly recorded mobile test case.
Test execution in Katalon Studio is running a series of test cases to check an application's functionality. This process involves Setting up execution configurations, running test cases (sequentially or in parallel), capturing test results, and generating test reports.
But how is this different from a playback? Test case playback is simply running a single test case to validate its steps. So, while playback focuses on one test case, test execution covers multiple test cases in a larger testing process.
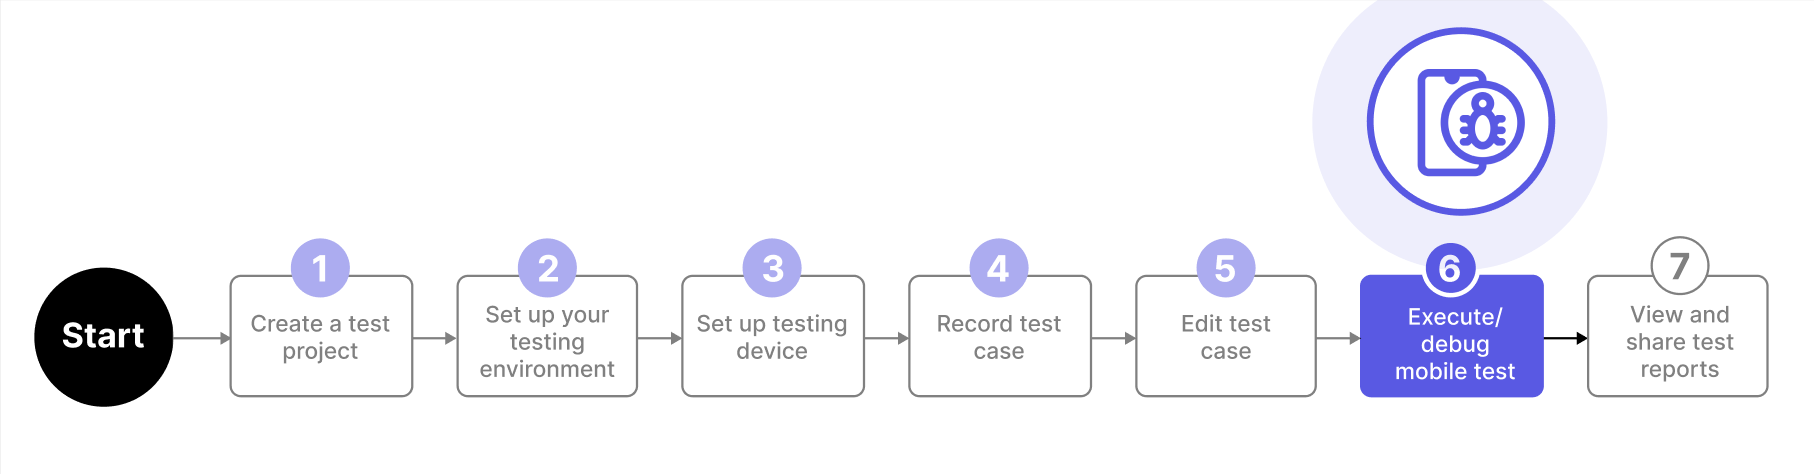
To execute tests in Katalon Studio, you need to perform the following tasks:
Scroll down or click on the following topic to set up your execution environment first: Configure execution settings.
Configure execution settings
Katalon Studio executes your mobile test case according to the execution environment as defined in your project settings. Follow these steps to configure your execution environment:
Execute your mobile test case
Follow these steps to execute your mobile test case.
- In Katalon Studio, go to Tests Explorer and select your mobile test case in the Test Cases folder.

- Execute your mobile test case.
- Click Run to execute the test case with the default execution environment defined in .
- Click the drop-down beside Run and select Android as the mobile test environment to execute the test case in.
- Job Progress is triggered automatically and displays the progress of your mobile test execution.

Are you encountering an execution failure instead? Or are you not sure with the order of the test steps?
Let us learn how to check and resolve any execution issues. See: Debug a test case in Katalon Studio.Debug a test case in Katalon Studio
Creating test cases is a repetitive task that requires a lot of editing and re-running test cases while ensuring the test execution does not fail. In many automation tools, when a test case fails and you make certain changes to the script, you usually have to execute the whole script all over again to make sure the test is executed as expected.
Katalon Studio has the following debugging utilities to help you resolve test steps or test script lines that causes test execution failure, while saving time in the process. Scroll down or click on a link to learn more:
Run from here
The Run from here utility allows you to resume the existing execution quickly. Katalon Studio currently supports Run from here with Chrome, Firefox, and Edge Chromium (Edge Chromium is supported in version 7.3.0 and later) only.
Follow these steps how to debug using the Run from here utility:
Start a browser with the Open Browser step, or you must have a currently running browser.
-
Make sure this browser's session is not terminated when the execution finishes (Go to and uncheck the Terminate options in the Post-Execution Options section based on your testing needs).

-
In the Manual view of the test case, right-click on a step, select Run from here and select one of the currently running browser instances to execute your test.
Note:-
If there are no running browser instances that are previously launched in Katalon Studio, Run from here is disabled.

-
Enable or Disable Steps
Katalon Studio allows you to enable or disable one or more test steps before executing the test case to skip unwanted steps during execution. You can use the provided keyboard shortcuts to perform the actions.
Follow these steps how to debug using Enable or Disable Steps:
- For Windows: Enter
Ctrl + D(to disable) and Ctrl+E (to enable) on selected steps. - For macOS: Enter
Command + /(to disable) andoption + command + /(to enable) on selected steps.

Debug mode
The Debug mode in Katalon Studio is designed to make debugging easy to use, allowing investigating the root causes more quickly.
Follow these steps how to debug using Debug mode:
-
Open a test case and click Script to switch to the Script view.

-
Double-click on the leftmost side of the script editor to mark a breakpoint. A breakpoint is where Katalon Studio pauses the test execution for you to start debugging.

-
Choose a browser from the main toolbar.

-
Confirm (select Yes) when being asked to display the Debug perspective.

-
The Debug perspective provides convenient options for debugging purposes. You can:
- Navigate execution using commands from the debug toolbar

Where:
Command Description 
Resume debugging 
Suspend debugging 
Terminate debugging 
Disconnect 
Step into the current code block 
Step over the current code block 
Return from the current code block 
Run to a specific line - Track values of variables using Watch utilities.

Where:
View Description Variables You can view all variables associated with the current debugged action using Variables View, which is similar to Variables View in Eclipse. Refer to this guide for more details. Breakpoints You can view all breakpoints using Breakpoints View, which is similar to Breakpoints View in Eclipse. Refer to this guide for more details. Expressions You can inspect data using Expressions View, which is similar to Expressions View in Eclipse. Refer to this guide for more details.
Debug from here
To use Debug from here with Chrome, Firefox, or Edge Chromium, do as follows:
- Start a browser with the
Open Browserstep, or you must have a currently running browser -
Make sure this browser's session is NOT terminated when the execution finishes (Go to and uncheck the Terminate options in the Post-Execution Options section based on your testing needs.
-
Open a test case in its Script view and double-click on the leftmost side of the script editor to mark a breakpoint. A breakpoint is where Katalon Studio pauses the test execution for you to debug.

-
Click Manual to switch to the test case's Manual view, right-click on a test step, select Debug from here then select one of the currently running browser instances to execute your test.
Note:- If there are no running browser instances that are previously launched in Katalon Studio, Debug from here... is disabled.

View test execution logs
After recording, editing, executing, and debugging your mobile test case, the next logical step is to view test reports and share it with your team.
Viewing execution logs and reports is our final step in the mobile test workflow. Viewing execution logs and test reports is an important aspect of Test Management, as it provides detailed insights into the test outcomes and the behavior of the application under test. These reports help identify patterns of failures, pinpoint areas of improvement, and support decision-making for future test cycles.

Katalon Studio includes the following features that allow you to view execution logs and share test reports with key team members so you can save time and concentrate on other aspects of mobile testing. Click on any of the links below to get started:
View execution log
Learn how to view and understand your test execution log.
Once your mobile test case finishes execution, you can review the results in the Log Viewer tab.
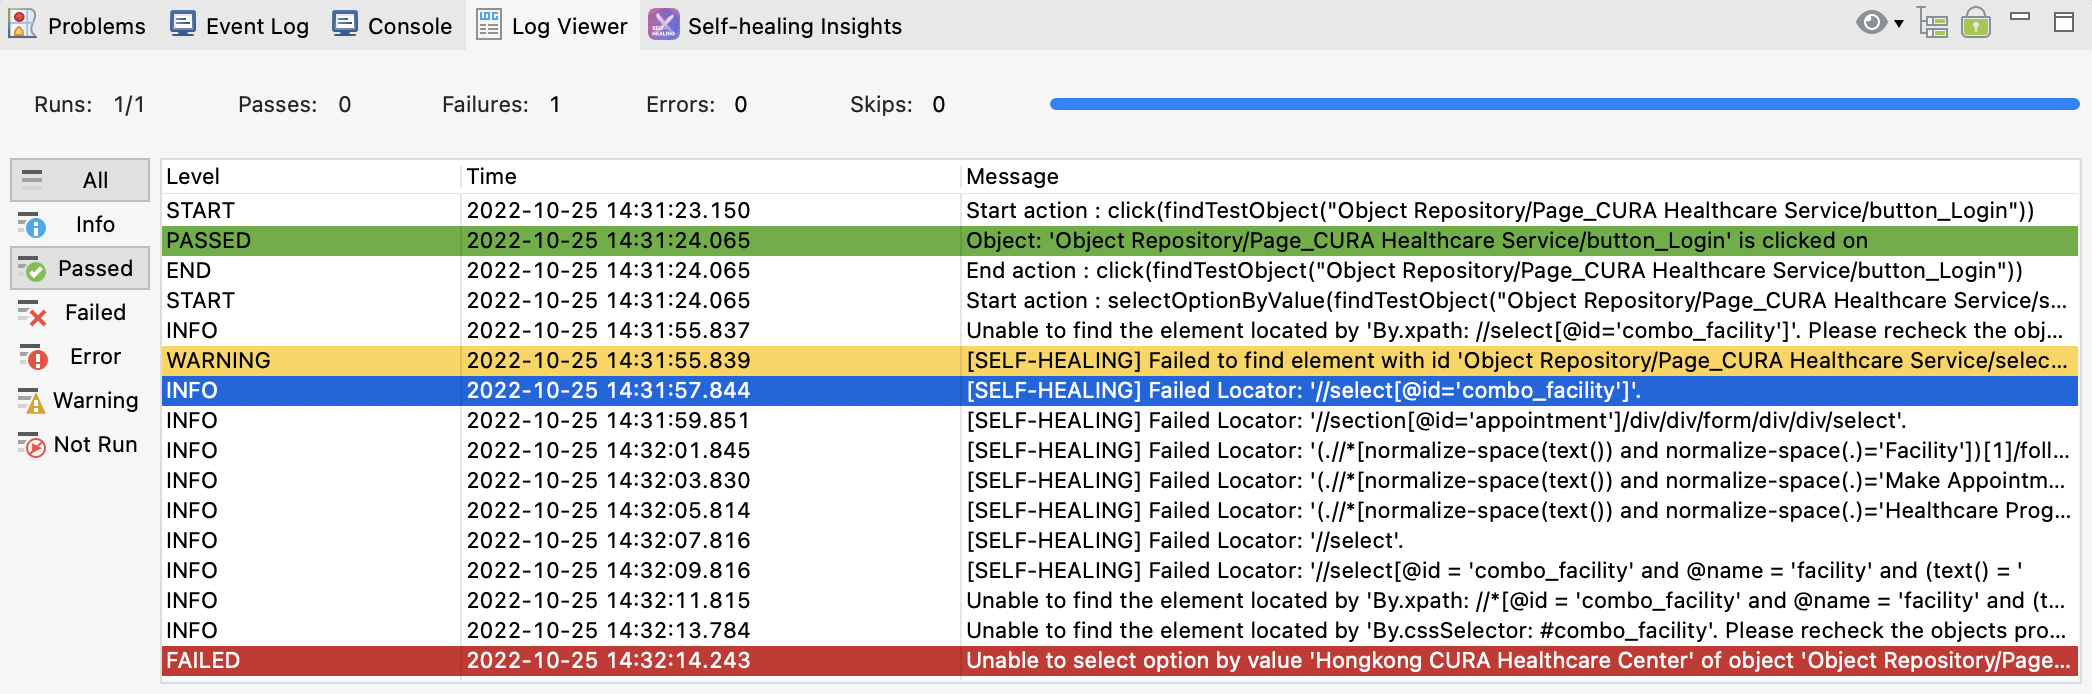
Using the filter options, you can specify what type of logs to be displayed:
| Filter | Description |
|---|---|
| All | Show all the log messages. |
| Info | Show only the log messages for information/reference. |
| Passed | Show only the log messages indicating that a step is successfully executed. |
| Failed | Show only the log messages indicating that a test step fails to execute. |
| Error | Show only the log messages indicating that some error has occurred at a given step. |
| Warning | Show only the log messages indicating that a test step is failed but accepted as a warning. |
| Not Run | Show only the log messages indicating that a test step is skipped. |
Share test reports via email in Katalon Studio
This feature is only applicable when you execute a test suite or a collection of test cases (test suite collection).
Follow these steps how to set up your mail server and customize email reports to automatically send out a summary report email whenever a test execution finishes.
Email settings
-
In Katalon Studio, go to to configure email settings.
-
You can customize the email template to match the report requirements and choose which types of report files to attach. You can select multiple file types (HTML, CSV, PDF, Log, or PNG).
After you successfully set up your mail server, sender, and recipients, Katalon Studio sends all email reports for test suite executions, including test suites inside a test suite collection.
You also have an option to keep your mailbox tidy by only sending email reports for test suite collection executions and skipping all emails for test suites stored inside that test suite collection. This option is useful when executing test suite collections containing many test suites.

Mail server settings
Mail Server Settings defines the mail server Katalon Studio uses for sending emails.
To set up your mail server, fill in your mail server host, port, credentials, and choose a protocol option.
-
Host and Port:
- Host: The domain name of the mail server.
- Port: The port to be used for that server. Below is a list of some common outgoing mail (SMTP) server configurations:
Email sever Host Port Reference Gmail smtp.gmail.com465 or 587 Check Gmail through other email platforms Outlook smtp.office365.com587 or 25 How to set up a multifunction device or application to send email using Microsoft 365 or Office 365 Yahoo! Mail smtp.mail.yahoo.com465 POP access settings and instructions for Yahoo Mail
Username and Password:
- Username: Your full email account to authenticate with the server (e.g., yourusername@gmail.com)
- Password: Your email password to authenticate with the server. This could be a password generated from App Passwords.
- If your email accounts are using two-step authentication, you can use Google App Passwords to set up a Gmail account in Katalon Studio. An App Password is a 16-digit passcode that gives Katalon Studio permission to access your Google Account. In the Select app dropdown of App Passwords, select the option Other (Custom name) to generate an app password for Katalon Studio. Then, use the generated passwords to put in the password section of Mail Server Settings. For details, see Google Account Help documentation: Sign in with App Passwords.
- If you do not use two-step authentication, you can allow less secure apps to access your account. However, to help keep your account secure, starting May 30, 2022, Google will no longer support the use of third-party apps or devices which ask you to sign in to your Google Account using only your username and password. For detail, see Google Account Help documentation: Less secure apps & your Google Account.
For Yahoo! Mail users:
Make sure to allow less secure apps to access your account. Follow this guide for more information: Ways to securely access Yahoo Mail.
As some SMTP servers do not require authentication and username in email address format, Katalon Studio does not validate usernames and passwords.
-
Protocol: The protocol to communicate with the mail server. There are three options:
- None
- SSL (Secure Sockets Layer)
- TLS (Transport Layer Security)
-
Encrypt authentication data: For sensitive data protection, we recommend enabling Encrypt authentication data.
After you fill in your mail server information, you can send a test email to check if the mail server is set up correctly. Input an email in the Recipients field, then click Send Test Email. The Send test email button is only enabled once Mail Server Settings and Recipients are filled correctly.

Email template
You can define the sender, recipients (the list of emails to receive reports), email subject, and body template in this section.

Katalon Studio supports adding Test Suite and Test Suite Collection names in your email subject with the placeholders ${suiteName} and ${suiteCollectionName}, respectively.
Report format
You can decide whether to include a test execution report as an email attachment or not. Specifically, you can choose to include log files and configure which report format (HTML, CSV, and PDF) of test executions to be sent as attachments in the email report.
Body template
To customize email body template for Test Suite, click Edit Template for Test Suite Execution or go to and select Test Suite.
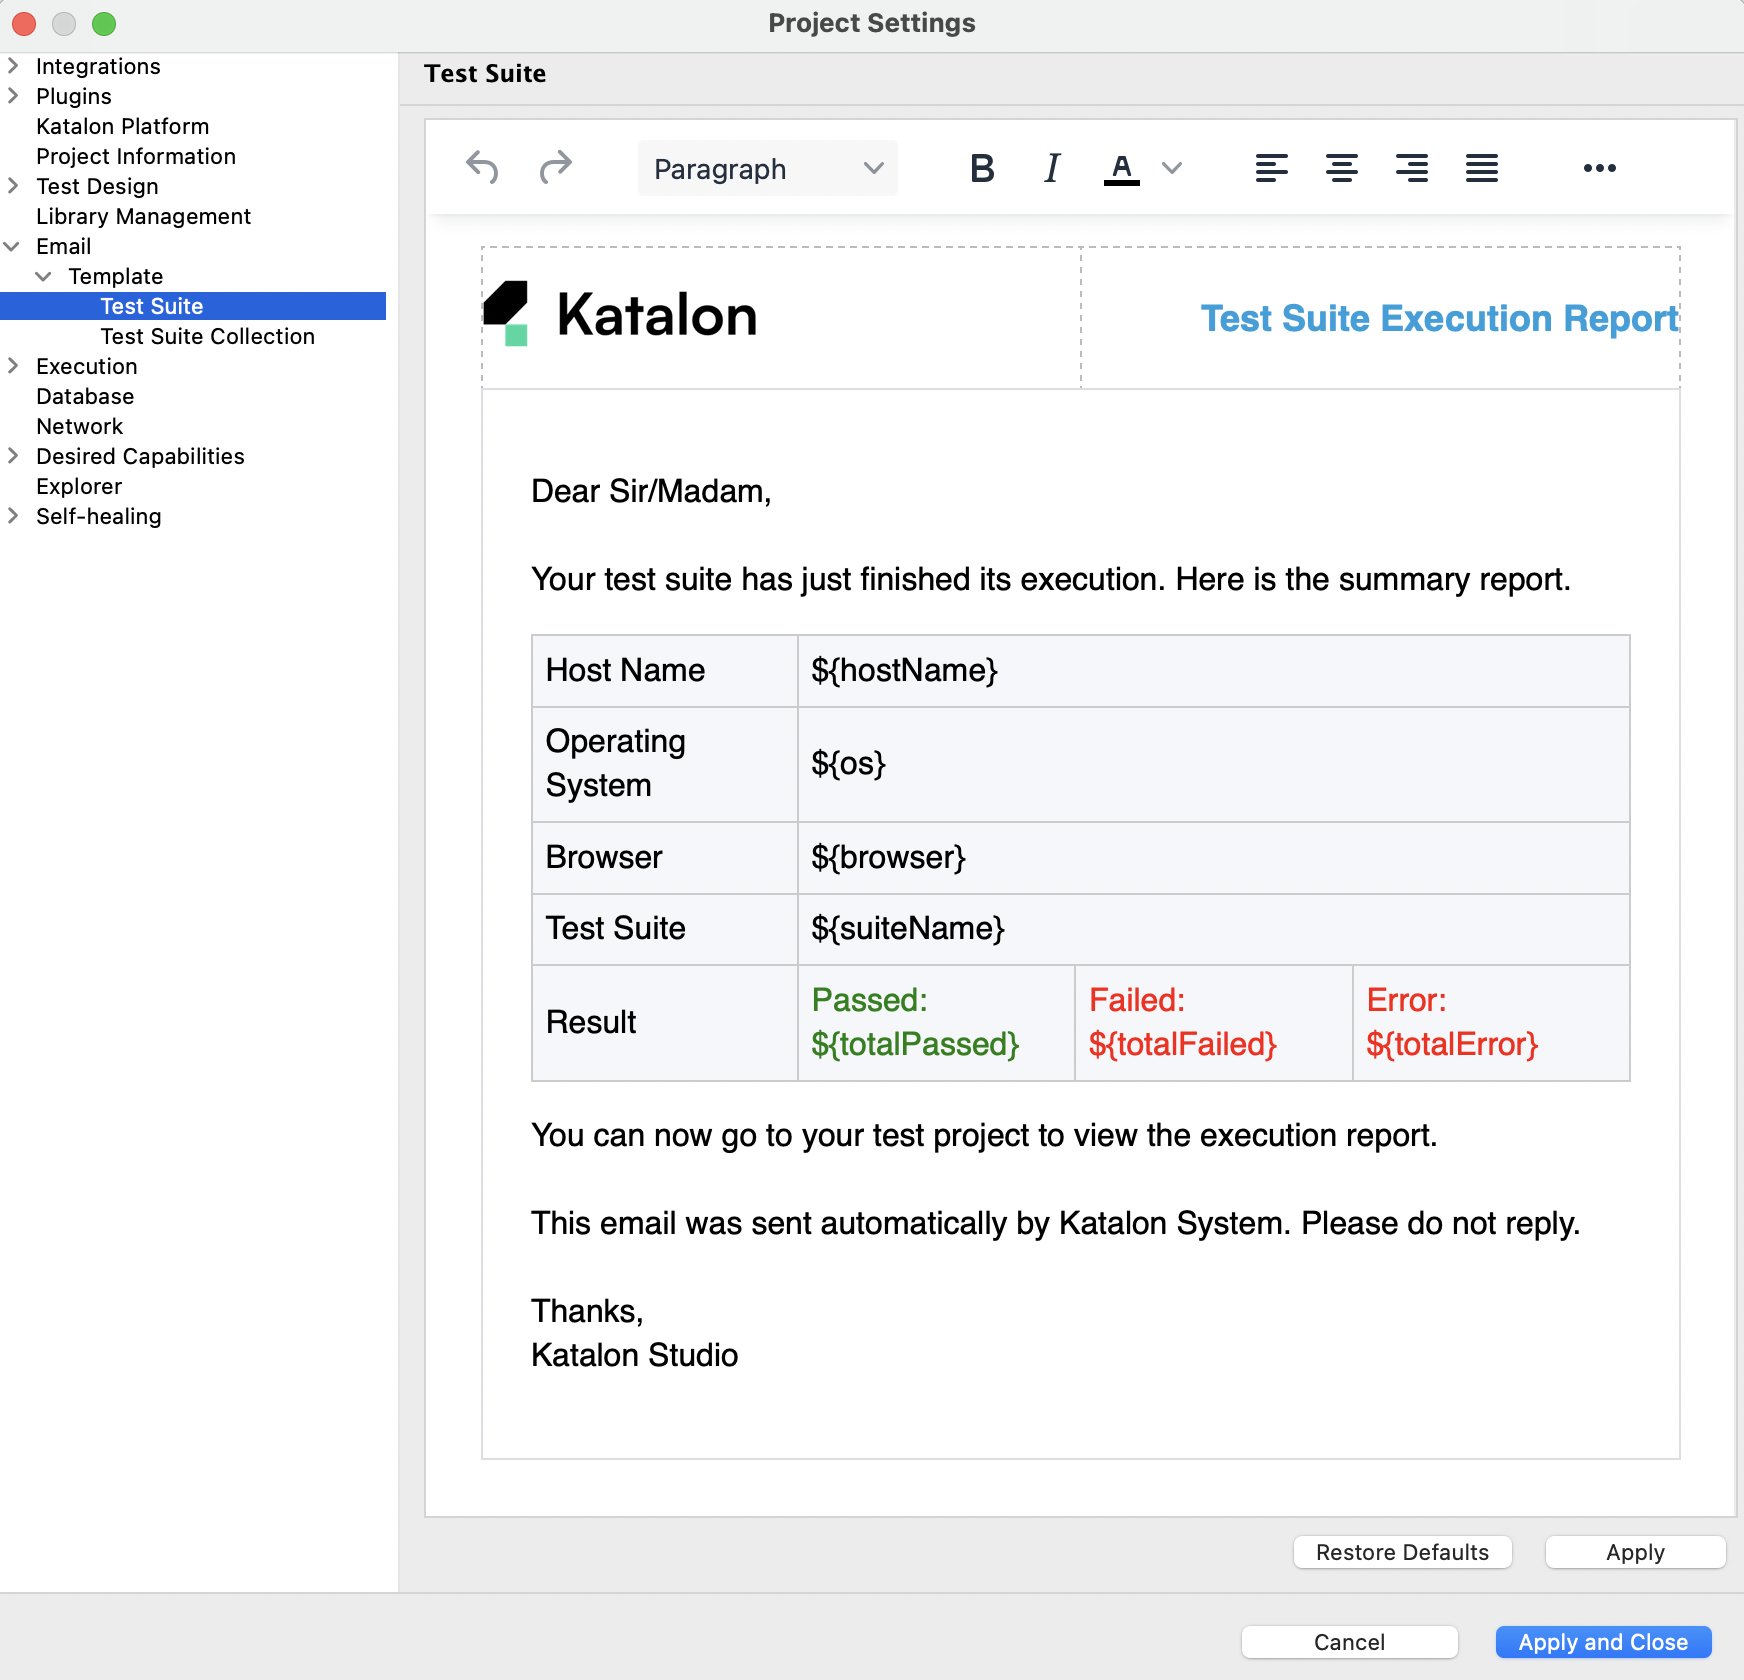
The following fields are in the template by default. You have the option to edit them out:
hostName: Host's nameos: Operating systembrowser: Browser's name and versiondeviceId: Id of the executed devicedeviceName: Name of the executed devicesuiteName: Name of the test suitetotalPassed: Total passed test casestotalFailed: Total failed test casestotalError: Total error test cases
For Test Suite Collection, click Edit Template for Test Suite Collection Execution or go to and select Test Suite Collection.
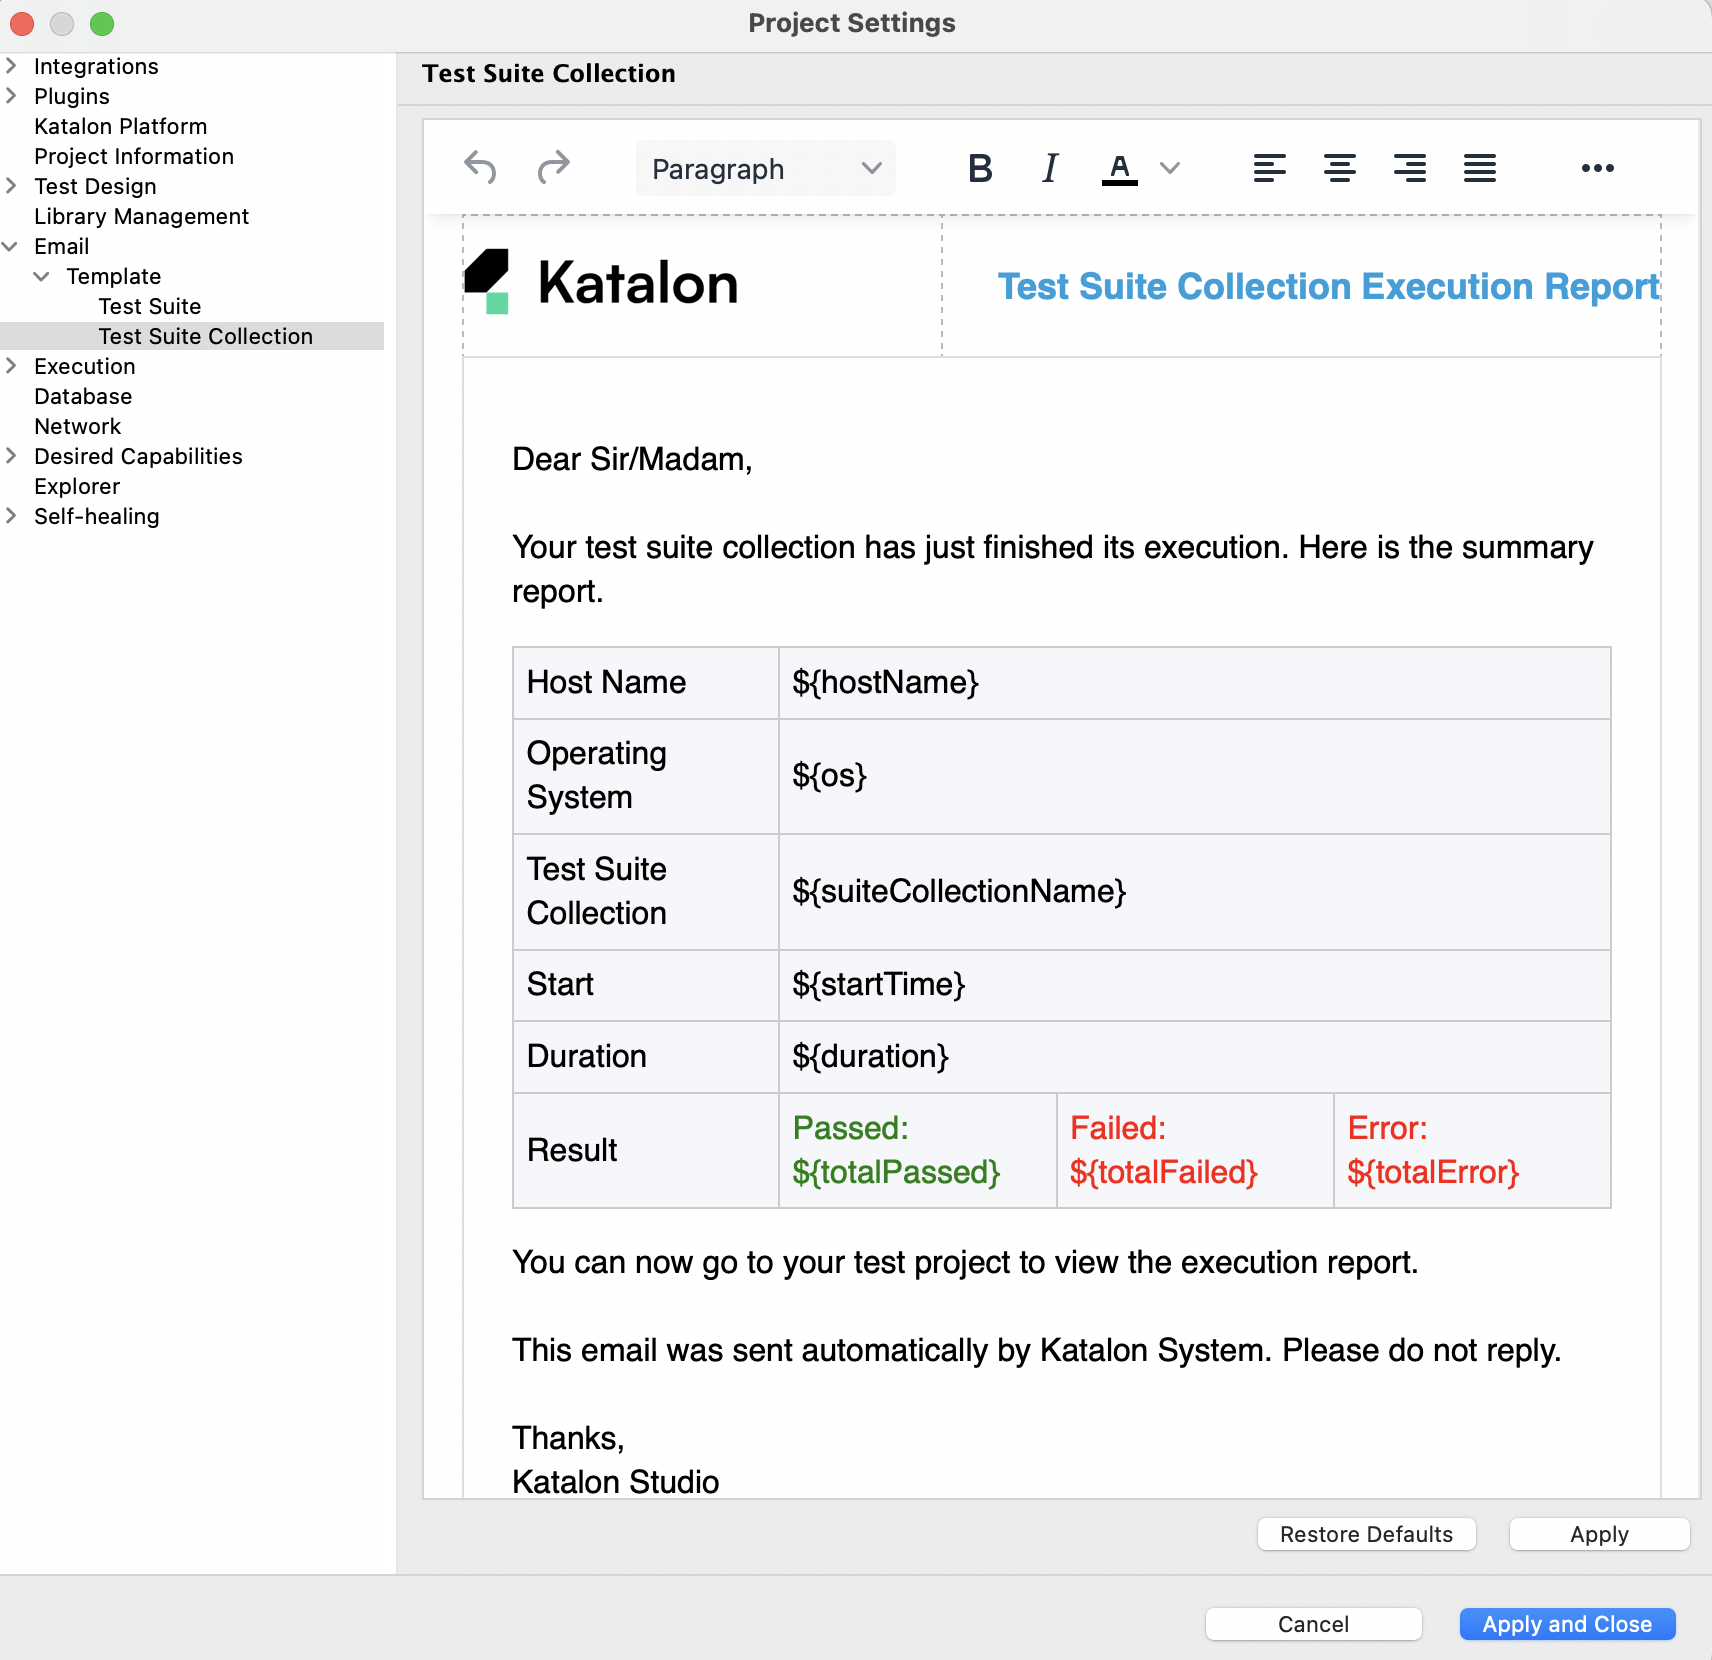 The following fields are in the template by default. You have the option to edit them out:
hostName: Host's nameos: Operating systemsuiteCollectionName: Name of Test Suite CollectionstartTime: When the Test Suite Collection started runningduration: The duration of test executiontotalPassed: Total passed test casestotalFailed: Total failed test casestotalError: Total error test cases
When done, click Apply when finished.
Recipe: Create and run an Android mobile test case in Katalon Studio
This recipe demonstrates how to create Android tests with Katalon Studio using Record and Playback.
The test scenario is: Send a message via the APIDemos.apk application.
Go through the following test scenario to get familiar with Katalon Studio's Record and Playback features.
- APIDemos.apk and sample project code are available here.
We recommend that you review the README file of the sample Android mobile tests project to ensure that you have properly set up and configured the APK on your Android device.
-
Record a test case and follow the steps of your test scenario:
- Launch
APIDemos.apkon the device. - Tap on OS.
- Tap on SMS Messaging.
- Enter a phone number and a message.
- Tap on Send.
- Launch
Create a new project
-
In the Tests Explorer sidebar, click New Project.
-
In the displayed New Project dialog:
- Name: Enter your project name.
- Type: In project type, select Mobile.
- Project: Select Sample Android Mobile Tests Project. The Repository URL is then filled with the test project URL automatically.
-
Location: Click Browse and select a folder location in your local machine where you want to store your new project.

Click OK to create your new project.
Record a test case
-
On the main toolbar, select .

-
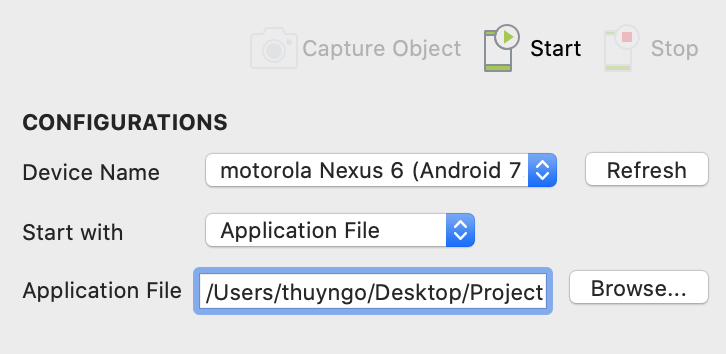
In the displayed Mobile Recorder dialog, provide your device configuration in the Configurations section:
- Device Name: select your connected Android devices.
- Start with: Select Application File in the dropdown list.
- Application File: Browse and select
APIDemos.apkthat you have downloaded previously.

-
Click Start to begin recording your test case:
- Wait until the AUT is launched.
- The Device View and All Objects sections are ready for you to interact with the application.
-
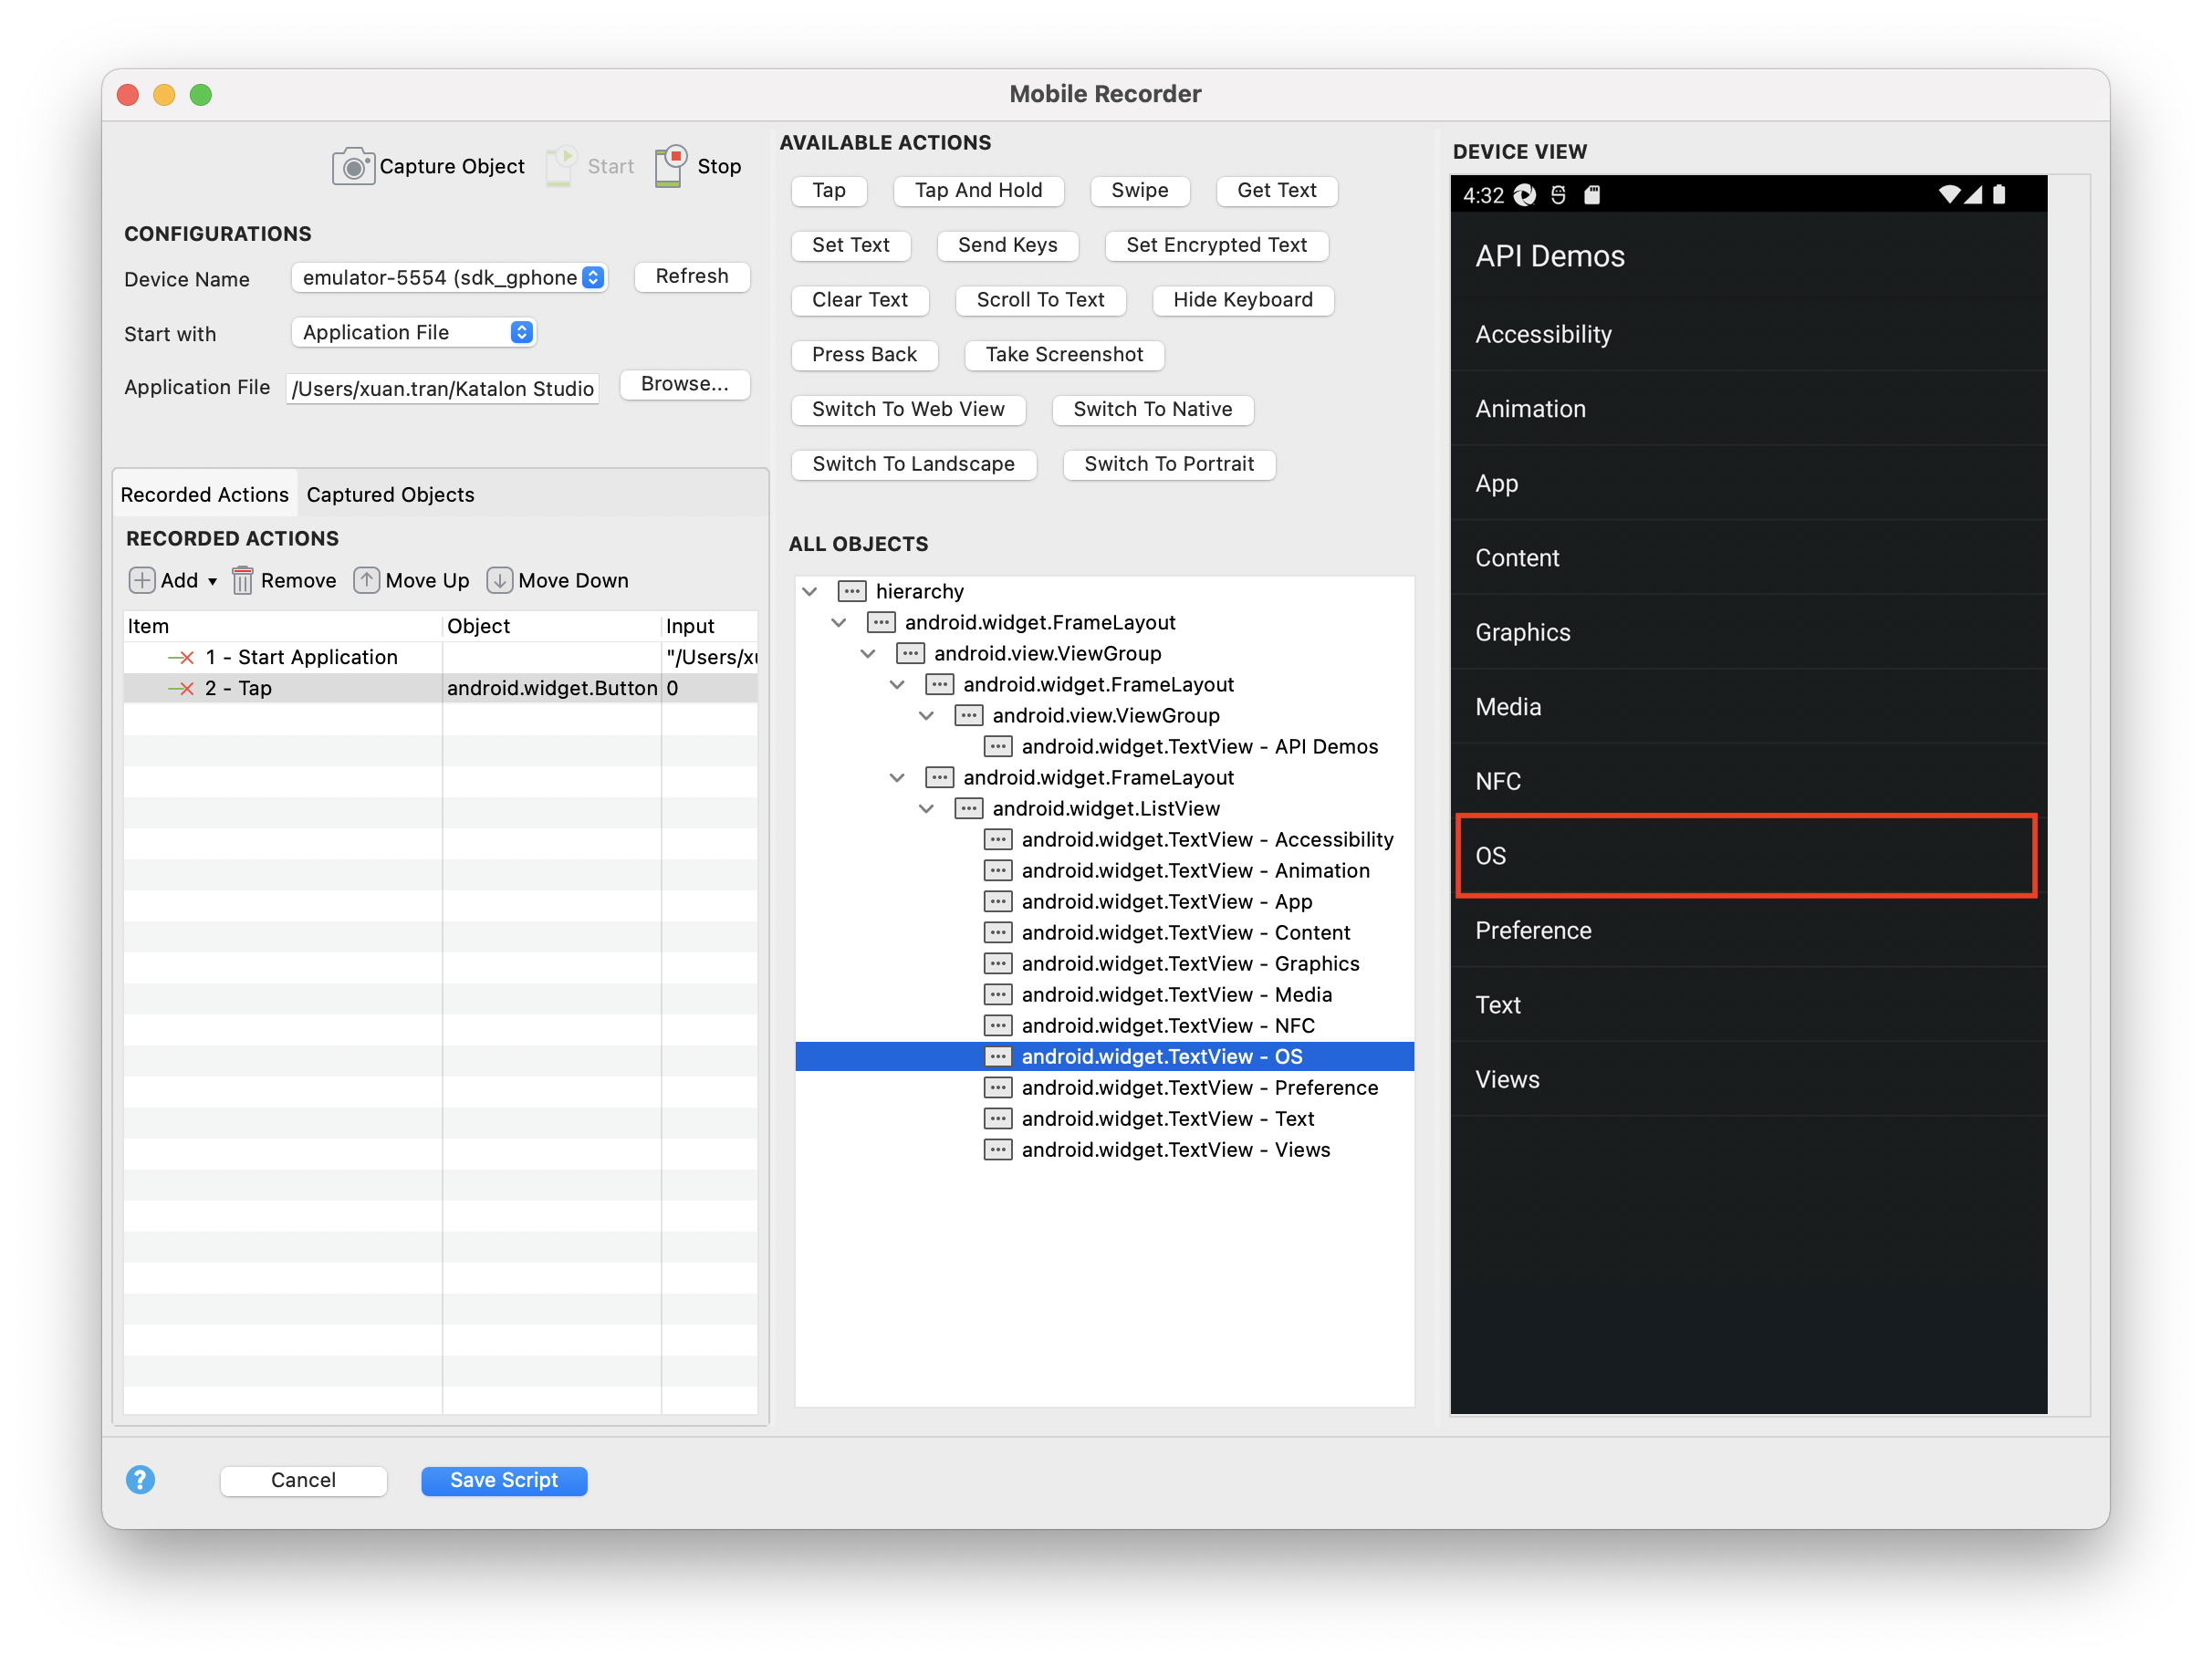
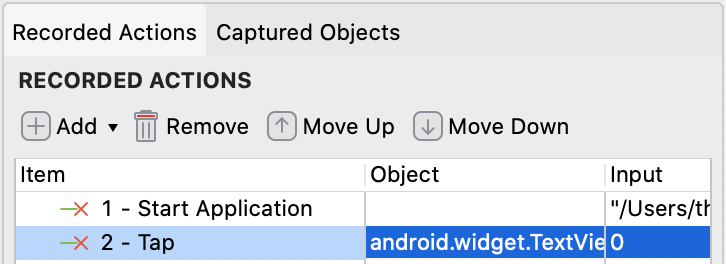
On the Device View section, click OS. Katalon Studio selects the OS subject in All Objects correspondingly.

-
Once the OS is selected, Tap is enabled in Available Actions. When you click Tap, the following happens:
- The Device View is rendered with newly displayed elements.
-
In Recorded Actions, Tap is added to the list of recorded steps.

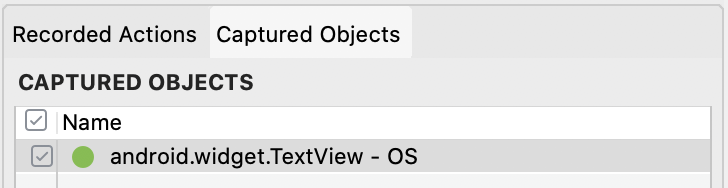
-
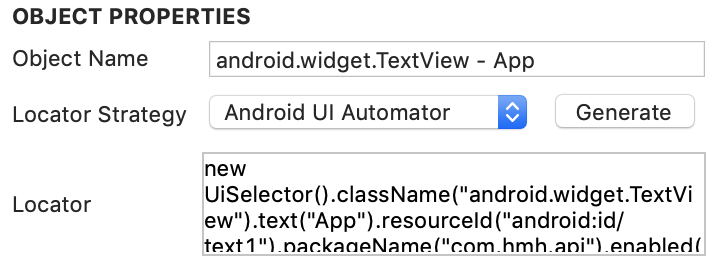
In Captured Objects, OS is captured with its properties.

Note:- The essential property of an object is its locator strategy and value. The default locator is a unique value in detecting that object.

- If you prefer another locator strategy, select your preferred one and generate a new locator. Click Highlight to see if your newly updated locator can detect the target object on its screen correctly.
-
Click SMS Messaging in Device View and click Tap in Available Actions.
You can see another tap action is added to the list of Recorded Actions and Captured Objects.

-
In Device View, select the text input area right next to Recipient. Then click Set Text in Available Actions.

A Text Input dialog is displayed, where you will enter a phone number and click OK. The phone number you entered in the Text Input dialog is then displayed under Recipient field in Device View.
-
In Device View, select the text input area next to the Message Body field and then click Set Text in Available Actions.
In the displayed Text Input dialog, enter any message and then click OK.

Your message is then displayed in the Message Body field in Device View and the Set Text action is added to Recorded Actions.
-
Scroll down to the end of the Mobile Recorder and click Save Script.
You have successfully record a test scenario for a real Android device. The next step is to review your recorded session by doing a playback.
Playback a test case
To playback the recorded scenario:
- Select the test case where you saved the recorded actions.
-
On the main toolbar, select the dropdown near the Run icon and then click Android.

-
In the displayed Android Devices dialog, select your connected Android device and then click OK.

Katalon Studio plays back the mobile test case with the recorded steps accordingly.
The recorded mobile test case based on our test scenario will look like this in Script view:
import static com.kms.katalon.core.testobject.ObjectRepository.findTestObject

import com.kms.katalon.core.configuration.RunConfiguration
import com.kms.katalon.core.mobile.keyword.MobileBuiltInKeywords as Mobile
import com.kms.katalon.core.model.FailureHandling as FailureHandling

'Start the Application'
Mobile.startApplication(RunConfiguration.getProjectDir() + '/APIDemos.apk', true)

'Tap on OK if this is the first time this application is launched on an Android 9+ device'
Mobile.tap(findTestObject('Object Repository/APIDemo/android.widget.Button - OK'), 0, FailureHandling.OPTIONAL)

'Tap on text "OS"'
Mobile.tap(findTestObject('Object Repository/APIDemo/android.widget.TextView - OS'), 0)

'Tap on text "SMS Messaging"'
Mobile.tap(findTestObject('Object Repository/APIDemo/android.widget.TextView - SMS Messaging'), 0)

'Enter a phone number in Recipient text box'
Mobile.setText(findTestObject('Object Repository/APIDemo/android.widget.EditText'), '+84345678910', 0)

'Enter a message in Body Message text box'
Mobile.setText(findTestObject('Object Repository/APIDemo/android.widget.EditText (1)'), 'Hello world! This is Katalon Mobile Recorder', 0)

'Send the message'
Mobile.tap(findTestObject('Object Repository/APIDemo/android.widget.Button - Send'), 0)

'Close the Application'
Mobile.closeApplication()
Having learned how to perform mobile testing on a real Android device, now let's explore testing on a real iOS device. See: Mobile testing on a real iOS device.