Mobile testing on a real iOS device
Learn how to create and execute a simple mobile test on an iOS device.
When performing mobile testing on an iOS device using Katalon Studio, keep the following key points in mind:
Knowledge Requirements: Ensure you have the necessary knowledge of iOS, Appium, and the iOS device you are using for testing.
Browser Installation: Make sure Chrome and Safari applications are installed on the iOS device for proper execution of test steps.
Environment Setup: Before executing your mobile test, verify that you have set up the environment for mobile testing on macOS.
Device Selection: Select iOS as the mobile device platform in Katalon Studio and choose the specific iOS device you want to test on.
Device Connection: Connect your real iOS device to the machine where you will run the test scripts.
To start, create a new test project with the
Set up your mobile testing environment
Creating a conducive testing environment is essential for conducting thorough and accurate mobile testing.
Setting up your mobile testing environment is the second step, and entails two crucial tasks: Install the Appium server and install and set up the Appium XCUITest Driver and other iOS dependencies.
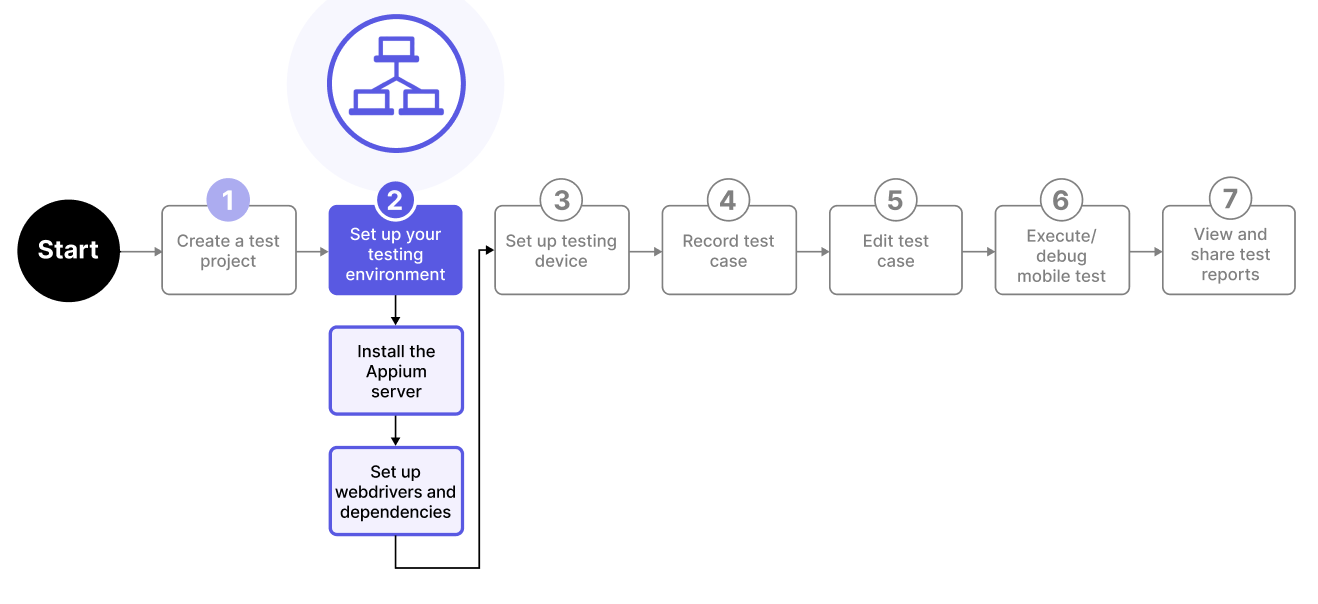
Scroll down below or click on the link to learn how: Install the Appium server.
Install the Appium server
To set up your mobile testing environment for your real Android device, you need to install and set up the Appium server.
Follow the steps below how to install Appium 2.x server. You may skip this step if you already have Appium 2.x server installed:
Install and set up the XCUITest Driver and dependencies
Installing and setting up the webdrivers (and any dependencies) is the second process in setting up your mobile testing environment.
Follow the steps to install the XCUITest Driver and applicable dependencies.
Set up your real iOS device
Set up your real iOS device You need to be enrolled first in the Apple Developer Program and register your real iOS device with Xcode.
After setting up your testing environment, you need to configure your real iOS device so it is ready for testing.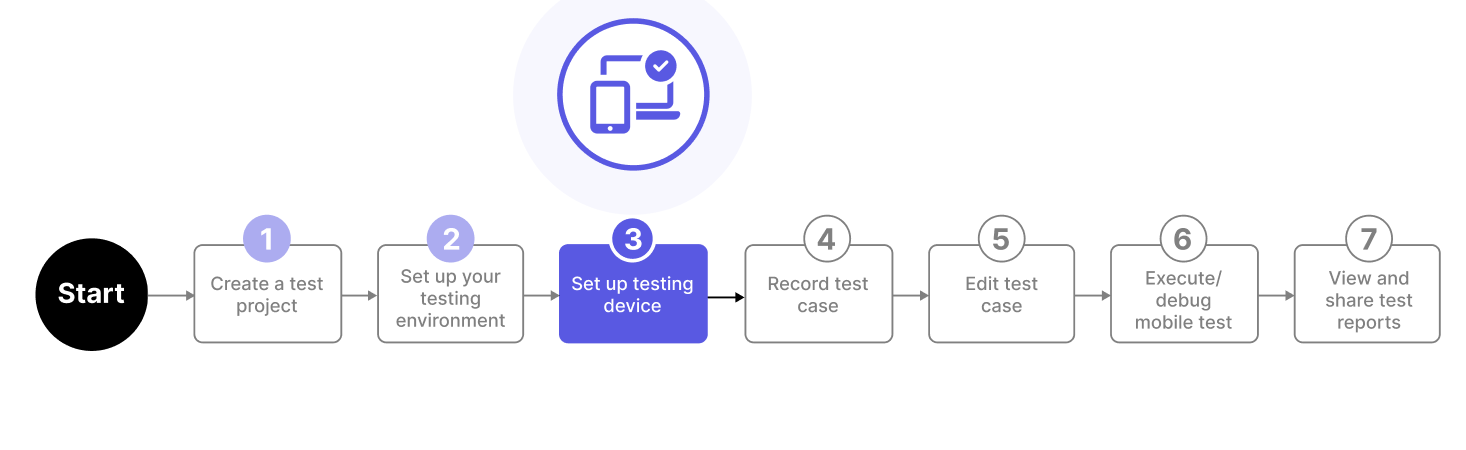 Learn how to set up your real iOS device for mobile testing by following these steps:
Learn about registering your device in Apple Developer by referring to this document: Register a single device in Apple Developer.
Launch Xcode, then navigate to . Click Add (+) to enter your Apple Developer Account ID and password.
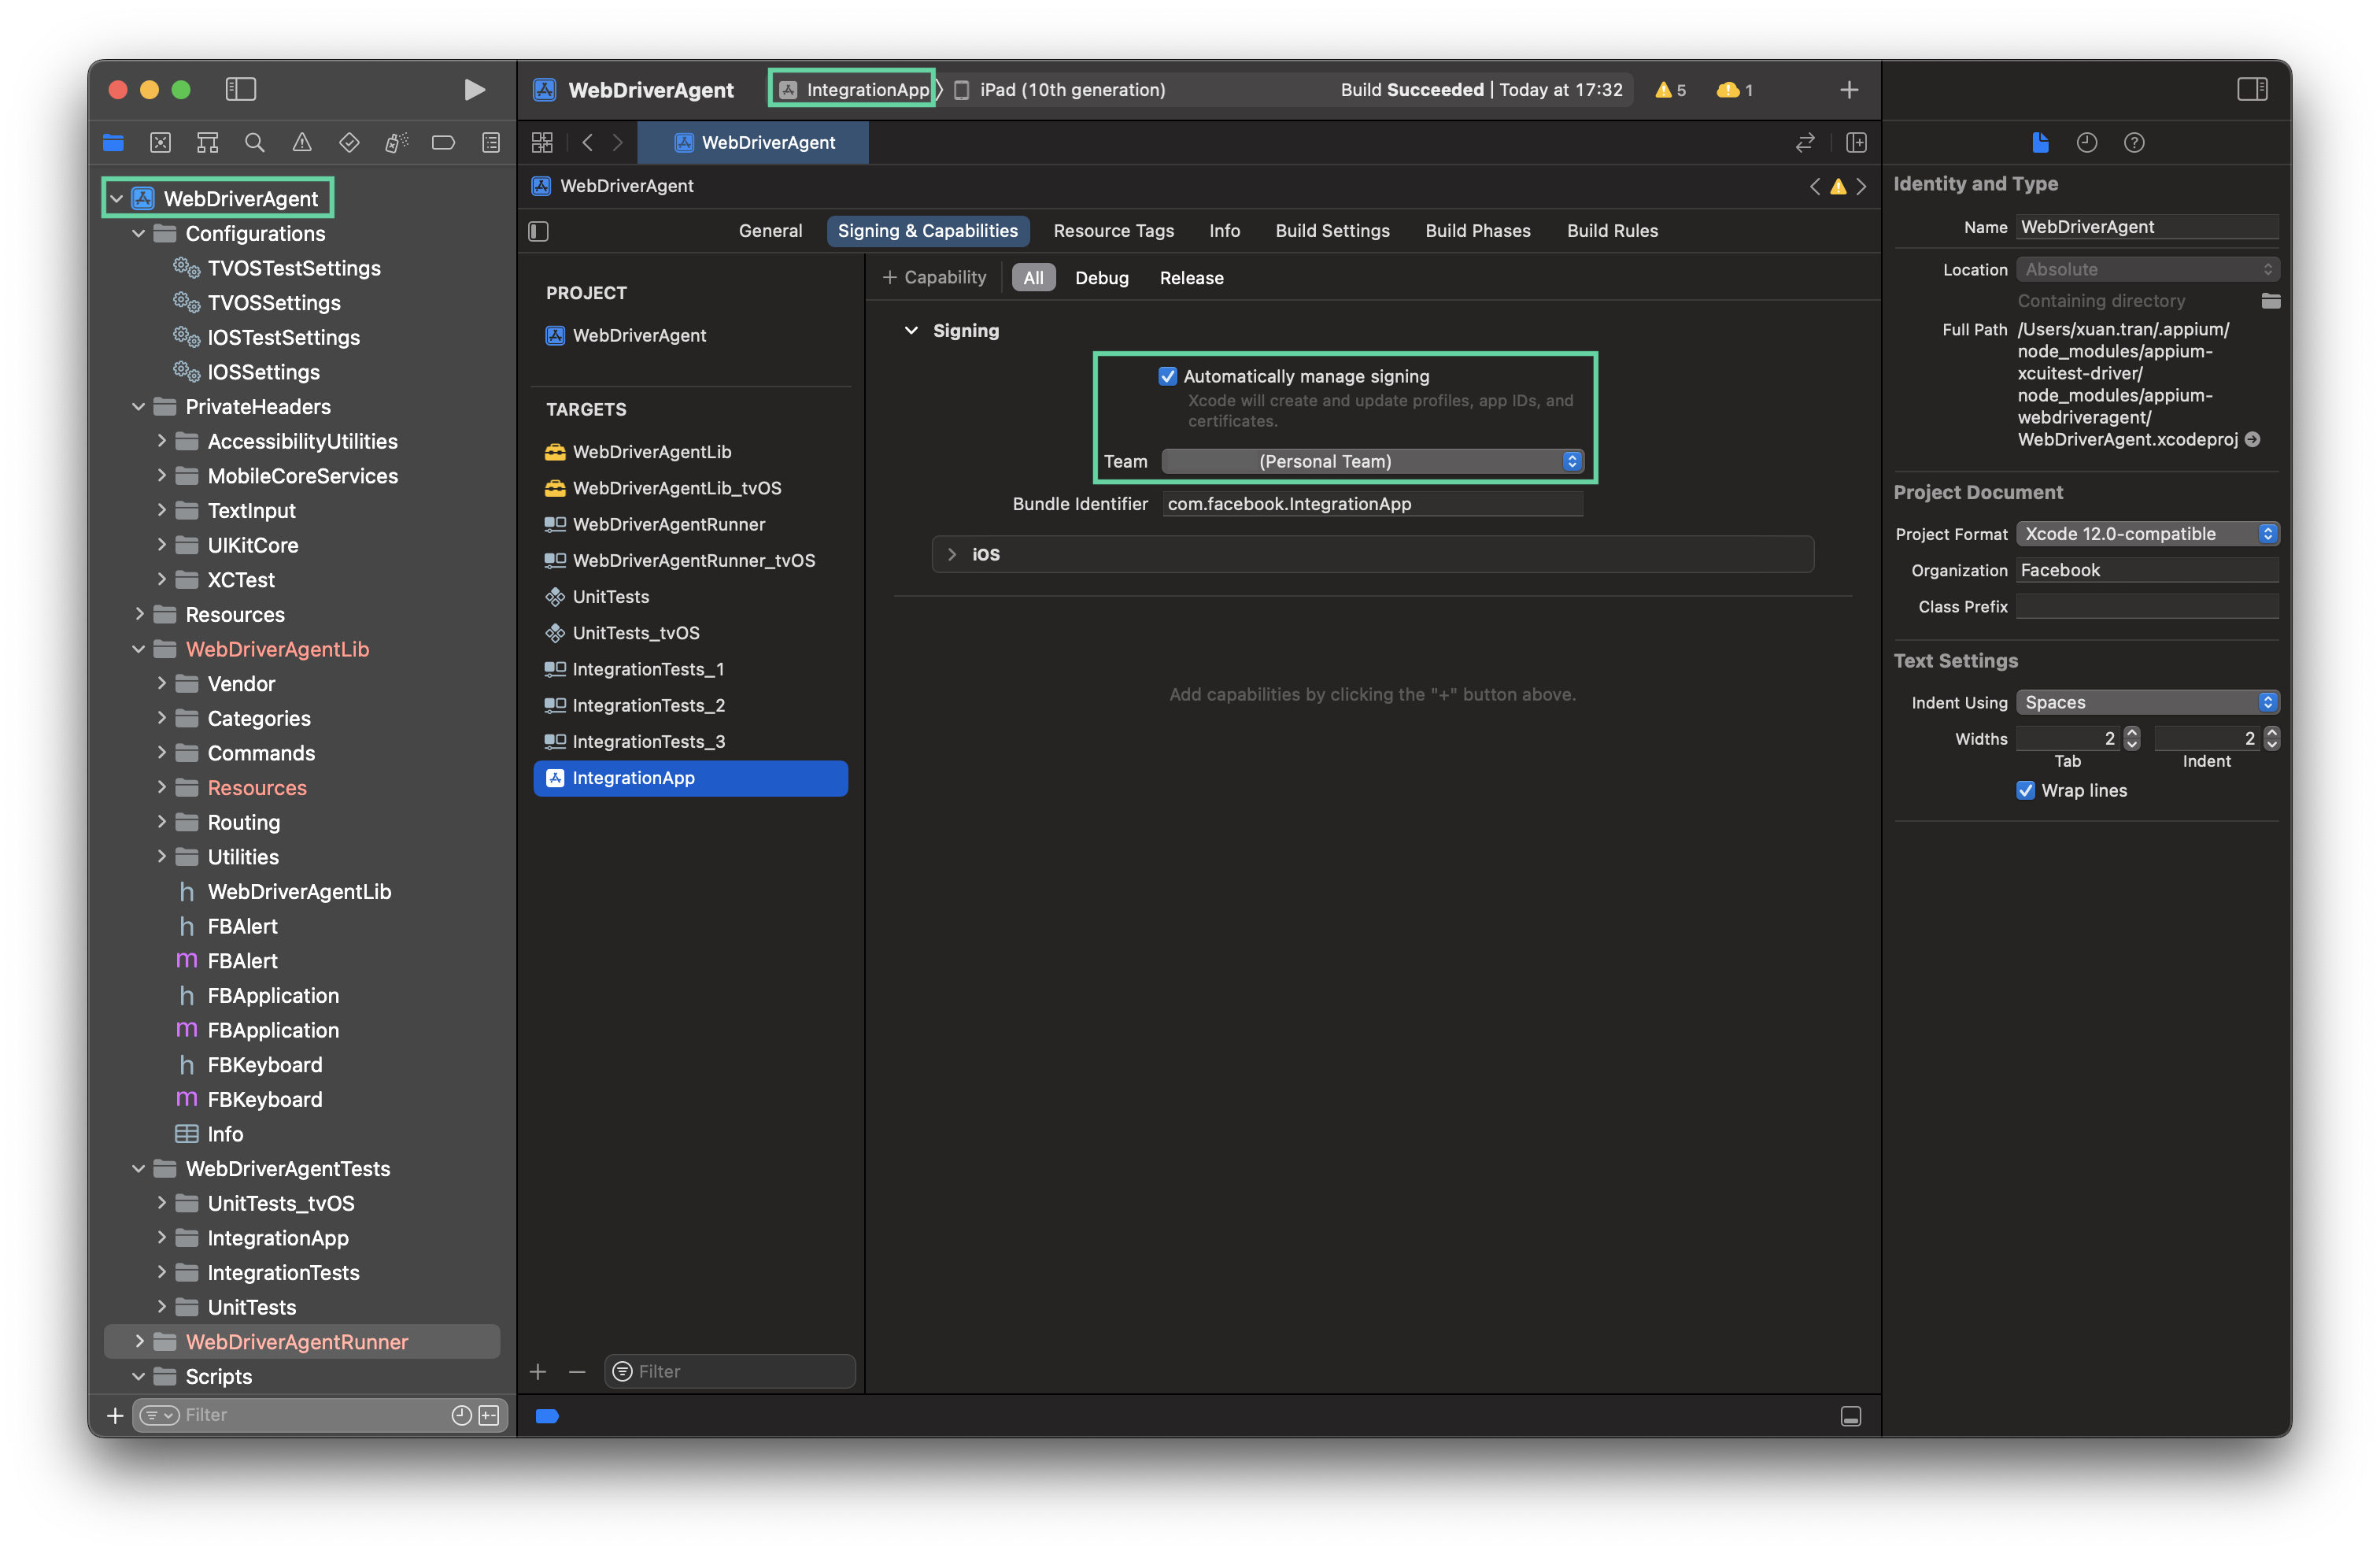
Install the WebDriverAgent manually.
Navigate to the
WebDriverAgentfolder in this directory:/Users/your_username/.appium/node_modules/appium-xcuitest-driver/node_modules/appium-webdriveragent/.For example,
/Users/john_smith/.appium/node_modules/appium-xcuitest-driver/node_modules/appium-webdriveragent/.Open the
WebDriverAgent.xcodeprojfile in Xcode.Build the IntegrationApp target with the following steps:
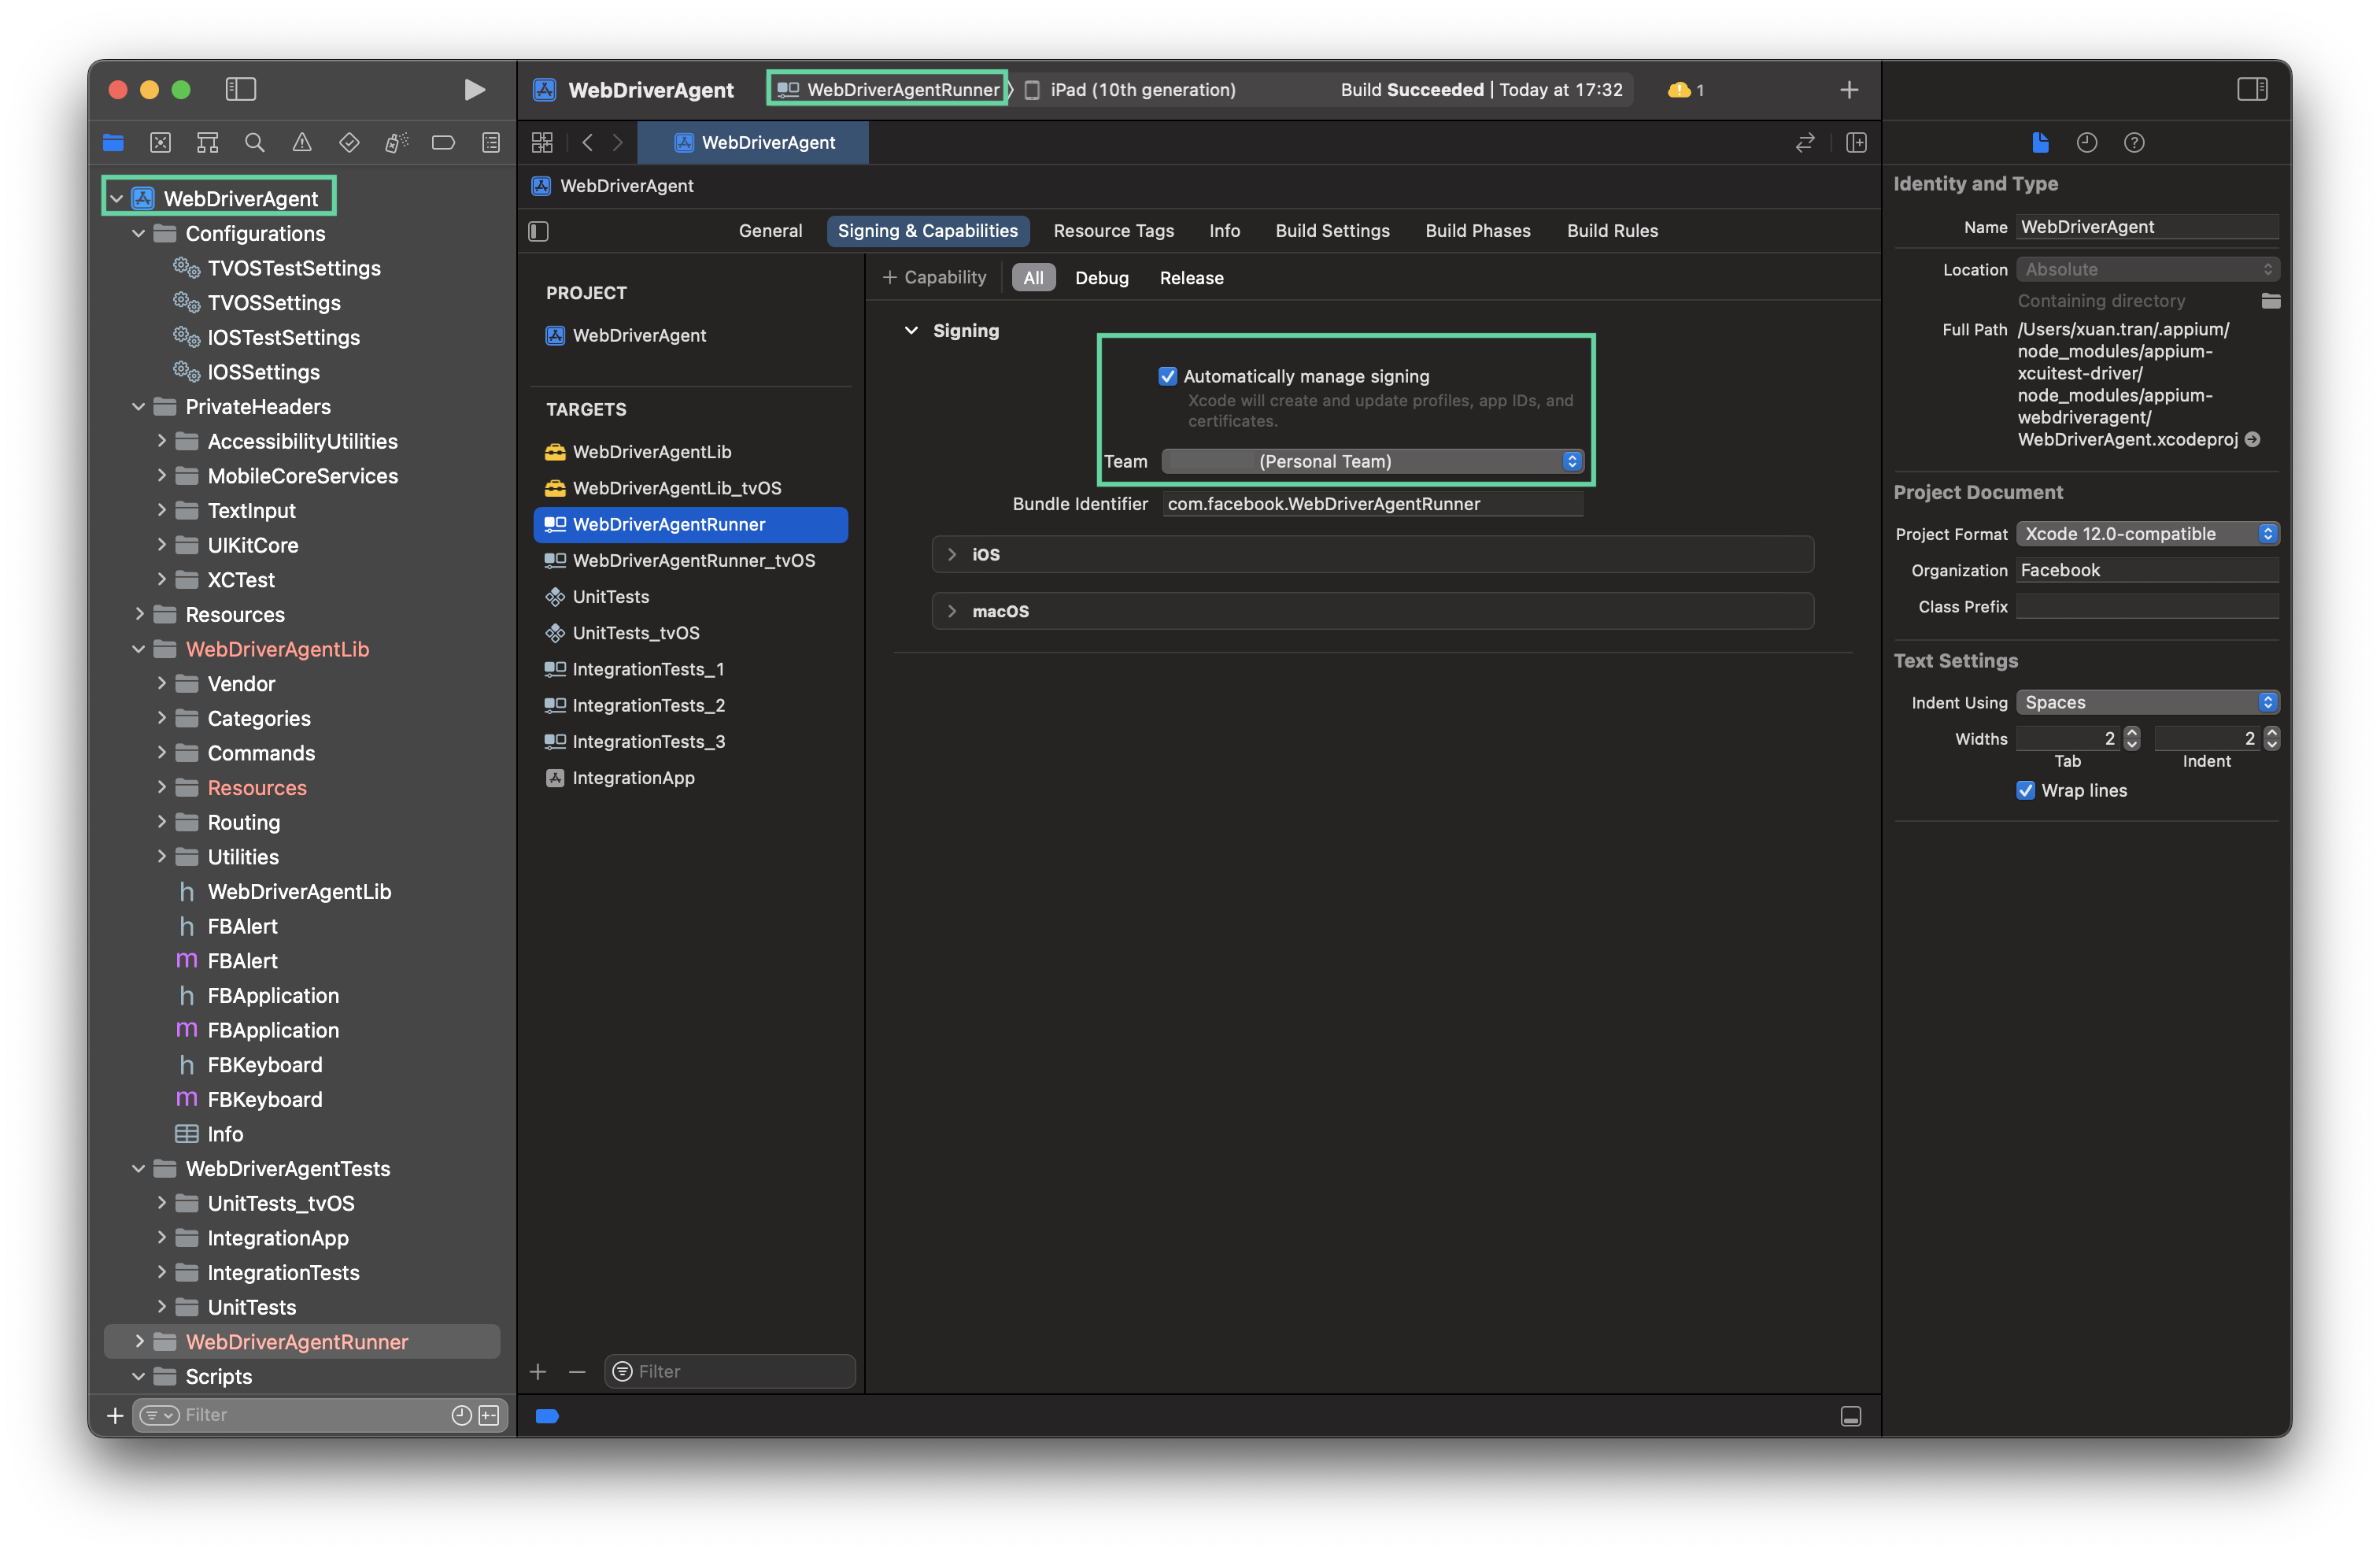
Select the IntegrationApp target. In the Signing & Capabilities section, check the Automatically manage signing box, then choose your team that you have set up when you registered your device in Apple Developer.
On the menu bar, select .
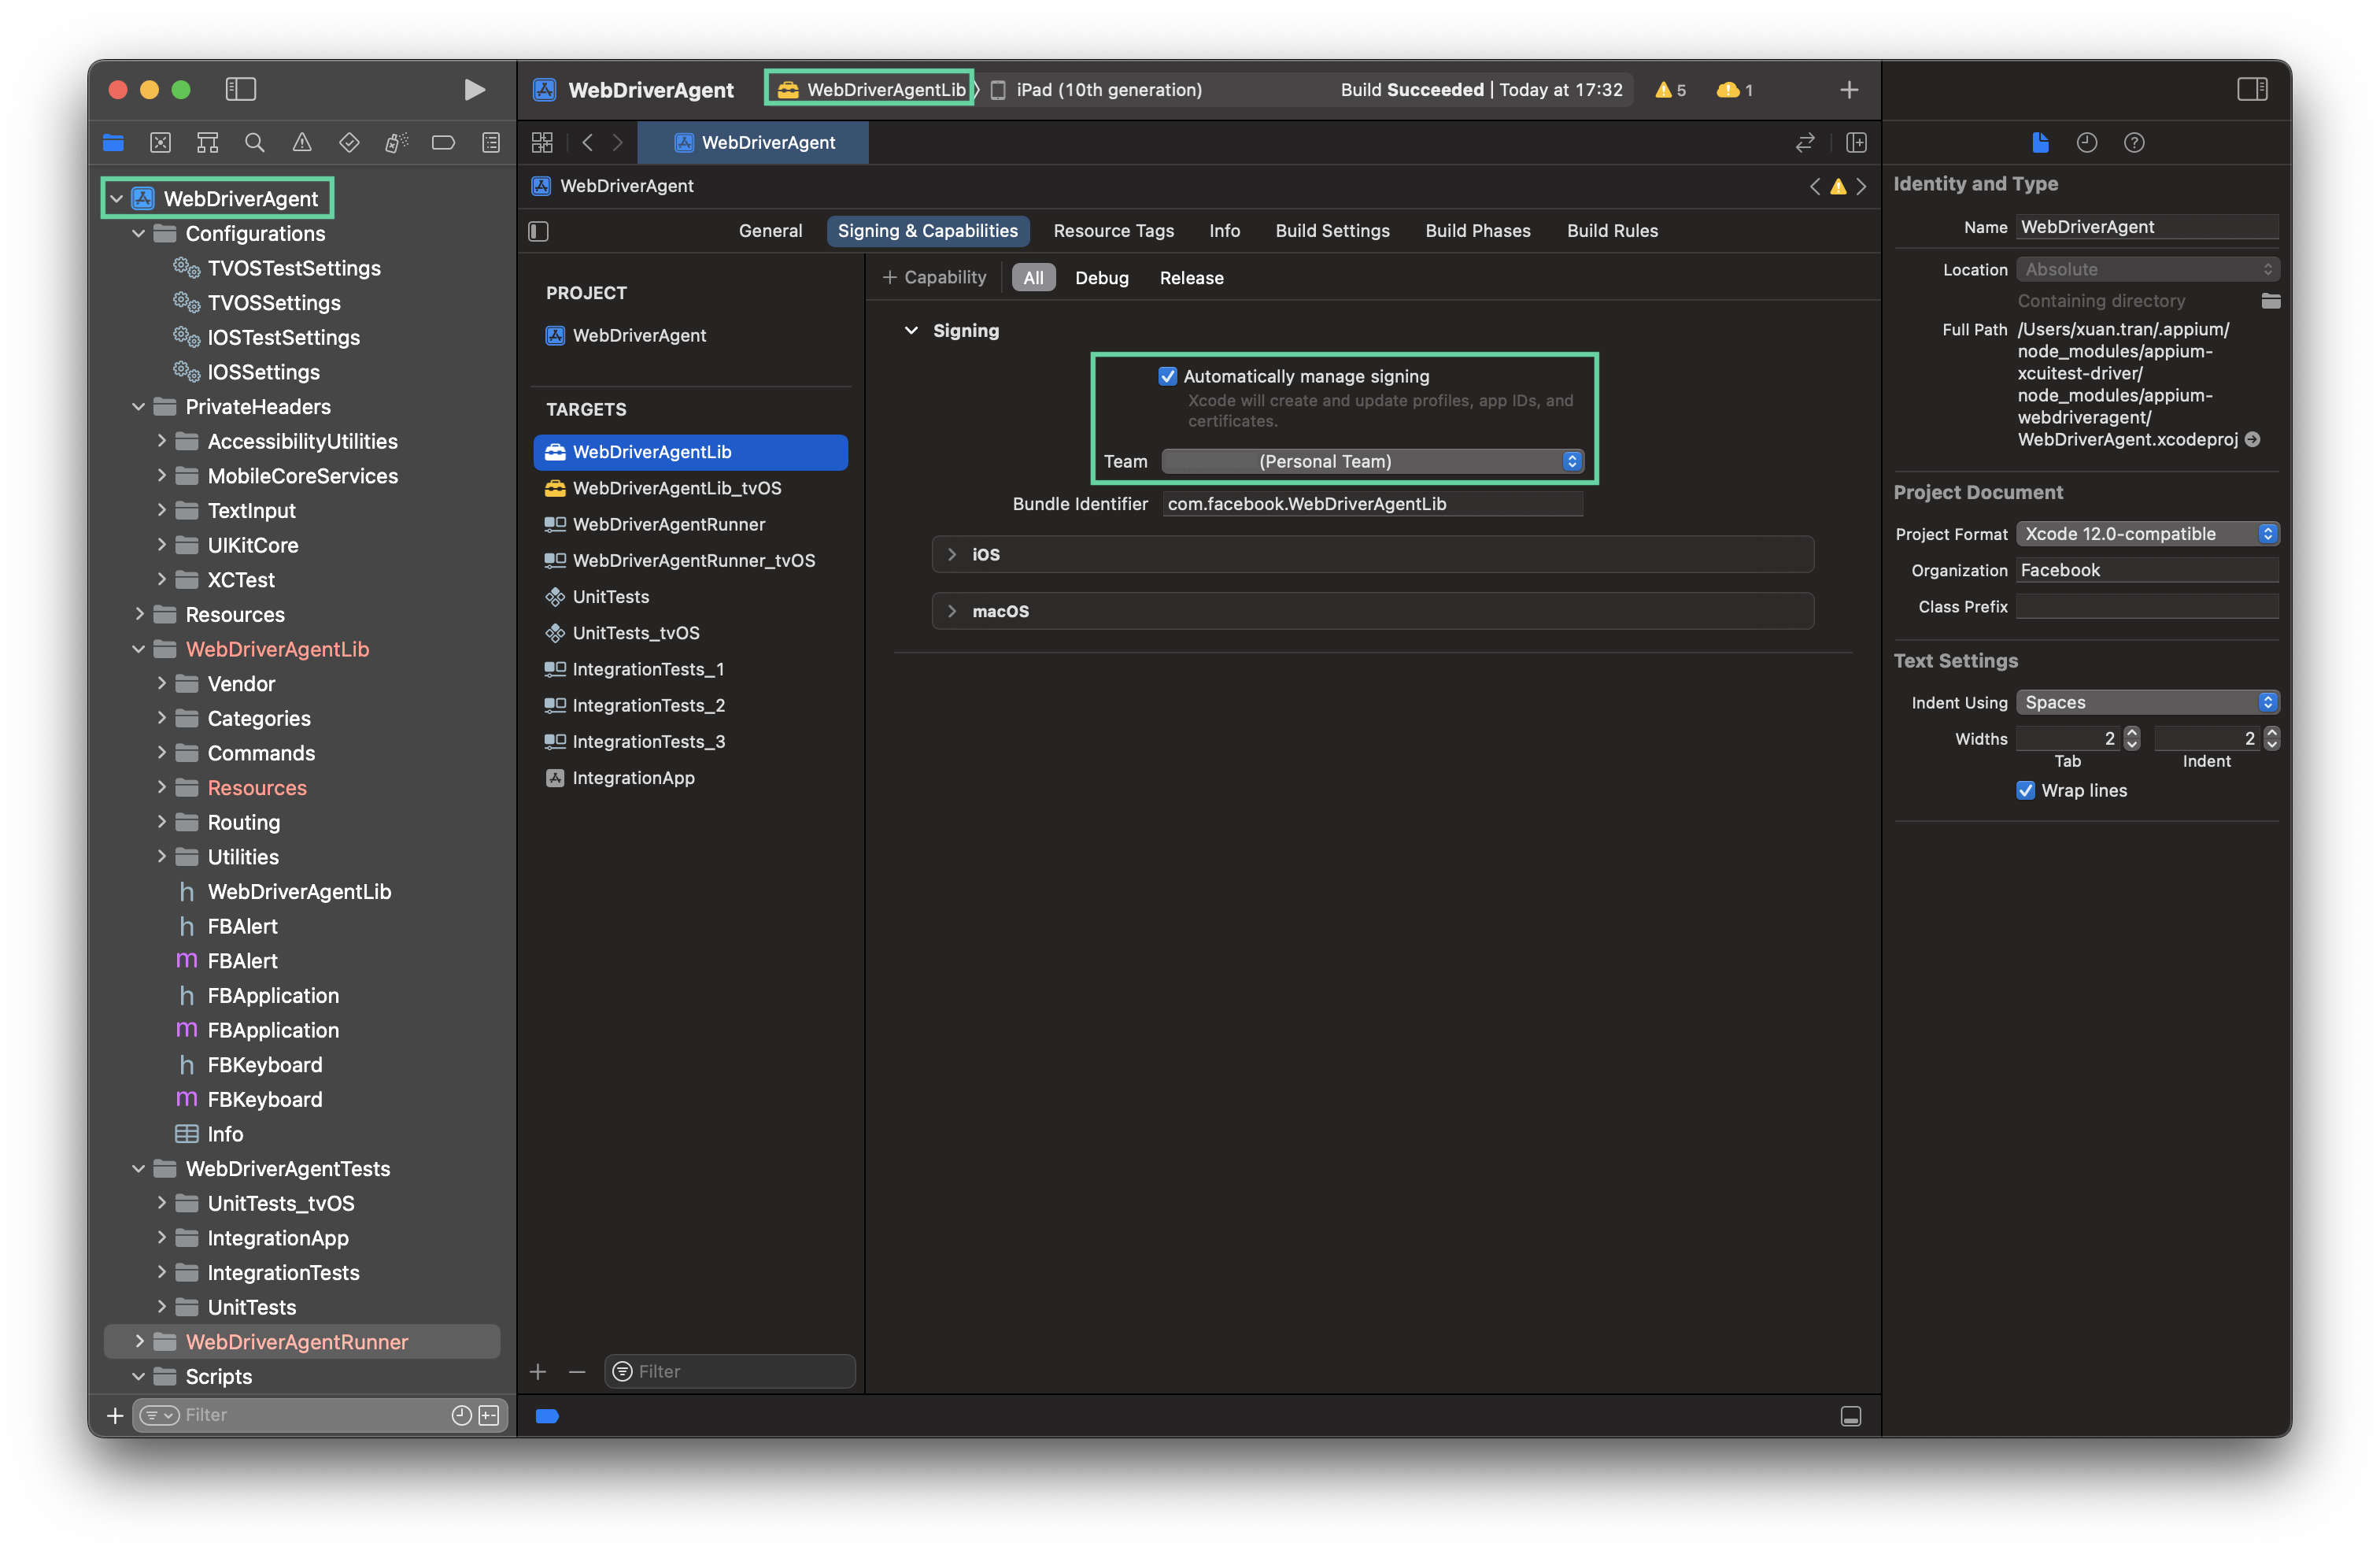
Build the WebDriverAgentLib target with the following steps:
Select the WebDriverAgentLib target. In the Signing & Capabilities section, check the Automatically manage signing box, then choose your team that you have set up when you registered your device in Apple Developer.
On the menu bar, select .
Build the WebDriverAgentRunner target with the following steps:
Select the WebDriverAgentRunner target. In the Signing & Capabilities section, check the Automatically manage signing box, then choose your team that you have set up when you registered your device in Apple Developer.
On the menu bar, select .
You have successfully installed the WebDriverAgent manually.
You have successfully set up your real iOS device for mobile testing. Click or scroll down to proceed with the next step: Playback a test case.
Record a mobile test case
This is a basic tutorial on how to begin mobile testing with Katalon Studio with completely new users in mind. Here you will learn how to create and execute your first test case.
Now that you are now familiar with the Mobile Recorder utility, we can now perform the fourth step in the mobile testing workflow: Recording a mobile test case.
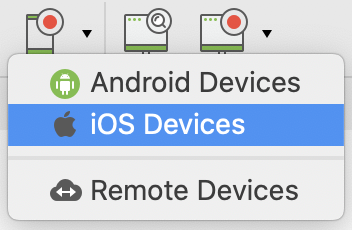
- On the main toolbar, click Record Mobile and then select the testing device. In the example below, we will use a real iOS device:
- In the Configurations section in the Mobile Recorder window, specify the device name, select Application file, and browse to select the application file from your development machine.
- When selecting a specific object in the Device View section, Katalon Studio also selects the corresponding object in the All Objects section.
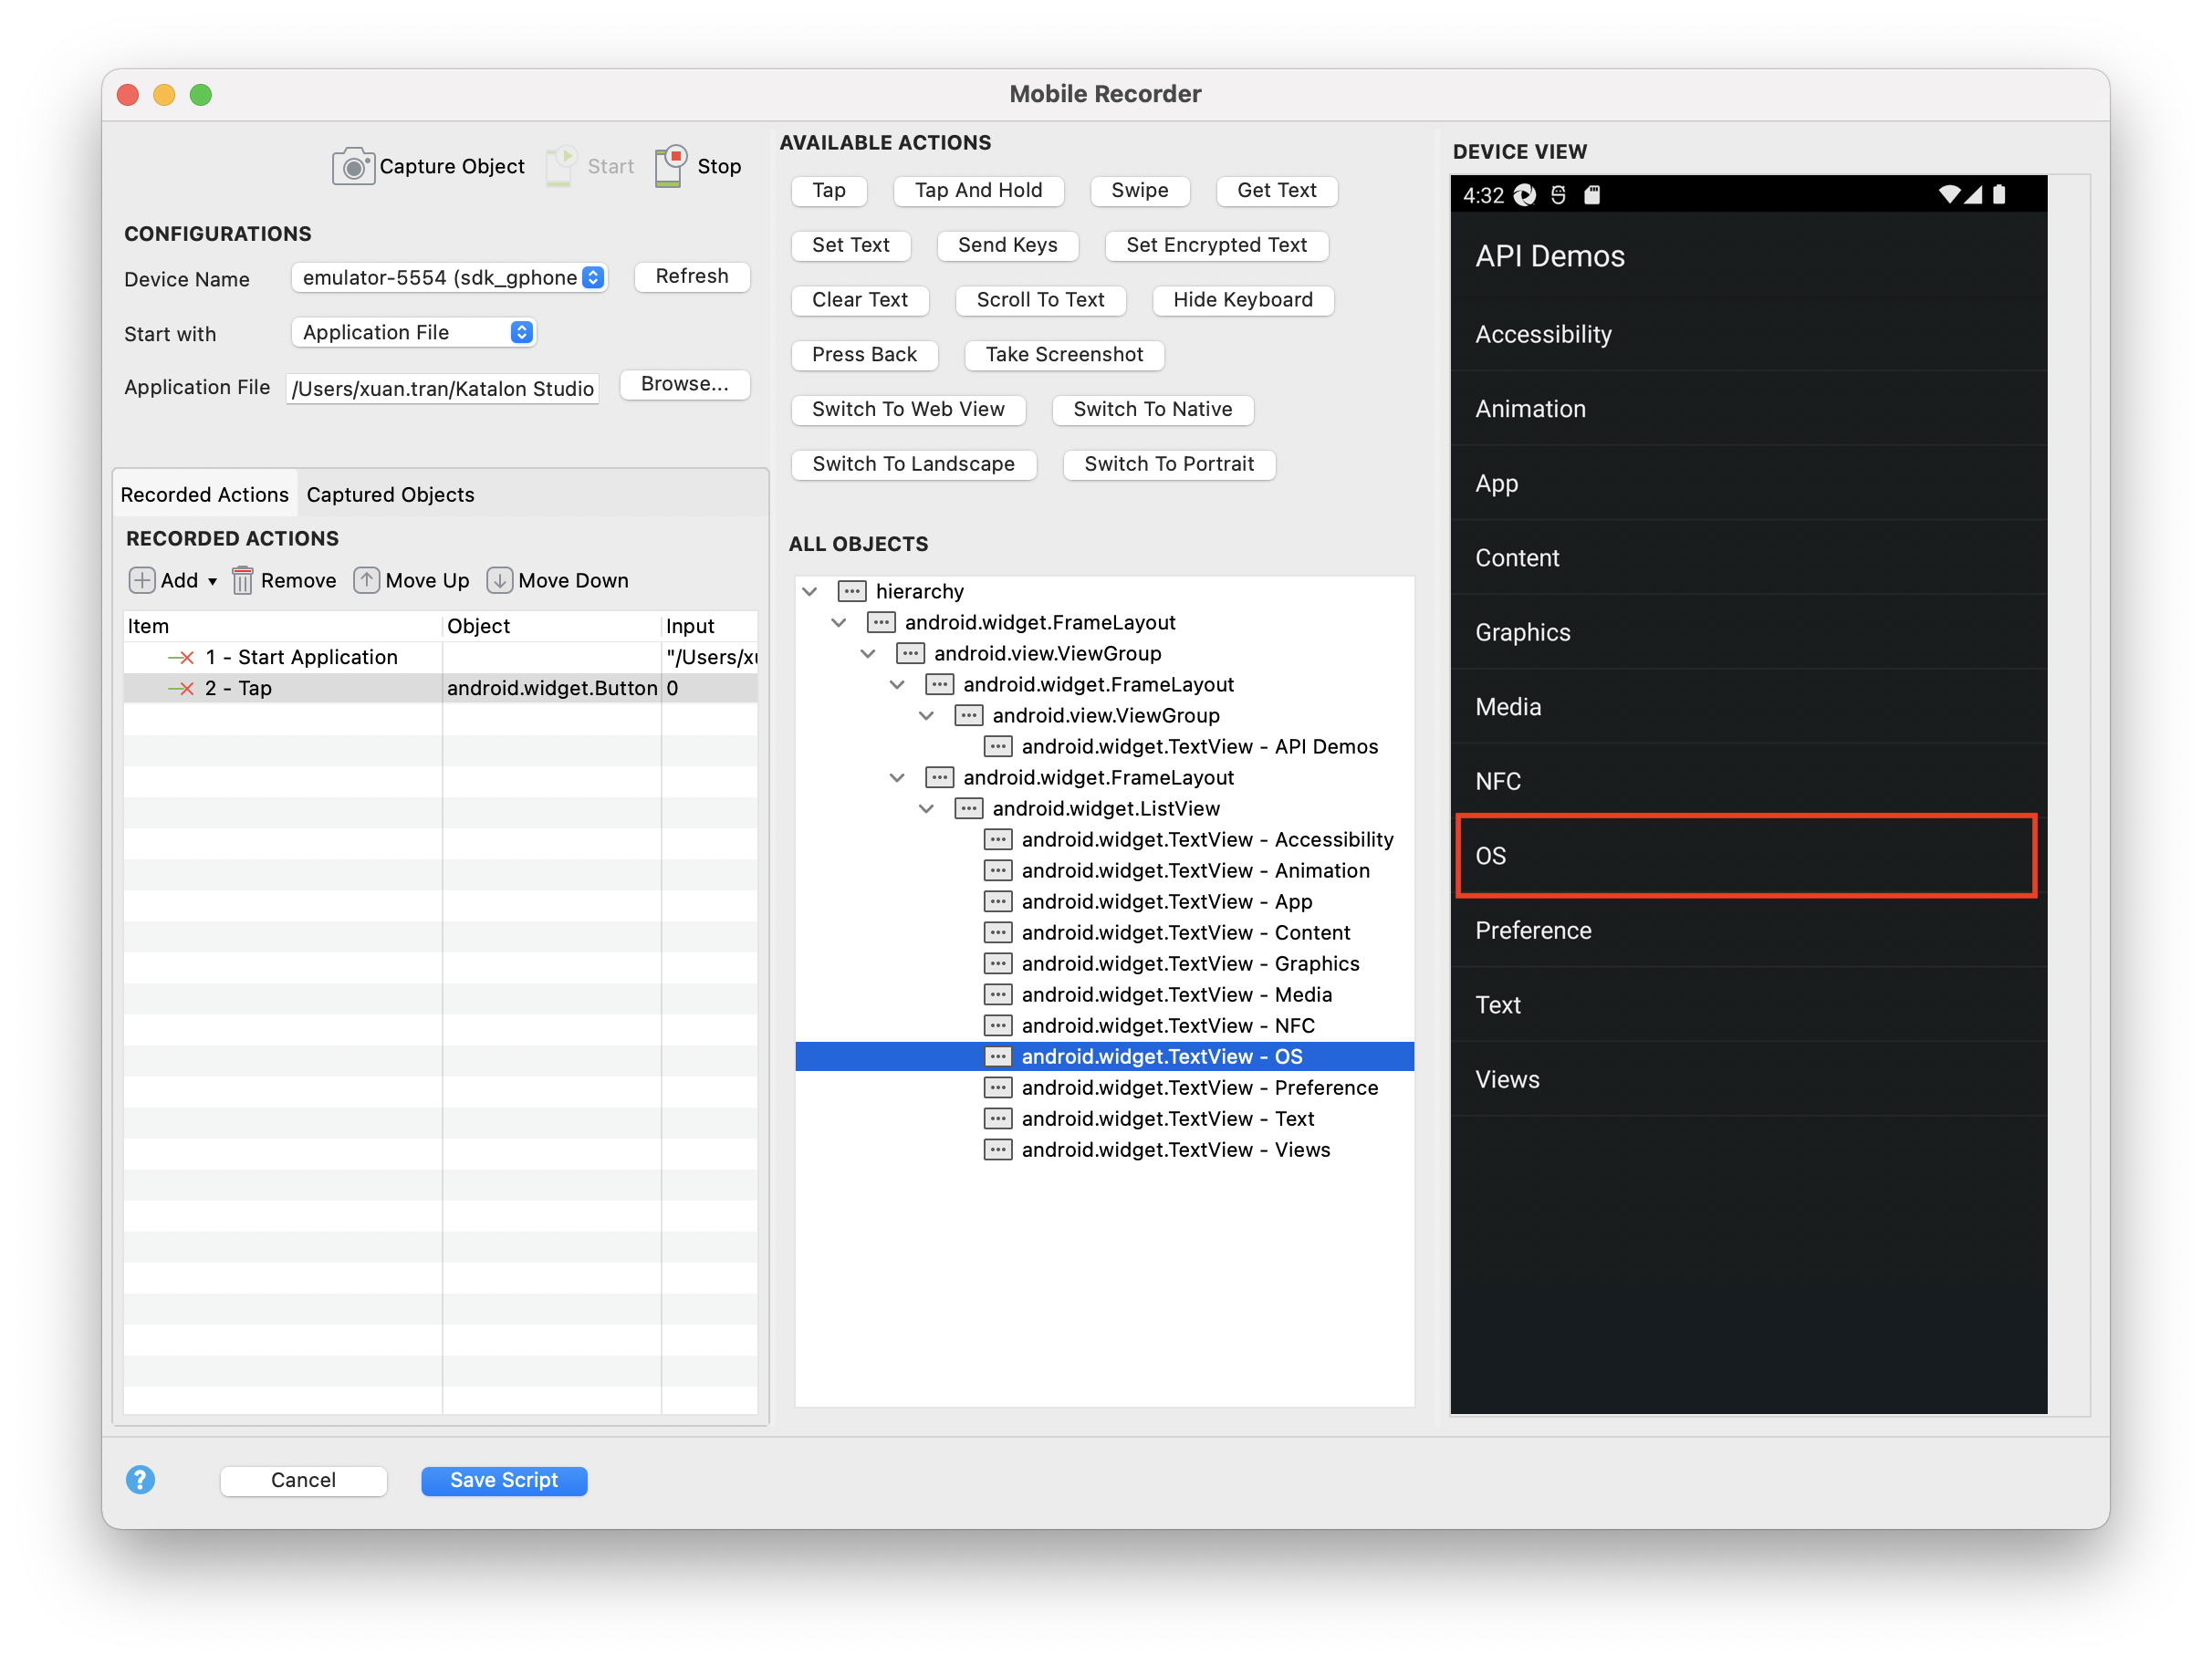
- You may check the Recorded Actions tab under the Configurations section to view the recorded actions.
- You may check the Captured Objects tab under the Configurations section to view all test objects captured and their properties.
- Add the recorded test steps to a new test case, append to or overwrite an existing one.
You can also try creating a new test case and generating the test steps in Manual view or Script view. Refer to the following links or scroll down for more information:
Edit mobile test case
Editing a mobile test case can be done using a manual editor or via script view, and by utilizing supported keywords.
Editing a mobile test case is considered the next logical step after you record your mobile test case.

Editing test cases in Katalon Studio can be done via manual view or script view as we have demonstrated previously. Simply access the Test Case Editor and follow the steps:
In the Manual tab, use the menu items or edit inline to add or edit your keywords.
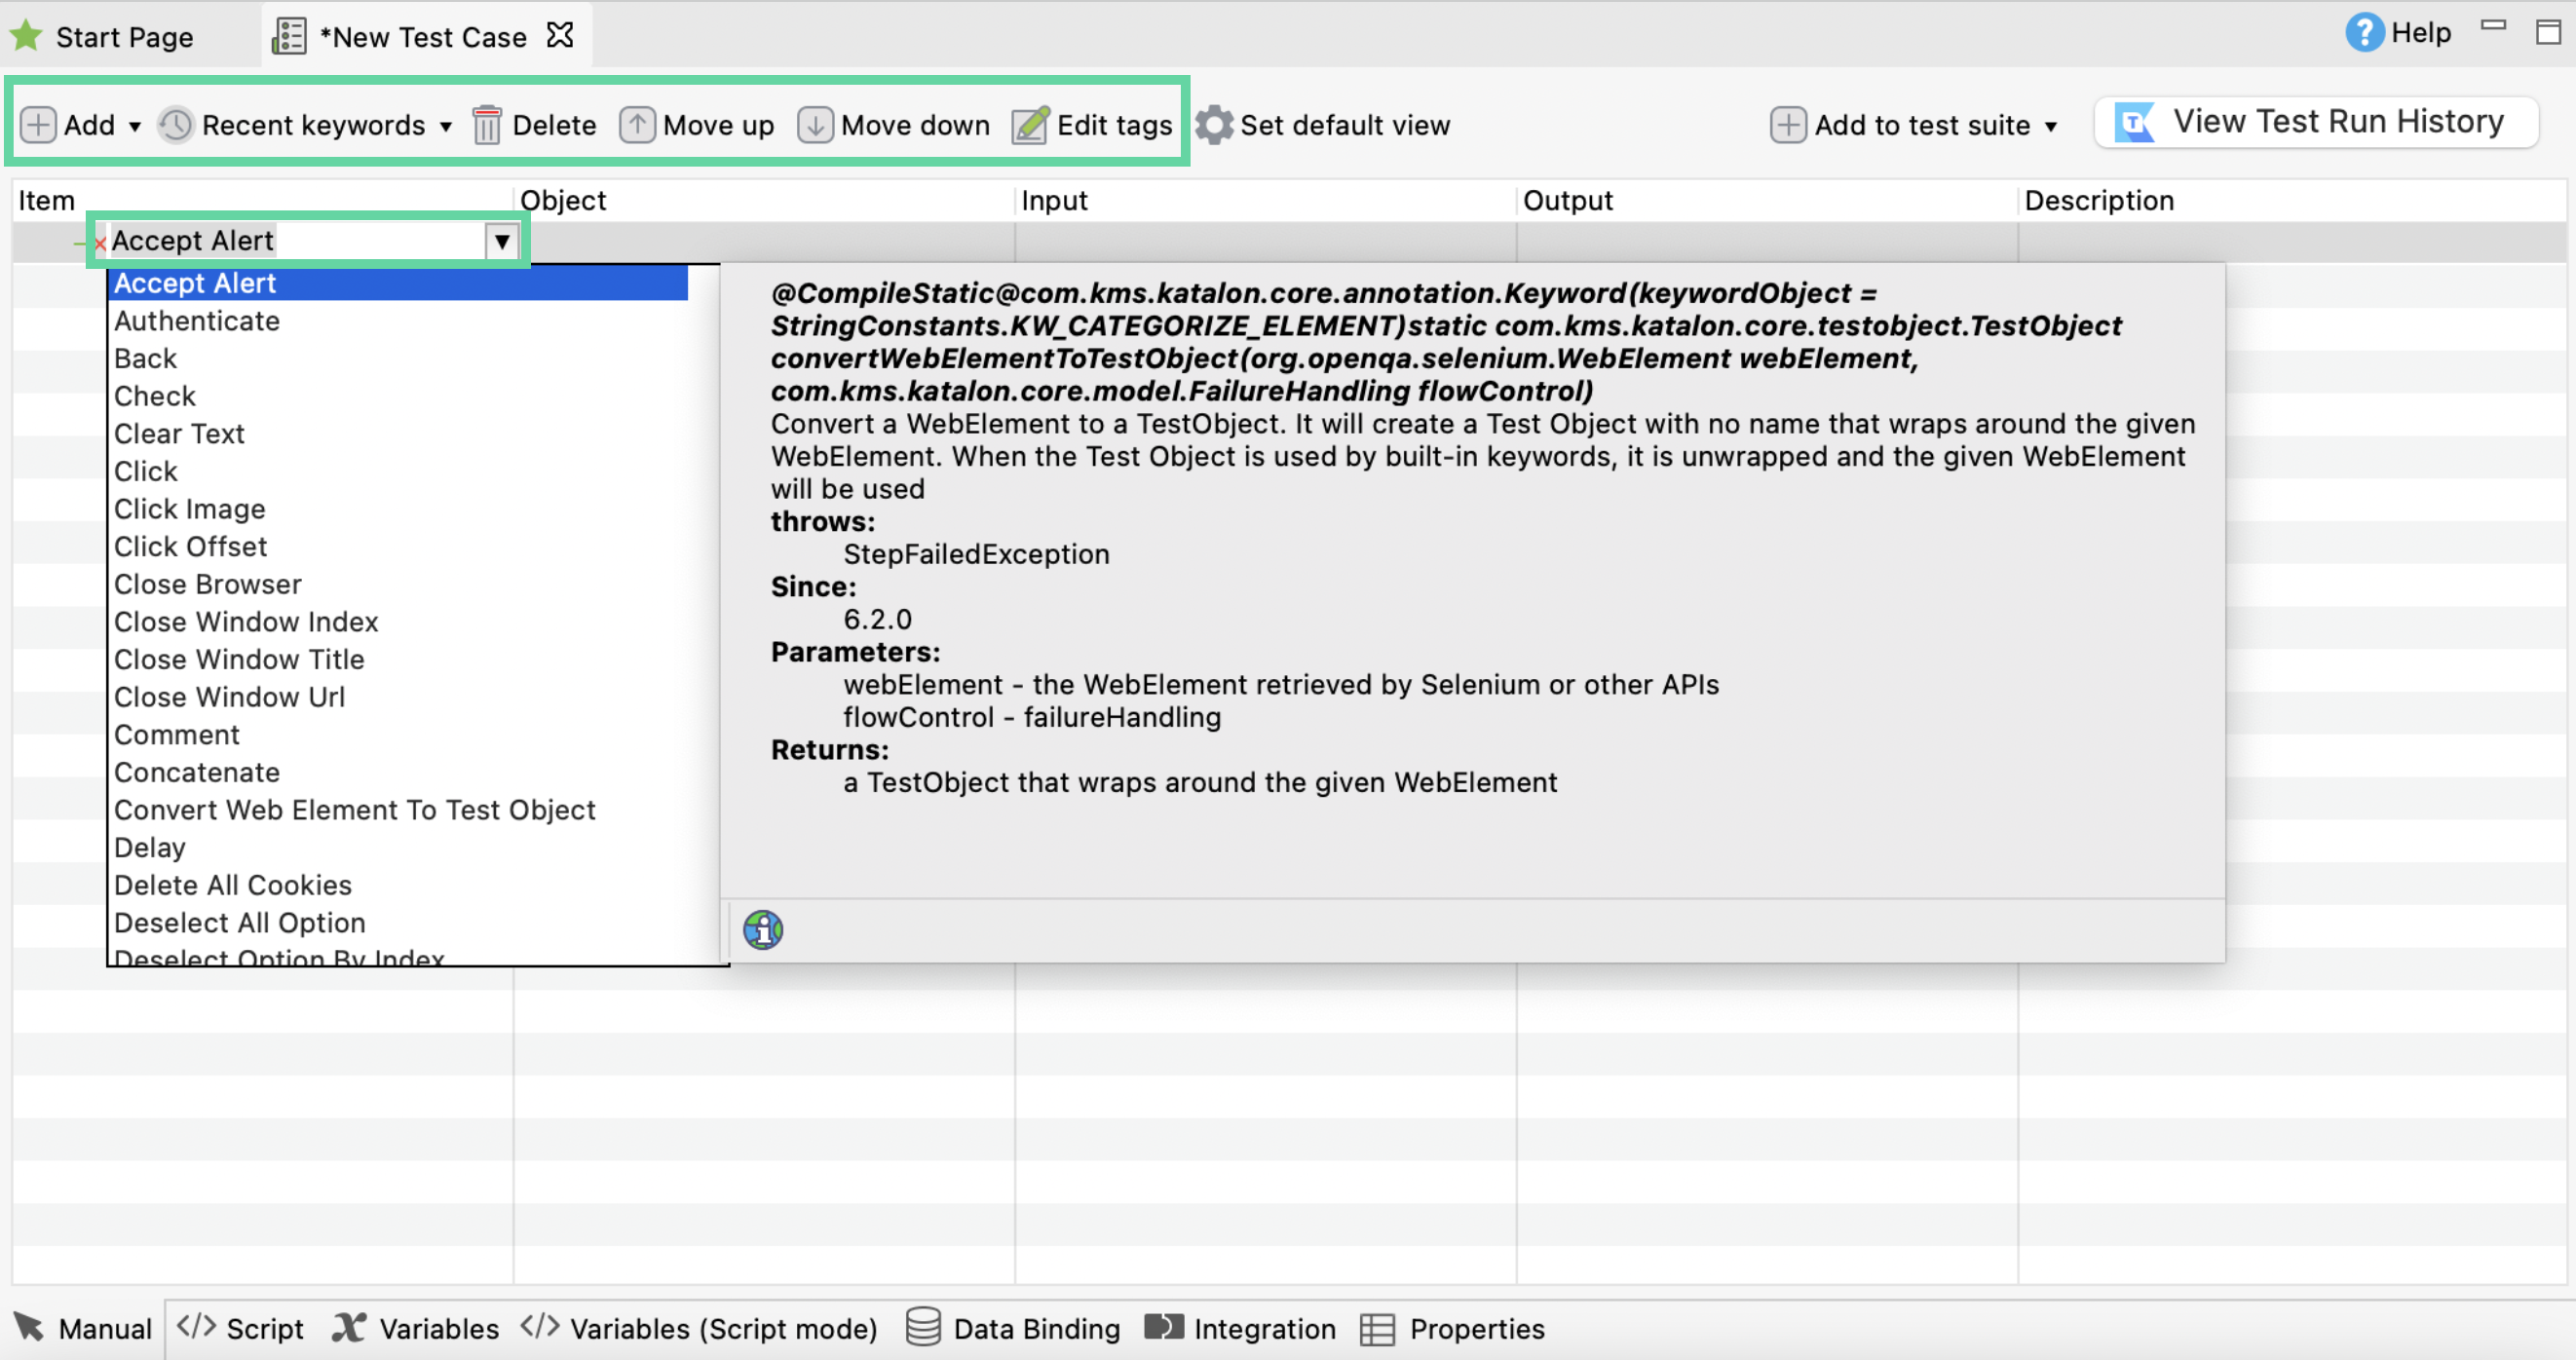
In the Script tab, your recorded interactions have been converted into Groovy script. You can use the ContentAssist function to add new or edit the test case.
For reference, a test step is written as follows:keywordtype.keywordaction('parameter')For mobile tests, we have mobile built-in keywords that you can access by typing the group keyword first (
Mobile.) and then selecting from the dropdown your selected action. The ContentAssist function also provides a tooltip that can provide context on how to write the parameters needed to execute the test step successfully, as shown below: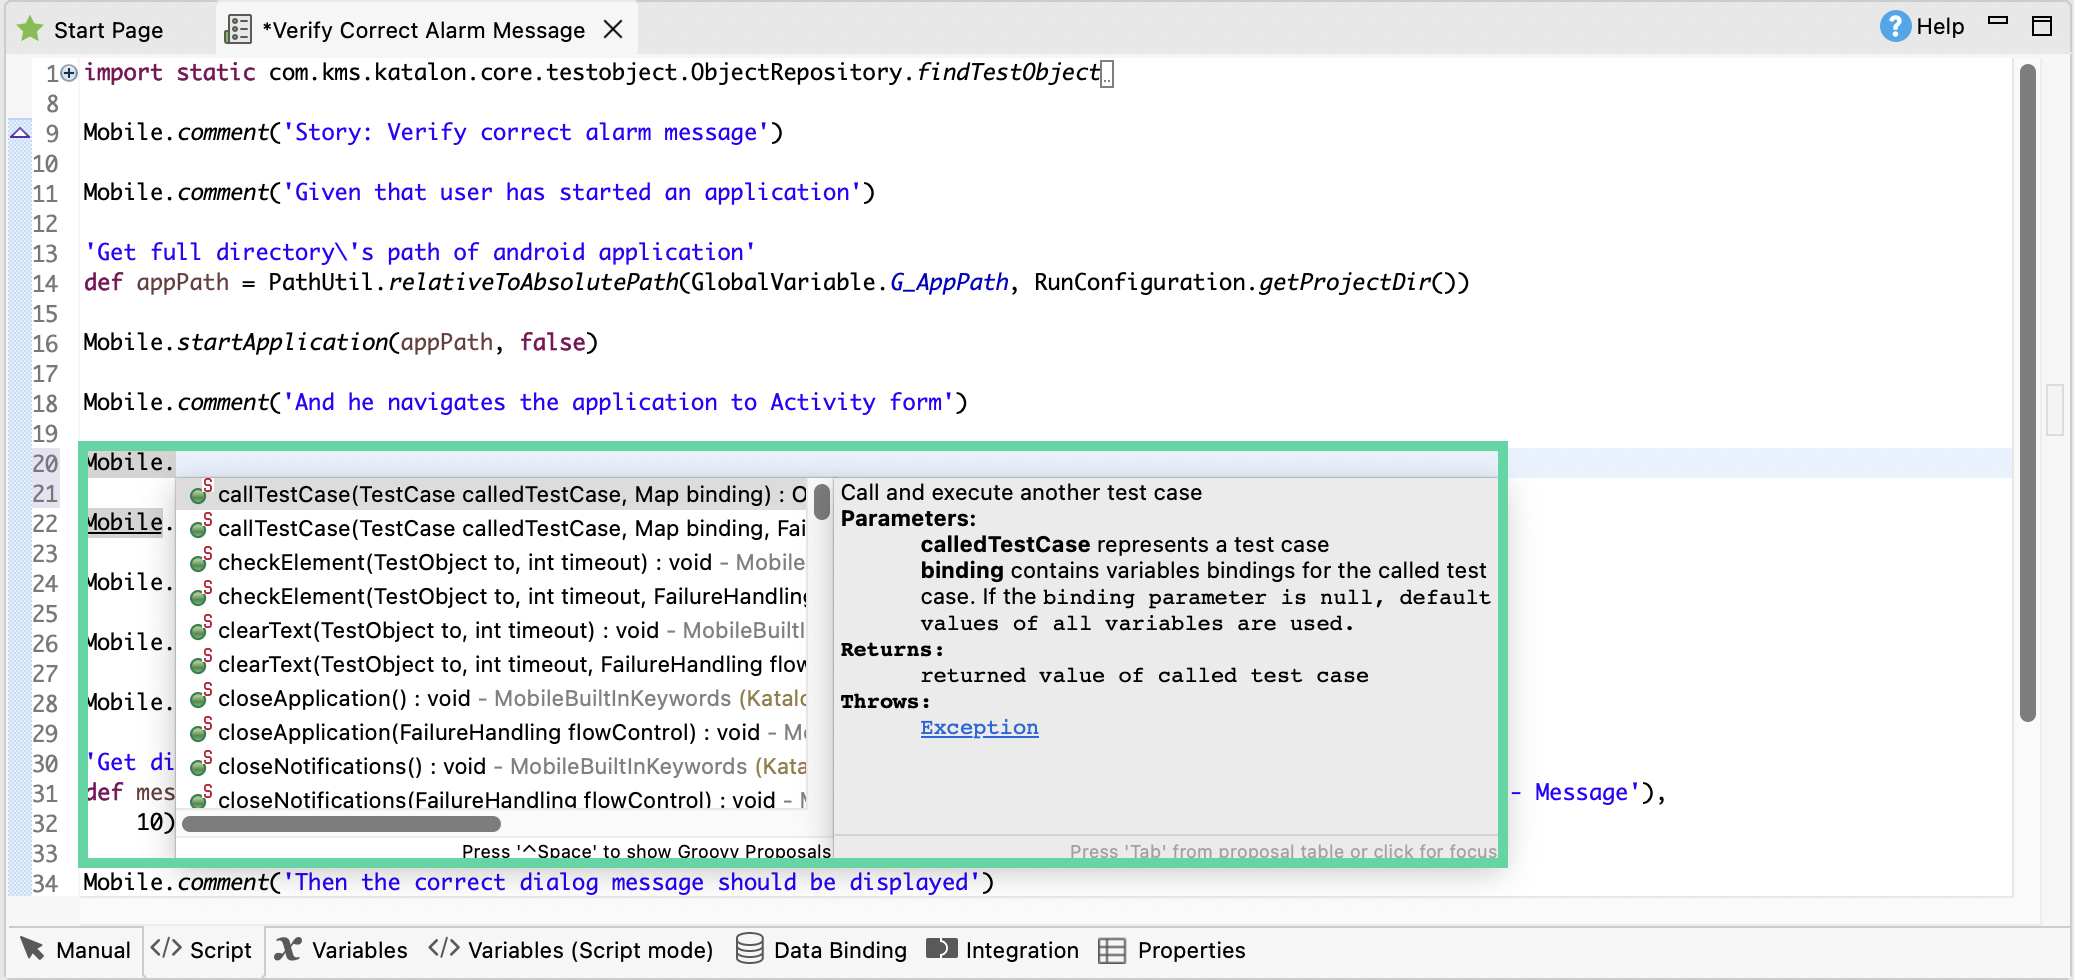
Your changes are automatically saved.
You can run a playback of your new mobile test case and verify if the test steps are accurate and in order. Here's how:- Select the test case where you saved the recorded actions.
On the main toolbar, select Android on the drop-down list next to Run.
In the displayed Android Devices dialog, select your preferred device and then click OK.
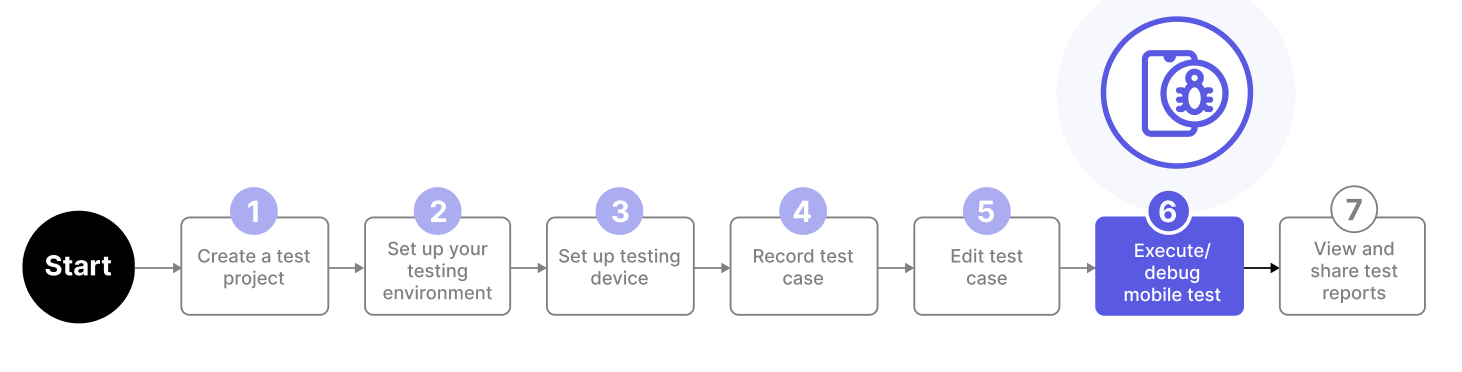
Execute and debug mobile test case
Learn how to execute and debug your newly recorded mobile test case.
Execute and debug your mobile test case is part of a repeatable process, alongside edit test case. This cyclical approach is essential because it ensures continuous improvement and optimization of your test cases. Regularly executing and debugging test cases allows for the identification and resolution of errors, while editing test cases helps to adapt and refine testing strategies to align with evolving application requirements and user feedback.
Refer to the following topics for more information on how to perform the following processes:
Make sure that you have configured your preferred execution settings. See: Configure execution settings.
Debug a test case in Katalon Studio - There are at least four solutions how:
Recipe: Create and run an iOS test case in Katalon Studio
This tutorial demonstrates how to create test cases for iOS with Katalon Studio using the Mobile Record Utility, then run the recorded test cases using a sample test case scenario.
- Launch the Coffee Timer application on the device.
- Tap on Green Tea.
- Tap on Start.
- Tap on Stop.
You can download the sample project as a .zip file here: iOS Mobile Tests.
Requirements
Set up your real iOS device. To set up a real iOS device, you can refer to this topic for more information: Set up your real iOS device.
Create a new project
To create a new project, go to .
Fill in the displayed New Project dialog as shown below:
Name The project name. In this example, we chose the name iOS.Type The project type. In this example, we chose the Mobile project type. Project This section allows you to choose a sample project. If you don't want to open a sample project, select the Blank option. In this example, we choose the Sample iOS Mobile Tests Project project. Repository URL The GitHub repository URL. After choosing the sample project, Katalon automatically fills in the URL. Location The save location of your project. 
After filling in the project details, click OK. A new mobile project opens.
Record a new test case
-
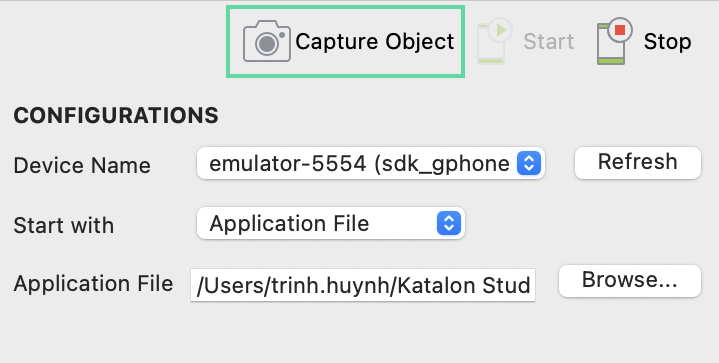
On the main toolbar, click Record Mobile and select your device type. For our example, we choose the iOS Devices option.

-
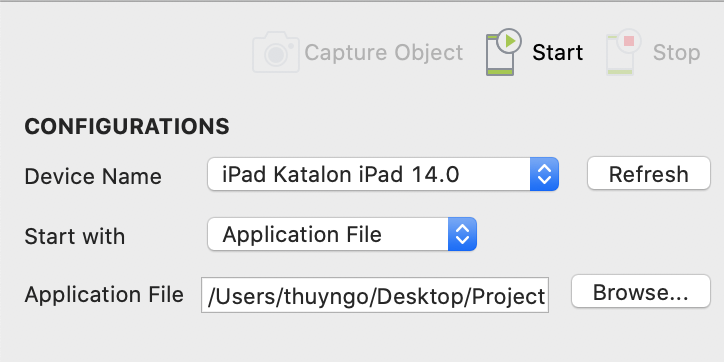
In the displayed Mobile Recorder dialog, specify the information in the Configurations section:

Device Name Select your connected iOS device. In the example above, we selected iPad Katalon iPad 14.0.Start with Select Application File in the dropdown list. Application File For your real iOS device: browse and select
Coffee Timer.ipa. -
Click Start to begin recording your test case. After the application under test (AUT) is launched, you can now see:
- Device View: this section displays the start page of your AUT. You can interact with the Device View section the same way as in a real iOS device.
- All Objects: this section displays all objects of the current view in the Device View section.
For our example, we see the start page of the Coffee Timer application in the Device View section and its object properties in the All Objects section.
-
In the Device View section, we click Green Tea. Katalon Studio correspondingly selects the Green Tea object in the All Objects section.

-
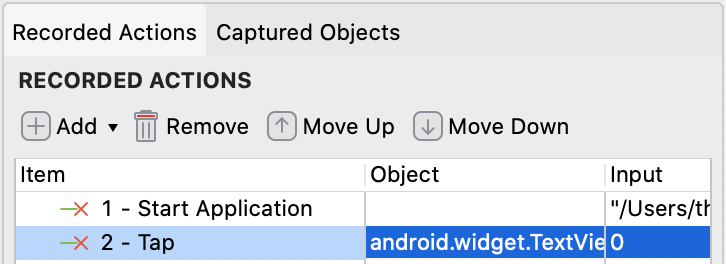
Once Green Tea is selected, we click the Tap action in the Available Action section, we now see:
- The Device View section displays the countdown for Green Tea.
-
Katalon automatically adds the Tap action to the list of recorded steps in the Recorded Actions tab.

-
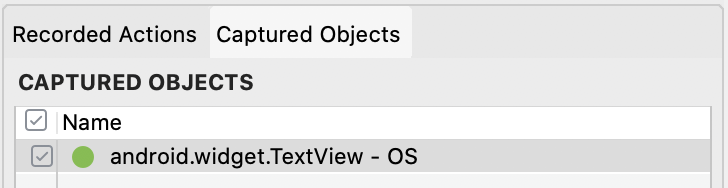
Katalon also captures the Green Tea object properties and includes it in the Captured Objects tab. To learn more about mobile object properties, you can refer to this document: Manage Mobile Test Objects.

Note:- If you prefer another locator strategy, you can select your preferred one, then click Generate to generate a new locator. You can also check if your newly updated locator can detect the target object correctly by clicking Highlight.

-
Similarly, click Start in the Device View section, then click Tap in the Available Actions section.
Katalon automatically adds another Tap action to the list of Recorded Actions and the Start object properties in the Captured Objects tab.

-
Next, click Stop in the Device View section, then click Tap in the Available Actions section.
Katalon automatically adds another Tap action to the list of Recorded Actions and the Stop object properties in the Captured Objects tab.

-
Click Save script. An open dialog asks you to save captured objects into the Object Repository of Katalon Studio. You can create a new folder or select an existing folder in Object Repository, then click OK.
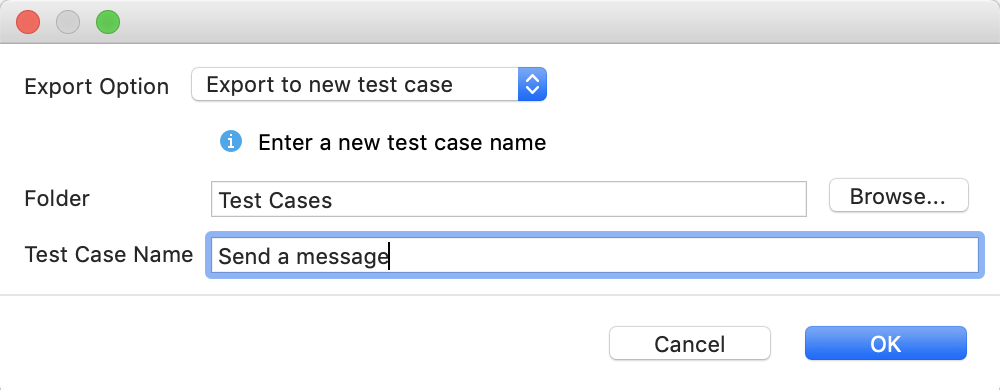
- A dialog opens, providing you three options to save your recorded test:
Export to new test case Export the recorded test steps to a new test case. Append to test case Add the recorded test steps to an existing test case. Overwrite test case Replace an existing test case with the recorded test case.  Note:
Note:- Appium known limitation: You may get incorrect object highlighting when rotating the device to landscape view.
- Workaround: After rotating, you need to click on the Capture Object button to refresh the All Objects tree, then the highlighting will work normally.
Run the recorded test case
To run the recorded steps, follow these steps:
- Select the test case where you saved the recorded actions.
-
On the main toolbar, select iOS in the dropdown list next to the Run icon.

-
In the displayed iOS Devices dialog, select an iOS device then click OK.

Katalon Studio executes the iOS test with the recorded steps accordingly.
import static com.kms.katalon.core.checkpoint.CheckpointFactory.findCheckpoint
import static com.kms.katalon.core.testcase.TestCaseFactory.findTestCase
import static com.kms.katalon.core.testdata.TestDataFactory.findTestData
import static com.kms.katalon.core.testobject.ObjectRepository.findTestObject
import static com.kms.katalon.core.testobject.ObjectRepository.findWindowsObject
import com.kms.katalon.core.checkpoint.Checkpoint as Checkpoint
import com.kms.katalon.core.cucumber.keyword.CucumberBuiltinKeywords as CucumberKW
import com.kms.katalon.core.mobile.keyword.MobileBuiltInKeywords as Mobile
import com.kms.katalon.core.model.FailureHandling as FailureHandling
import com.kms.katalon.core.testcase.TestCase as TestCase
import com.kms.katalon.core.testdata.TestData as TestData
import com.kms.katalon.core.testobject.TestObject as TestObject
import com.kms.katalon.core.webservice.keyword.WSBuiltInKeywords as WS
import com.kms.katalon.core.webui.keyword.WebUiBuiltInKeywords as WebUI
import com.kms.katalon.core.windows.keyword.WindowsBuiltinKeywords as Windows
import internal.GlobalVariable as GlobalVariable
import org.openqa.selenium.Keys as Keys

Mobile.startApplication('/Users/thuyngo/Desktop/Project/iOS/App/Coffee Timer 2021-01-27 16-49-52/Apps/Coffee Timer.ipa', true)

Mobile.tap(findTestObject('Object Repository/XCUIElementTypeStaticText - Green Tea (1)'), 0)

Mobile.tap(findTestObject('Object Repository/XCUIElementTypeButton - Start (2)'), 0)

Mobile.tap(findTestObject('Object Repository/XCUIElementTypeButton - Stop (1)'), 0)

Mobile.closeApplication()