Test using mobile keywords
Katalon Studio supports keywords-driven testing where a test case consist of keywords representing actions of users on the mobile Application Under Test (AUT).
What is keyword-driven testing?
Keyword-driven testing is a software testing methodology that uses keywords to represent actions to be performed on a mobile application. You create mobile test cases by combining these predefined keywords, which represent specific supported actions like clicking a button or entering text. This approach allows users to create readable and maintainable test scripts without needing deep programming knowledge.
- Launch the Coffee Timer application on the device.
- Tap on Green Tea.
- Tap on Start.
- Tap on Stop.
| Test Step | Keyword | Element |
|---|---|---|
| Launch the Coffee Timer application on the iOS device. | StartApplication | Coffee Timer application |
| Tap on Green Tea. | Tap | Green Tea object |
| Tap on Start. | Tap | Start object |
| Tap on Stop. | Tap | Stop object |
Create test steps using mobile keywords
Refer to this section for the list of mobile keywords that are currently supported in Katalon Studio.
Mobile keywords typically cover a wide range of common actions performed on mobile devices, such as tapping, swiping, entering text, and verifying the presence of elements. By using these keywords, testers can create scripts that emulate user interactions with an app without needing to write detailed code.
Mobile keywords
Refer to the following list of mobile keywords you can use in adding or editing the test steps for your mobile test case by engaging the Device View and Available Actions sections and the Recorded Actions tab:
Generate test steps in Katalon Studio manual view
The tutorial below gives you step-by-step instructions to create test steps in Katalon Studio manual view.
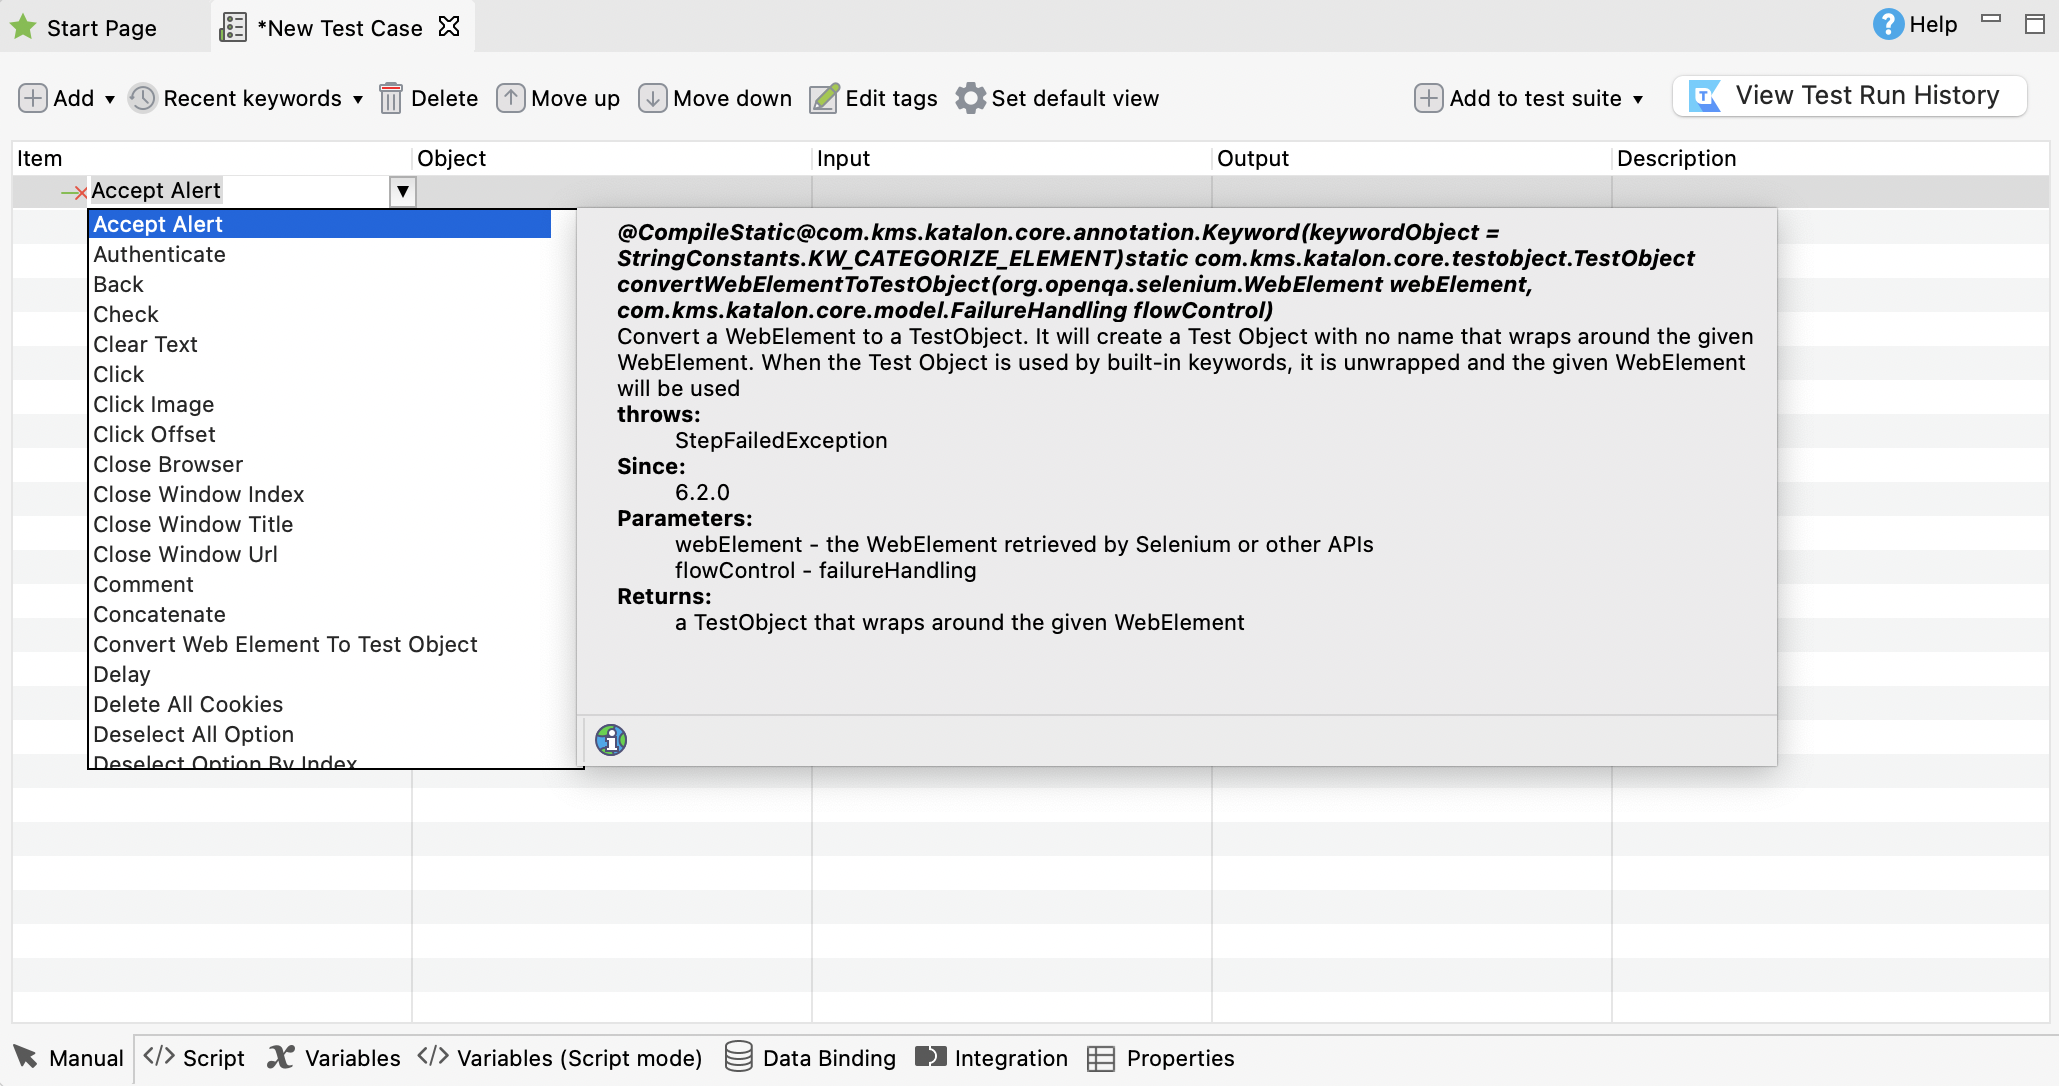
- In the newly created test step, type a keyword, or click on the dropdown button to select a keyword. Add an Object, Input, Output, and Description for that test step, if any.
 Note:
Note:To learn more about a keyword in Katalon Studio, hover over each keyword to see its description. You can also use the search bar on our Katalon Studio documentation page to find the detailed information and usage example of each keyword.
You can also add a Statement or Call Test Case as a test step. To learn how Statement and Call Test Case works, see Statement and Call Test Case. - To execute a test case, from the main toolbar, click Run.
Recent keywords
Recent objects and object folders
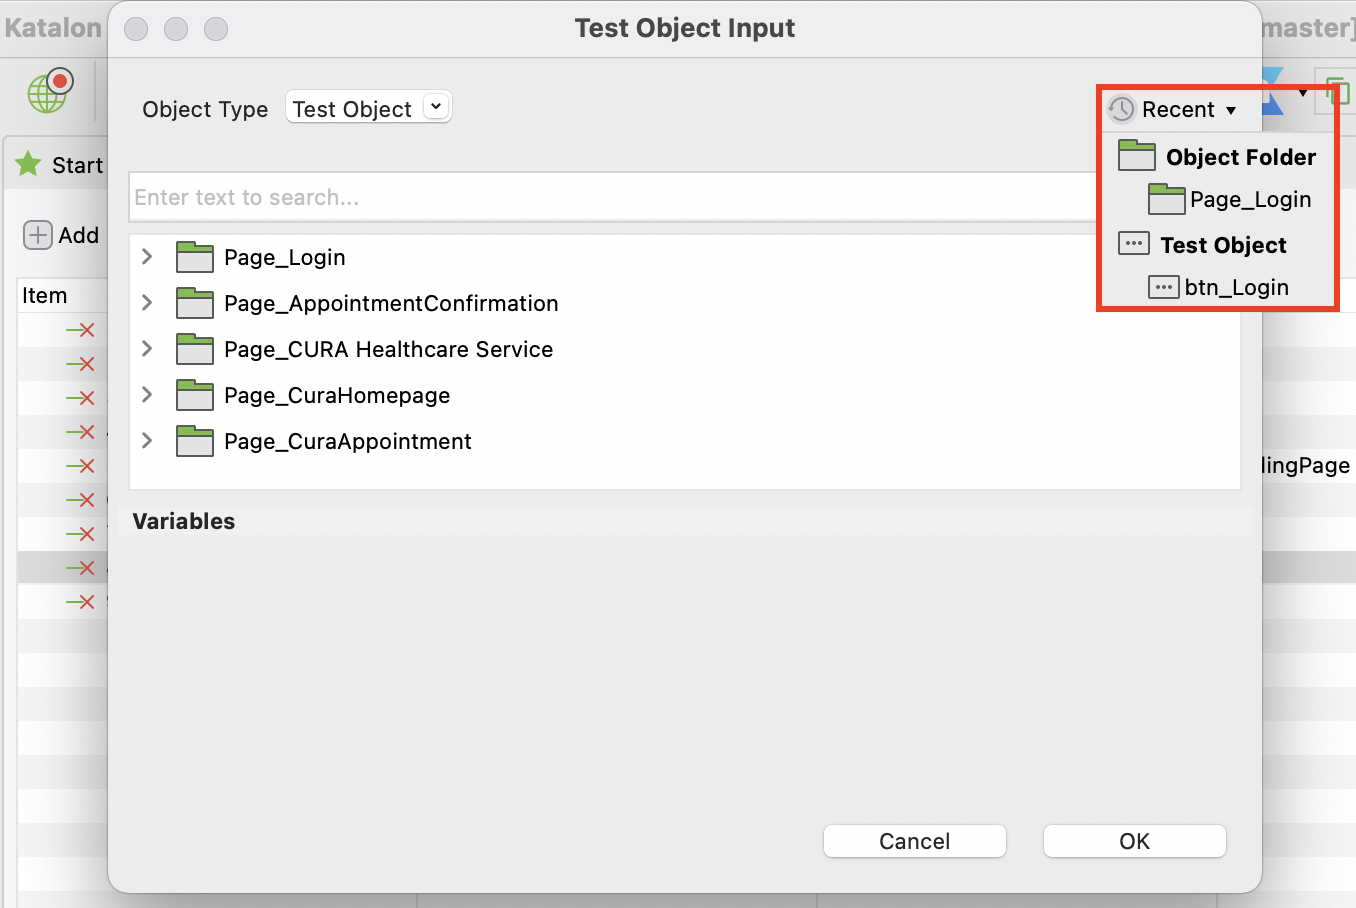
The recent list will have two sections: Object Folder and Test Object.
- Test Object: Displays the names of the last 5 selected objects.
- Object Folder: Displays the names of 5 folders that contains any recently used objects.
Usage example: Create a sample test case in manual view
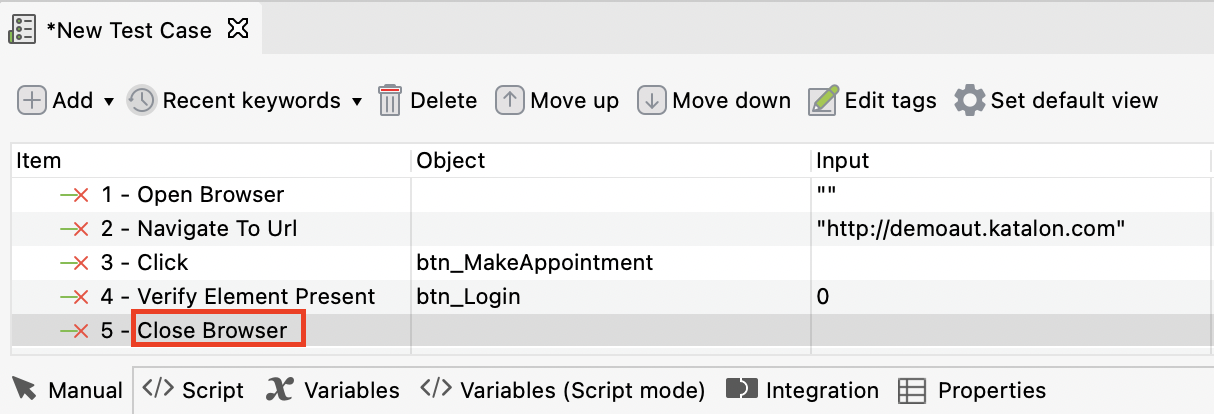
In our example, we use a sample test case with the steps as below:
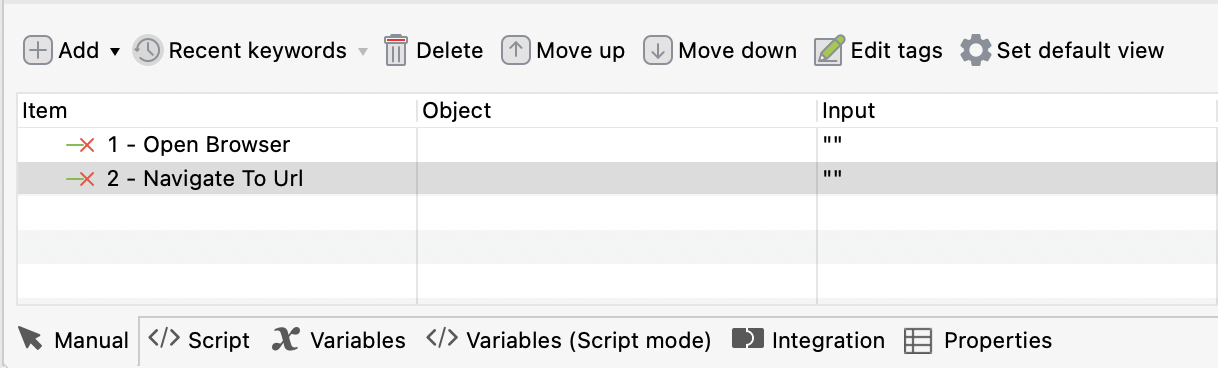
- Open the browser.
- Navigate to a website.
- Click on a specific control.
- Validate if a control exists on the page.
- Close the browser.
- Open the browser: Select the Open Browser keyword. This keyword opens a browser and navigates to the specified URL if provided.Note:
You can view the description of a keyword by hover your mouse over that keyword.

- Navigate to a website: Add the Navigate To Url keyword. This keyword will navigate to a specified URL. Double click on the Input cell to provide additional data (parameters) for the keyword.
The Input dialog displays.
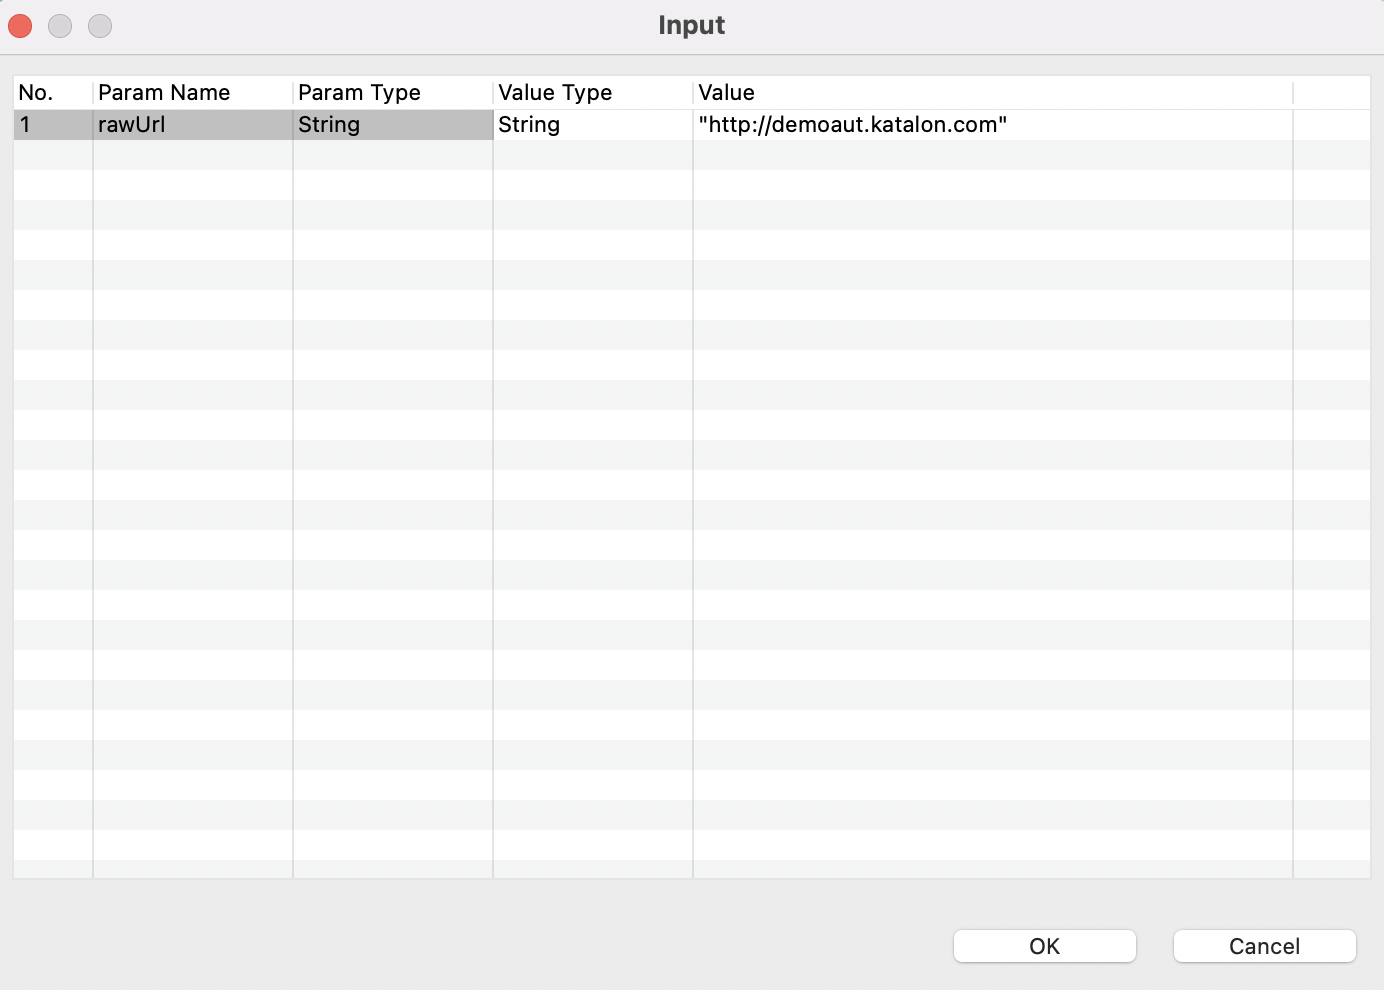 For now, enter the URL of Katalon demo AUT: http://demoaut.katalon.com into the Value column, then click OK.
Field Description No The number of parameter for the selected keyword. Param Name The name of the parameter. Param Type The required data type for the parameter. Value Type The type of your input value (e.g. strings, variables, data sources) Value The input value for this parameter.
The input value can be varied based on Value Type. Refer to Value Types in Katalon for more details.
- Click on a specific control: Add the Click keyword. This keyword represents the click action on a given object. Double click on the Object cell and provide the object for the keyword.
- Validate if a control exists on the page: All captured objects in Object Repository are displayed in the Test Object Input dialog. Select your object then click OK. To learn how to capture objects, see Spy Object.
 Add the Verify Element Present keyword. This keyword validates if a certain object is displayed on the executing browser. Similar to the previous step, you need to specify the object to be used with this keyword.
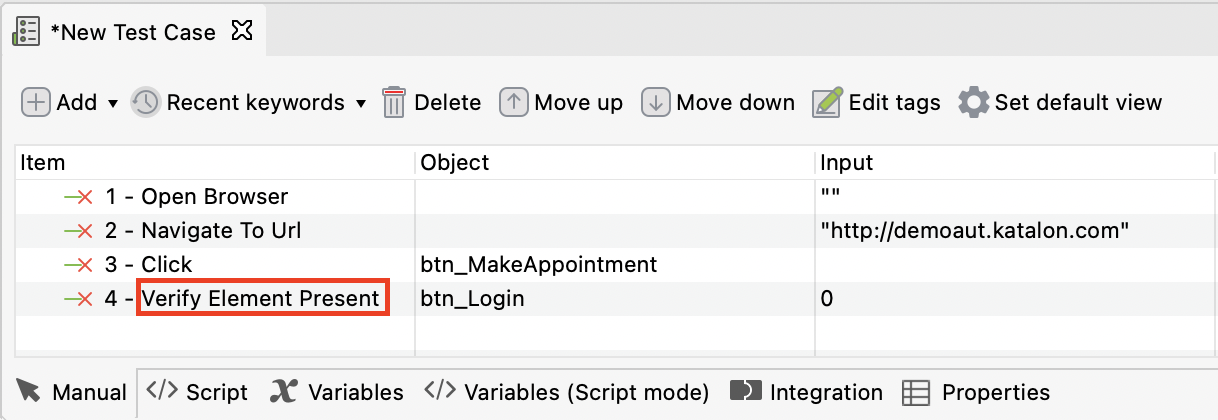
- Close the browser: Add the Close Browser keyword and save your test case.
Generate test steps in Katalon Studio script view
Once a new test case is created, you can switch to the Script view using the corresponding tab at the bottom of the test case editor. Test steps specified in the Manual view are translated into a Groovy script in Script view.
By using the import statement in a test script, you can reference to the classes you wish to use. Expand the import section to see all default imported classes by Katalon Studio. The name after 'as' in each import statement is an alias for the class. You can change the alias for each class. These classes are necessary for composing a test script.
Use built-in keywords in script view
The following API docs may prove useful when working in script view:
| Class | Description |
|---|---|
| Built-in Keywords | List of common built-in keywords |
| WebUI Built-in Keywords | List of Web UI built-in keywords |
| Web Service Built-in Keywords | List of Web Service built-in keywords |
| Mobile Built-in Keywords | List of Mobile built-in keywords |
| Windows Built-in Keywords | List of Windows built-in keywords |
WebUI. for Web UI or WS. for Web Service.
Refer to an object in script view
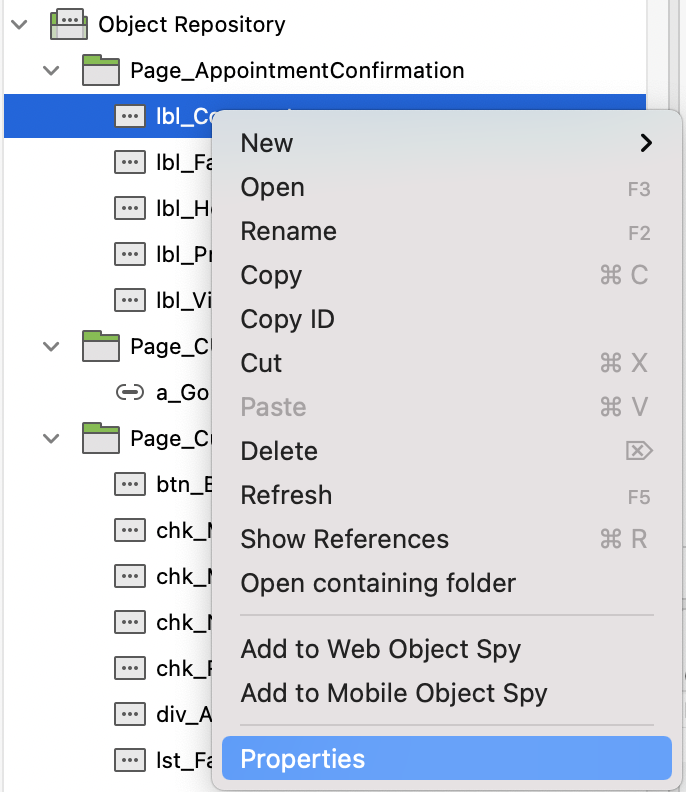
- You can find any object ID from its Properties dialog. Go to Tests Explorer > Object Repository. Right-click on an object and choose Properties.
- To refer to an object in Object Repository, use
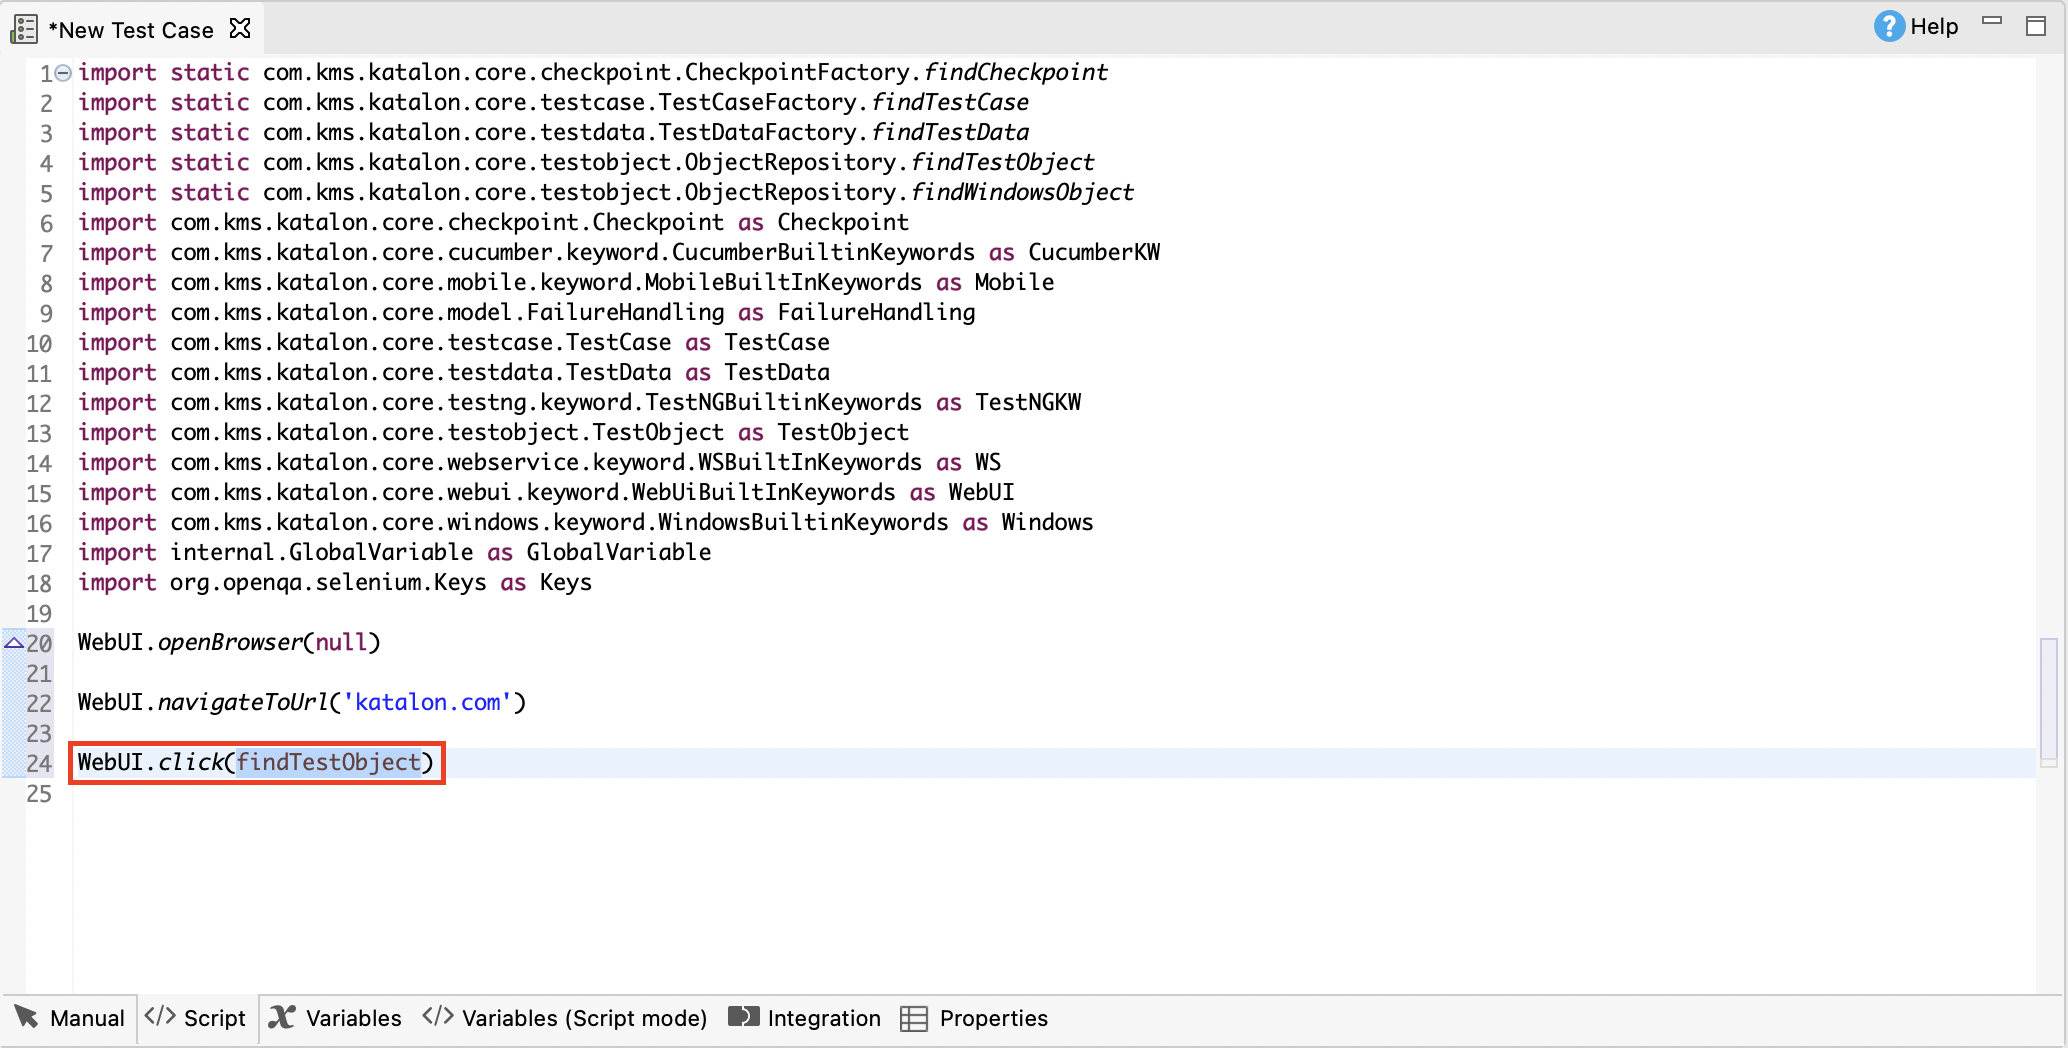
findTestObject('{Object ID}'), in which Object ID is the ID of that object in Katalon Studio. You can also drag and drop the object into the test case editor to generate this syntax.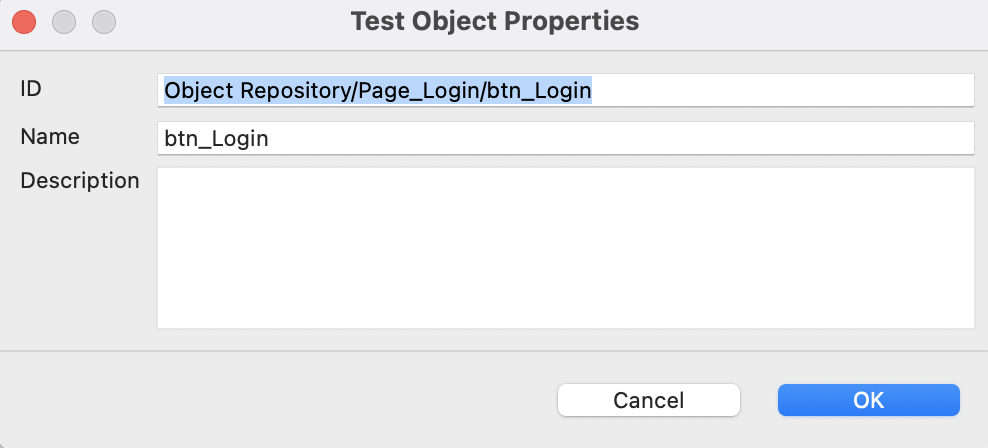
Usage example: Generate test steps in script view
In our example, we use a sample test case with the steps as below:
- Open the browser.
- Navigate to a website.
- Click on a specific control.
- Validate if a control exists on the page.
- Close the browser.
In this scenario, you will create a Web application test script to make use of the WebUI built-in keywords. Follow these steps to automate the above test scenario in Script view:
- Open the browser: Type
WebUI.and select the Open Browser keyword. This keyword opens a browser and navigates to the specified URL if it is provided. Selected keywords will have their description displayed along for reference.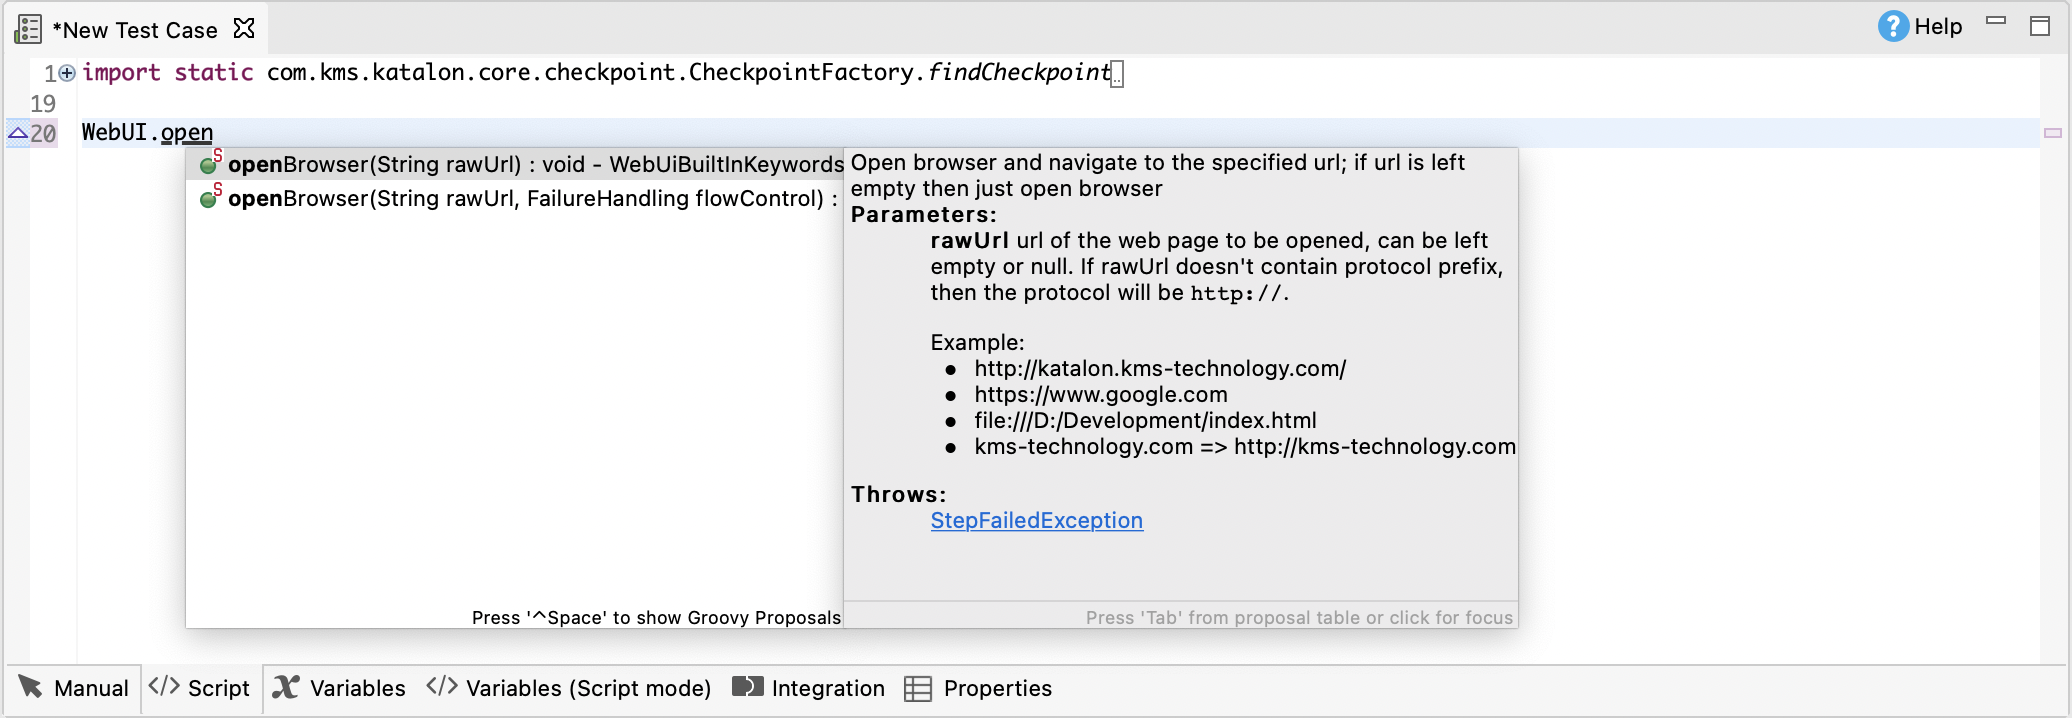
- Navigate to a website: Enter the Navigate To Url keyword. This keyword navigates to a specified URL. For now, enter the URL of Katalon Studio: http://katalon.com/ as the value of the parameter.
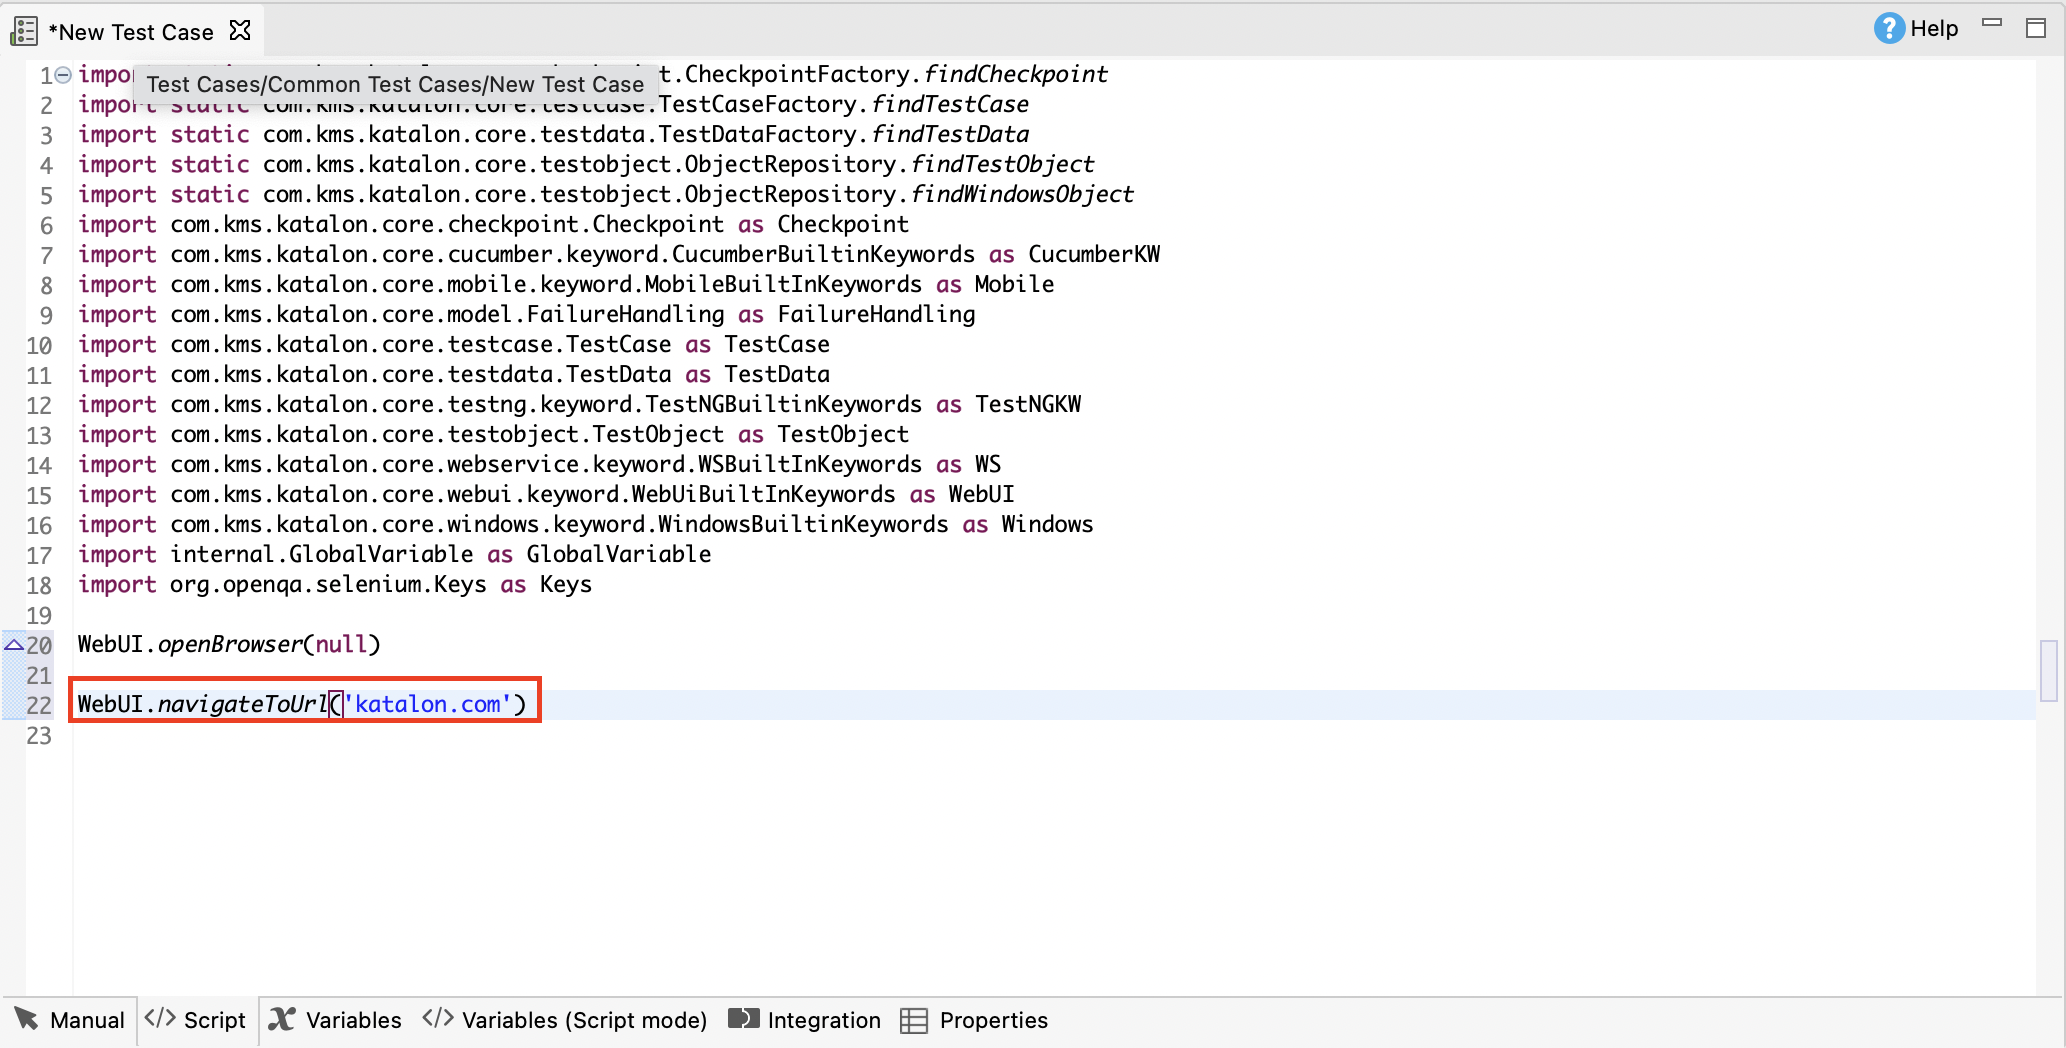
- Click on a specific control: Enter the Click keyword. This keyword represents the click action on a given object. You need to specify an object for this action.
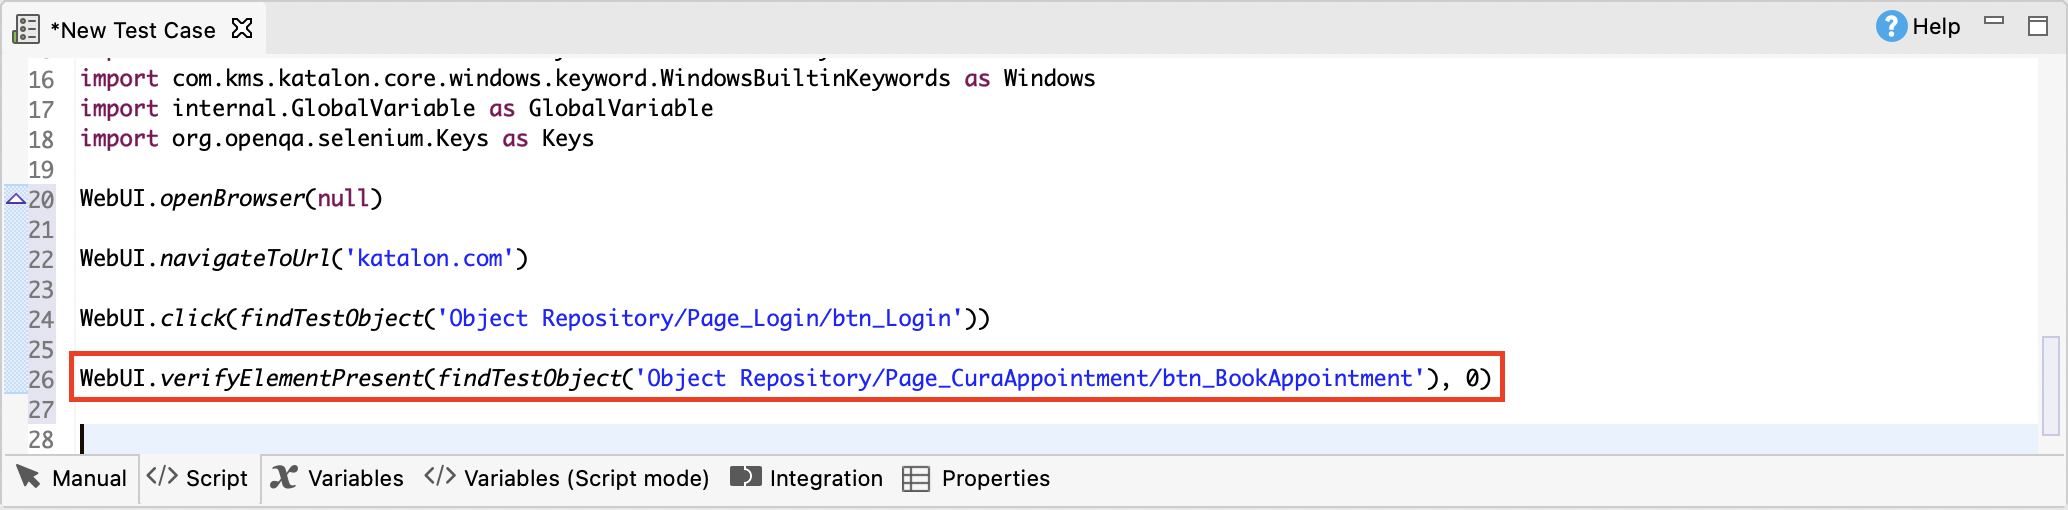
- Validate if a control exists on the page: Enter the Verify Element Present keyword. This keyword validates if a certain object is displayed on the executing browser. Similar to the previous step, you need to specify the object to be used with this keyword.
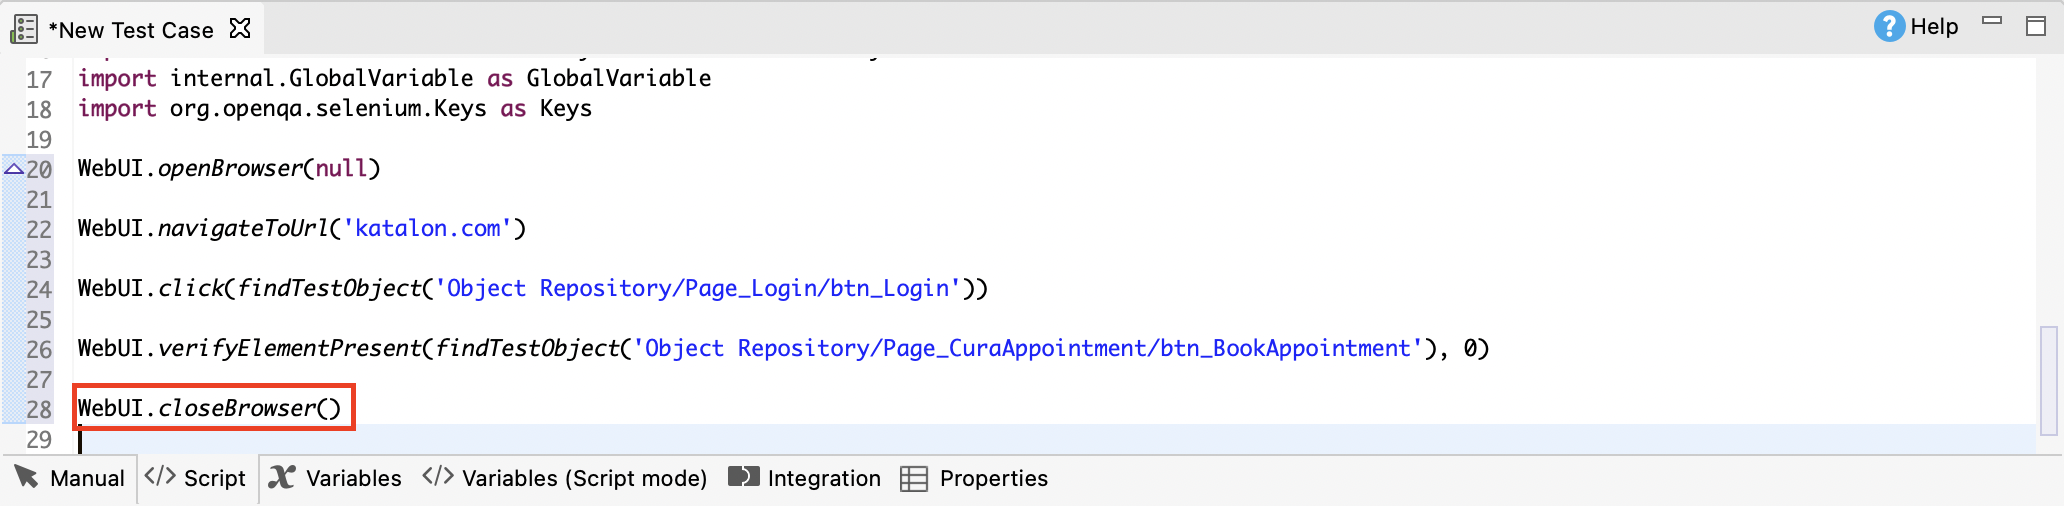
- Close the browser: Add the Close Browser keyword and save your test case.
How to perform multi-touch actions in a mobile app in Katalon Studio
Multi-touch action often appears in gaming applications. This tutorial shows you how to perform a multi-touch action at four different points simultaneously. We will use the MultiTouch Tester app to demonstrate automation testing on this typical behavior.
First, download:

In Manual Mode
- Select Start Application from mobile keyword and click on Input.
- The Input dialog window is displayed. In parameter name appFile, select Value Type as Variable and in Value passing the variable name as path.

- Add Wait For Element Present as a new parameter.
- Initialize Katalon Mobile Driver to the Appium Driver.
- Call the 'Get Device Height' method and capture the height. Then store it in a variable 'device_Height'.
- Call the 'Get Device Width' method and capture the width. Then store it in a variable 'device_Width'.
- Add a binary statement and get X, Y Coordinates for touch action 1 (top left side).
- Repeat step 6 for touch action 2 (top right side), touch action 3 (bottom left side), and touch action 4 (bottom right side).
- Create an object of
MultiTouchActionclass. - Set all four touch actions on given X, Y Coordinates of the screen.
- Add a method call statement and press first action with X, Y coordinates and wait for 5 seconds then release. Repeat for the three other actions.
- The final step is to add a method call statement and generate a multi-touch action chain.

As demonstrated in the step-by-step guide above, there are repeated steps that would be more efficiently created in Script Mode. We recommend utilizing this feature to quickly automate the test scenario and easily manage your test scripts. See:
In Script Mode
Refer to the steps in the following topic for the test scenario: In Manual Mode.
Your test script should look like this:
import static com.kms.katalon.core.testobject.ObjectRepository.findTestObject

import java.time.Duration

import com.kms.katalon.core.configuration.RunConfiguration as RunConfiguration
import com.kms.katalon.core.mobile.keyword.MobileBuiltInKeywords as Mobile
import com.kms.katalon.core.mobile.keyword.internal.MobileDriverFactory as MobileDriverFactory

import io.appium.java_client.AppiumDriver as AppiumDriver
import io.appium.java_client.MultiTouchAction as MultiTouchAction
import io.appium.java_client.TouchAction as TouchAction
import io.appium.java_client.touch.WaitOptions
import io.appium.java_client.touch.offset.PointOption


'Path of the Apk File Store in path variable'
def path = RunConfiguration.getProjectDir() + '/Data Files/MultiTouchTester.apk'

'Start the application'
Mobile.startApplication(path, false)

'Wait for Element Visible "Touch Me"'
Mobile.waitForElementPresent(findTestObject('MultiTouchTester/text_Touch Me'), 30)

'Verify Element Visible "Touch Me"'
Mobile.verifyElementVisible(findTestObject('MultiTouchTester/text_Touch Me'), 30)

'Initializing Katalon Mobile Driver to Appium Driver'
AppiumDriver<?> driver = MobileDriverFactory.getDriver()

'Get Device Height and store to "device_Height" variable'
device_Height = Mobile.getDeviceHeight()

'Get Device Width and store to "device_Width" variable'
device_Width = Mobile.getDeviceWidth()

'Get X1 coordinate of touchpoint 1 (Top Left Side)'
int X1 = device_Width * 0.20

'Get Y1 coordinate of touch action 1 (Top Left Side)'
int Y1 = device_Height * 0.20

'Get X2 coordinate of touchpoint 2 (Top Right Side)'
int X2 = device_Width * 0.80

'Get Y2 coordinate of touchpoint 2 (Top Right Side)'
int Y2 = device_Height * 0.20

'Get X3 coordinate of touchpoint 3 (Bottom Left Side)'
int X3 = device_Width * 0.20

'Get Y3 coordinate of touchpoint 3 (Bottom Left Side)'
int Y3 = device_Height * 0.80

'Get X4 coordinate of touchpoint 4 (Bottom Right Side)'
int X4 = device_Width * 0.80

'Get Y4 coordinate of touchpoint 4 (Bottom Right Side)'
int Y4 = device_Height * 0.80

'Create object to "MultiTouchAction" class '
MultiTouchAction multiTouch = new MultiTouchAction(driver)

'Create First action Object to "TouchAction" class'
TouchAction action1 = new TouchAction(driver)

'Create Second action Object to "TouchAction" class'
TouchAction action2 = new TouchAction(driver)

'Create Third action Object to "TouchAction" class'
TouchAction action3 = new TouchAction(driver)

'Create Fourth action Object to "TouchAction" class'
TouchAction action4 = new TouchAction(driver)

'Press First action with x y coordinates wait 5 Seconds then release'
action1.press(PointOption.point(X1, Y1)).waitAction(WaitOptions.waitOptions(Duration.ofMillis(5000))).release()

'Press Second action with x y coordinates wait 5 Seconds then release'
action2.press(PointOption.point(X2, Y2)).waitAction(WaitOptions.waitOptions(Duration.ofMillis(5000))).release()

'Press Third action with x y coordinates wait 5 Seconds then release'
action3.press(PointOption.point(X3, Y3)).waitAction(WaitOptions.waitOptions(Duration.ofMillis(5000))).release()

'Press Fourth action with x y coordinates wait 5 Seconds then release'
action4.press(PointOption.point(X4, Y4)).waitAction(WaitOptions.waitOptions(Duration.ofMillis(5000))).release()

'Multi Touch Object to add Multiple touch actions as per you need'
multiTouch.add(action1).add(action2).add(action3).add(action4).perform()
Performing Pinch to Zoom In Action in Katalon Studio
This tutorial is to test the Pinch To Zoom In action in the mobile app. The app used for this demonstration can be downloaded here. We will be using Android O.S for this tutorial, so please make sure that your Android device API is greater than 18.
Scenario
In the screenshot below, we want to zoom into "Hello World" and verify the zoom-in action.

Manual Mode
- Step 1: Select Start Application from mobile keyword and click on Input it will open a window, where for appFile select Value Type as
Variableand in Value, pass the variable name aspathand click OK.

- Step 2: Add a Wait For Element Present item for API Demos to show up.
- Step 3: Call 'Scroll To Text' from mobile keyword, pass
Viewsas Input. 'Scroll To Text' acceptsStringtype parameter (Text of the element to scroll to).

- Step 4: Call 'Tap' method and pass the object of
Views. - Step 5: Select Scroll To Text keyword and pass the
Tabstext.

- Step 6: Call 'Tap' method and pass the object of
WebView. - Step 7: Add wait commands to wait for
Hello worldlink to be visible. - Step 8: Call 'Get Element Height' method and capture the
Hello Worldheight to store it in a variable named 'ele_Height'. - Step 9: Call 'Get Element Width' method and capture the of
Hello Worldelement width to store it in 'ele_Width'. - Step 10: Add 'Pinch To Zoom In At Position' method from mobile keyword list and pass the following values in:
eleHeight,eleWidth,Offset value.

- Step 11: After zooming in, we need to verify that element has been zoomed. Thus, we need to re-capture the element Height and Width.
- Step 12: After zooming the element height and width should be greater than the existing height and width in the test. By using 'Verify Greater Than' method, we can validate the element height and width.

As you can see from the step-by-step guide above, there are repeated steps that will be easier to create in Script Mode. Thus, we suggest the users to utilize this feature where one can quickly automate the test scenario and easily manage test scripts.
Script Mode
The Pinch To Zoom In scenario in Script Mode is as follows:
import static com.kms.katalon.core.testobject.ObjectRepository.findTestObject

import com.kms.katalon.core.configuration.RunConfiguration as RunConfiguration

import com.kms.katalon.core.mobile.keyword.MobileBuiltInKeywords as Mobile

import com.kms.katalon.core.model.FailureHandling as FailureHandling

'Path of the Apk File Store in path variable'

def path = RunConfiguration.getProjectDir() + '/Data Files/ApiDemos.apk'

'Start the application'

Mobile.startApplication(path, false)

'Wait for element Present of Heading API Demos'

Mobile.waitForElementPresent(findTestObject('API Demos Objects/Zoom_IN/heading_API_Demos'), 45)

'Checking the Element "Heading API Demos" is in Visible '

Mobile.verifyElementVisible(findTestObject('API Demos Objects/Zoom_IN/heading_API_Demos'), 30)

'Scroll to Views text'

Mobile.scrollToText('Views', FailureHandling.STOP_ON_FAILURE)

'Tap on Views'

Mobile.tap(findTestObject('API Demos Objects/Zoom_IN/text_Views'), 20)

'Scroll to WebView text'

Mobile.scrollToText('WebView', FailureHandling.STOP_ON_FAILURE)

'Checking the Element "WebView" is in Visible '

Mobile.verifyElementVisible(findTestObject('API Demos Objects/Zoom_IN/text_WebView'), 30)

'Tap on WebView'

Mobile.tap(findTestObject('API Demos Objects/Zoom_IN/text_WebView'), 30)

'Wait for Element Present "Hello World"'

Mobile.waitForElementPresent(findTestObject('API Demos Objects/Zoom_IN/link_Hello World'), 30)

'Checking the Element "Hello World" is in Visible '

Mobile.verifyElementVisible(findTestObject('API Demos Objects/Zoom_IN/link_Hello World'), 30)

'Get Element Height of "Hello World" Element'

ele_Height = Mobile.getElementHeight(findTestObject('API Demos Objects/Zoom_IN/link_Hello World'), 30)

'Get Element Width of "Hello World" Element'

ele_Width = Mobile.getElementWidth(findTestObject('API Demos Objects/Zoom_IN/link_Hello World'), 30)

'Pinch to Zoom In on "Hello World" Element up to 200 Offset'

Mobile.pinchToZoomInAtPosition(ele_Height, ele_Width, 200)

'Get Element Height of  Zoom In "Hello World" Element'

zoom_ele_Height = Mobile.getElementHeight(findTestObject('API Demos Objects/Zoom_IN/link_Hello World'), 30)

'Get Element Width of Zoom In "Hello World" Element'

zoom_ele_Width = Mobile.getElementWidth(findTestObject('API Demos Objects/Zoom_IN/link_Hello World'), 30)

'Verify the Element Height of Zoom In greater than normal Element height'

Mobile.verifyGreaterThan(zoom_ele_Height, ele_Height)

'Verify the Element Width of Zoom In greater than normal Element Width'

Mobile.verifyGreaterThan(zoom_ele_Width, ele_Width)

'Close the Application.'

Mobile.closeApplication()
The source code is available here. For further instructions and help, please refer to Pinch To Zoom In At Position guide and join us on Katalon Forum.
Handling Alert Dialog in Mobile App in Katalon Studio
An alert dialog box is used to send a message to the user. An alert box displays a dialog with a specific message and allows user to accept or reject the alert (OK/Cancel buttons).
The .apk file can be downloaded here. Start the app. Select App > Alert Dialogs.
Scenario
We want to test the alert dialog which usually appears on mobile app when there are suspicious/potentially dangerous actions.

Manual Mode
- Step 1: Select Start Application from mobile keyword and click on Input to open a new dialogue. In appFile, select 'Value Type' as Variable. In Value, pass the variable name as 'path'.

- Step 2: Add a Wait For Element Present item.
- Step 3: Call Scroll To Text from mobile keyword, pass App to Input. Scroll To Text accepts String type parameter (Text of the element to scroll to).

- Step 4: Call Tap method and pass the object of App.
- Step 5: Select Scroll To Text method and pass the Alert Dialogs text.

- Step 6: Tap on Alert Dialogs.
- Step 7: Add another Wait for Element Present keyword for object App/Alert Dialogs.
- Step 8: Call Scroll To Text from mobile keyword, pass the input as OK Cancel dialog with traditional theme.
- Step 9: Call Tap method and pass the object of OK Cancel dialog with traditional theme.
- Step 10: Verify alert using Verify Element Visible keyword.
- Step 11: Capture the text of alert using Get Text command and store it in a variable actual_AlertText.
- Step 12: Verify Actual and Expected alert texts by Verify Match keyword.

- Step 13: Tap on OK Button.
Script Mode
import static com.kms.katalon.core.testobject.ObjectRepository.findTestObject

import com.kms.katalon.core.configuration.RunConfiguration as RunConfiguration

import com.kms.katalon.core.mobile.keyword.MobileBuiltInKeywords as Mobile

import com.kms.katalon.core.model.FailureHandling as FailureHandling


'Path of the Apk File Store in path variable'

def path = RunConfiguration.getProjectDir() + '/Data Files/ApiDemos.apk'


'Start the application'

Mobile.startApplication(path, false)


'Wait for element Present of Heading API Demos'

Mobile.waitForElementPresent(findTestObject('API Demos Objects/Article_4/heading_API_Demos'), 45)


'Scroll to App text'

Mobile.scrollToText('App', FailureHandling.STOP_ON_FAILURE)


'Tap on App'

Mobile.tap(findTestObject('API Demos Objects/Handle Alert/text_App'), 20)


'Scroll to Alert Dialogs text'

Mobile.scrollToText('Alert Dialogs', FailureHandling.STOP_ON_FAILURE)


'Tap on Alert Dialogs'

Mobile.tap(findTestObject('API Demos Objects/Handle Alert/text_Alert Dialogs'), 30)


'Wait for Element Present of Header Alert'

Mobile.waitForElementPresent(findTestObject('API Demos Objects/Handle Alert/text_Header Alert'), 30)


'Verify Element Visible of Header Alert'

Mobile.verifyElementVisible(findTestObject('API Demos Objects/Handle Alert/text_Header Alert'), 30)


'Scroll to "OK Cancel dialog with traditional theme"'

Mobile.scrollToText('OK Cancel dialog with traditional theme', FailureHandling.STOP_ON_FAILURE)


'Tap On Button OK Cancel dialog with traditional theme'

Mobile.tap(findTestObject('API Demos Objects/Handle Alert/button_OK Cancel dialog with traditional theme'), 30)


'Wait for Element Visible of Alert Title'

Mobile.waitForElementPresent(findTestObject('API Demos Objects/Handle Alert/text_Alert Title'), 30)


'Verify the Element Visible of Alert Title'

Mobile.verifyElementVisible(findTestObject('API Demos Objects/Handle Alert/text_Alert Title'), 30)


'Get the Alert Title text and Store in to "actual_AlertText" variable'

actual_AlertText = Mobile.getText(findTestObject('API Demos Objects/Handle Alert/text_Alert Title'), 30)


'Verify the actual and Expected Alert Texts'

Mobile.verifyMatch(actual_AlertText, "Lorem ipsum dolor sit aie consectetur adipiscing\nPlloaso mako nuto siwuf cakso dodtos anr koop.",false)


'Tap on OK Button on Alert'

Mobile.tap(findTestObject('API Demos Objects/Handle Alert/button_OK'), 30)
For further instructions and help, please refer to Katalon User Guide or Katalon Forum.
Handling Drag and Drop in Mobile App in Katalon Studio
In this tutorial, we will see how to handle drag and drop action in a mobile application using Katalon Studio. The source code can be downloaded here.
Scenario
The scenario is to drag and drop a draggable object containing the text "Brad Mehldau" and a droppable object containing the text "Kurt Rosenwinkel".
- Step 1: Start the Application (Drag and Drop.apk)
- Step 2: Tap on Basic Usage playground text
- Step 3: Drag Brad Mehldau text to drop at Kurt Rosenwinkel text
Manual Mode
- Step 1: Select Start Application from mobile keyword and click on Input to open a new dialogue. In appFile, select 'Value Type' as Variable. In Value, pass the variable name as 'path'.

- Step 2: Add a Wait For Element Present item to wait for Basic Usage playground to pop up.
- Step 3: Select Tap from mobile keyword and pass the object of Basic Usage playground.
- Step 4: Similarly, add a Wait For Element Present item to wait for the 'Brad Mehldau' text.
- Step 5: Select the DragAndDrop keyword to perform the drag and drop action.
- Step 6: The draggable object will be dragged into the droppable object.

You can utilize our Script feature to automate the test.
Script Mode
import static com.kms.katalon.core.testobject.ObjectRepository.findTestObject

import com.kms.katalon.core.configuration.RunConfiguration as RunConfiguration

import com.kms.katalon.core.mobile.keyword.MobileBuiltInKeywords as Mobile

import com.kms.katalon.core.model.FailureHandling as FailureHandling


'Path of the Apk File Store in path variable'

def path = RunConfiguration.getProjectDir() + '/Data Files/Drag and Drop.apk'


'Start the Application'

Mobile.startApplication(path, false)


'Wait for Element Present of text "Basic Usage playground"'

Mobile.waitForElementPresent(findTestObject('Drag Sort Demos/Handle Drag and Drop/text_Basic Usage playground'), 30)


'Verify Element visible of "Basic Usage playground"'

Mobile.verifyElementVisible(findTestObject('Drag Sort Demos/Handle Drag and Drop/text_Basic Usage playground'), 30)


'Tap on "Basic Usage playground"'

Mobile.tap(findTestObject('Drag Sort Demos/Handle Drag and Drop/text_Basic Usage playground'), 30)


'Wait for Element Present of "Brad Mehldau"'

Mobile.waitForElementPresent(findTestObject('Drag Sort Demos/Handle Drag and Drop/text_Brad Mehldau'), 30)


'Verify Element visible of "Brad Mehldau"'

Mobile.verifyElementVisible(findTestObject('Drag Sort Demos/Handle Drag and Drop/text_Brad Mehldau'), 30)


'Use the dragAndDrop keyword to perform the drag and drop action.'

Mobile.dragAndDrop(findTestObject('Drag Sort Demos/Handle Drag and Drop/text_Brad Mehldau'), findTestObject('Drag Sort Demos/Handle Drag and Drop/text_Kurt Rosenwinkel'),

     30)


Mobile.delay(50, FailureHandling.STOP_ON_FAILURE)


Mobile.closeApplication()
Using List to Store the Mobile Elements to Validate Data in Katalon Studio
Scenario
We want to select a Radio button from a List. In order to do so, we need to capture all the button elements in a collection and pick the desired Radio button.
Manual Mode
- Step 1: Select Start Application from Mobile keyword and click on Input it will open a window. In appFile, select Value Type as Variable. In Value, pass the variable name as path.

- Step 2: Add Wait For Element Present item.
- Step 3: Call Scroll To Text from mobile keyword, pass the input as Views. Scroll To Text accepts String type parameter (Text of the element to scroll to).

- Step 4: Call Tap method and pass the object of Views.
- Step 5: Call Scroll To Text from mobile keyword, pass the input as Radio Group.
- Step 6: Tap on Radio Group.
- Step 7: After tapping on 'Radio Group', we want to wait for heading 'Views/Radio Group' to be visible on the screen.
- Step 8: Add a binary statement to initialize Appium Driver with Katalon Mobile Driver.
- Step 9: Add another binary statement to get all radio elements and store in a List. In Left Expression, select 'Variable' as Value Type and pass 'elements' in Value. In Right expression, select 'Method Call' as Value Type and pass the list of radio buttons object information.

- Step 10: Add a for-each loop statement.

– Step 10.1: Add a binary statement to capture the text of each element in the list and store it in the "actual_Text" variable.
– Step 10.2: Add 'if' statement and verify whether the actual text matches the expected text. When the actual text matches the expected text, perform click action on Radio button.
– Step 10.3: After performing click event, we need to terminate for each loop. Add a method call statement 'break' to achieve this.

The step-by-step guide can also be achieved through Script Mode. We suggest using the Script feature in Katalon to automate the process faster.
Script Mode
import static com.kms.katalon.core.testobject.ObjectRepository.findTestObject

import org.openqa.selenium.WebElement as WebElement

import com.kms.katalon.core.configuration.RunConfiguration as RunConfiguration

import com.kms.katalon.core.mobile.keyword.MobileBuiltInKeywords as Mobile

import com.kms.katalon.core.mobile.keyword.internal.MobileDriverFactory as MobileDriverFactory

import com.kms.katalon.core.model.FailureHandling as FailureHandling

import io.appium.java_client.AppiumDriver as AppiumDriver


'Path of the Apk File Store in path variable'

def path = RunConfiguration.getProjectDir() + '/Data Files/ApiDemos.apk'


'Start the application'

Mobile.startApplication(path, false)


'Wait for element Present of Heading API Demos'

Mobile.waitForElementPresent(findTestObject('API Demos Objects/List_Example/heading_API_Demos'), 45)


'Scroll to Views text'

Mobile.scrollToText('Views', FailureHandling.STOP_ON_FAILURE)


'Tap on Views'

Mobile.tap(findTestObject('API Demos Objects/List_Example/text_Views'), 20)


'Scroll to Radio Group text'

Mobile.scrollToText('Radio Group', FailureHandling.STOP_ON_FAILURE)


'Tap on Radio Group'

Mobile.tap(findTestObject('API Demos Objects/List_Example/text_Radio Group'), 30)


'Wait for Element Present of Header Radio Group'

Mobile.waitForElementPresent(findTestObject('API Demos Objects/List_Example/text_Header Radio Group'), 30)


'Initializing Appium Driver by Katalon Mobile Driver'

AppiumDriver<?> driver = MobileDriverFactory.getDriver()


'Getting all similar elements and storing in to List'

List<WebElement> elements = driver.findElementsByClassName('android.widget.RadioButton')


'Printing the Size of list elements'

println('The size of elements is ::' + elements.size())


'Here Using For each loop for iterations'

for (WebElement radio : elements) {

    'Get the text of each element in the list and store in to the "actual_Text" variable.'

    String actual_Text = radio.getText()

     'Here verifying the actual text with expected text of "Dinner" on every iteration'

     if(actual_Text.equals("Dinner"))

     {

           'Click on expected Element "Dinner" '

           radio.click();

           'Break the loop'

           break;

     }

}
The source code is available here.
Handling Spinner in Mobile Automation Testing in Katalon Studio
The source code can be downloaded here. This behavior is very common in mobile software development. An example is choosing a location out of a list of US states and territories.
Scenario
Scroll down in Planet Spinner list and select "Pluto". Verify selected value "Pluto".

Manual Mode
- Step 1: Select Start Application from mobile keyword and click on Input. A dialog will be displayed. In appFile, select Value Type as Variable. In Value, pass the variable name as path.

- Step 2: Add Wait For Element Present item.
- Step 3: Call Scroll To Text from mobile keyword, pass the input as Views. Scroll To Text accepts String type parameter (Text of the element to scroll to).

- Step 4: Call Tap method and pass the object of Views.
- Step 5: Call Scroll To Text from mobile keyword, pass the input as Spinner.
- Step 6: Tap on Spinner.
- Step 7: Here in this step after tapping on 'Spinner' we need to wait for Heading 'Views/Spinner' is visible on the screen.
- Step 8: Call Tap method and pass the object of 'Planet Spinner' option.
- Step 9: Call Scroll To Text from mobile keyword, pass the input as Pluto.
- Step 10: Call Tap method and pass the object of Pluto option.
- Step 11: To verify that Pluto option has been selected, we are capturing the text of the selected object by calling Get Text keyword and storing it in a variable.

- Step 12: Call 'Verify Match' keyword to validate whether the value stored a variable is matched with the expected result.

The step-by-step guide can also be achieved through Script Mode. We suggest using the Script feature in Katalon to automate the process faster.
Script Mode
import static com.kms.katalon.core.testobject.ObjectRepository.findTestObject
import com.kms.katalon.core.configuration.RunConfiguration as RunConfiguration
import com.kms.katalon.core.mobile.keyword.MobileBuiltInKeywords as Mobile
import com.kms.katalon.core.model.FailureHandling as FailureHandling

'Path of the Apk File Store in path variable'
def path = RunConfiguration.getProjectDir() + '/Data Files/ApiDemos.apk'

'Start the application'
Mobile.startApplication(path, false)

'Wait for element Present of Heading API Demos'
Mobile.waitForElementPresent(findTestObject('API Demos Objects/Spinner_Example/heading_API_Demos'), 45)

'Scroll to Views text'
Mobile.scrollToText('Views', FailureHandling.STOP_ON_FAILURE)

'Tap on Views'
Mobile.tap(findTestObject('API Demos Objects/Spinner_Example/text_Views'), 20)

'Scroll to Spinner text'
Mobile.scrollToText('Spinner', FailureHandling.STOP_ON_FAILURE)

'Tap on Spinner'
Mobile.tap(findTestObject('API Demos Objects/Spinner_Example/text_Spinner'), 20)

'wait for Element Present of text Header Spinner'
Mobile.waitForElementPresent(findTestObject('API Demos Objects/Spinner_Example/text_header Spinner'), 20)

'Verify Element Visible of text Header Spinner'
Mobile.verifyElementVisible(findTestObject('API Demos Objects/Spinner_Example/text_header Spinner'), 30)

'Tap on Spinner Planet'
Mobile.tap(findTestObject('API Demos Objects/Spinner_Example/spinner_Planet'), 30)

'Scroll to "Pluto" text'
Mobile.scrollToText('Pluto', FailureHandling.STOP_ON_FAILURE)

'Tap on Pluto'
Mobile.tap(findTestObject('API Demos Objects/Spinner_Example/text_Pluto'), 20)

'Get Selected Dropdown Value and Stored in to "actual_SelectedValue" variable'
actual_SelectedValue = Mobile.getText(findTestObject('API Demos Objects/Spinner_Example/validation_Selected Spinner value'),
    30)

'Verify Actual and Expected value of Selected Dropdown'
Mobile.verifyMatch(actual_SelectedValue, 'Pluto', false)

Mobile.closeApplication()
Note: This scenario can be also handled by capturing the values in a list and tapping on the desired value from spinner.
The source code is available at: katalon-studio-samples/katalon-mobile-automation.
Handling Scroll to Element in Mobile Automation in Katalon Studio
Scroll To Text
This tutorial illustrates Scroll to text behavior in the mobile app. The demonstration uses API demos, which you can download from here. The application apk file also comes with the sample project packaged with your product installation. We will be using Android O.S for this tutorial, so make sure that your Android device API is greater than 18.
Scenario
The screenshot of the app below has a listview containing 'n' number of rows. Our goal is to scroll down to the text 'Views', and to tap on it. When the user taps on Views, the app navigates to another screen.

We can easily automate this scenario in two ways: manual and script modes.
Manual Mode
- Step 1: Click on Add and select Binary Statement.

- Step 2: Go to Input field. Select value type as Variable in Left Expression and name the variable as 'path'. This name will show up in Value.

- Step 3: Select Value Type as Binary in Right Expression. Next, click on the Value field. In the new window, enter Left and Right Expressions.
- Step 4: Select value type as Method call in Left Expression. Click on the Input field, a window will pop up where user can select an Object Type as Class, Object as RunConfiguration, method as getProjectDir() to continue.

- Step 5: In Right Expression, select String as Value Type and pass the path of the "/folder name/apk file name with extension".
For example, if the apk file is stored in Data Filesfolder in File Explorer, the passed path is "/Data Files/ApiDemos.apk"

- Step 6: Select Start Application from mobile keyword andclick on Input. A new window will appear. In appFile, select 'Value Type' as Variable. In Value, pass the variable name as path.

- Step 7: Add Wait For Element Present item.
- Step 8: Call Scroll To Text from mobile keyword to pass Input as Views. Scroll To Text accepts String type parameter (Text of the element to scroll to)

- Step 9: Call Tap method and pass the object of Views from Object Repository
- Step 10: Select Scroll To Text method and pass input as 'Tabs'

The step-by-step guide above can be achieved through Script mode (switch to Script Mode by clicking on Script tab).
Script Mode
import static com.kms.katalon.core.testobject.ObjectRepository.findTestObject
import com.kms.katalon.core.configuration.RunConfiguration as RunConfiguration
import com.kms.katalon.core.mobile.keyword.MobileBuiltInKeywords as Mobile
import com.kms.katalon.core.model.FailureHandling as FailureHandling

'Path of the Apk File Store in path variable'
def path = RunConfiguration.getProjectDir() + '/Data Files/ApiDemos.apk'

'Start the application'
Mobile.startApplication(path, false)

'Wait for element Present of Heading API Demos'
Mobile.waitForElementPresent(findTestObject('API Demos Objects/heading_API_Demos'), 45)

'Scroll to Views text'
Mobile.scrollToText('Views', FailureHandling.STOP_ON_FAILURE)

'Tap on Views'
Mobile.tap(findTestObject('API Demos Objects/text_Views'), 20)

'Scroll to Tabs text'
Mobile.scrollToText('Tabs', FailureHandling.STOP_ON_FAILURE)
Note: Steps 1 to 6 in Manual mode can be optimized by adding a single line in script mode; i.e.,
def path = RunConfiguration.getProjectDir() + '/Data Files/ApiDemos.apk'
The source code is available here. For further instructions and help, please refer to Scroll to Text guideline and join us on Katalon Forum.
Handling Vertical Swipe in Mobile Automation in Katalon Studio
Swipe Vertically from Top to Bottom
This tutorial illustrates Vertical Swiping from Top to Bottom action in the mobile app.This demonstration uses API Demos, which you can download from here. We will be using Android O.S for this tutorial, please make sure that your Android device API is greater than 18.
Scenario
The screenshot of the app below has a listview containing 'n' number of rows. Our goal is to swipe vertically from top to bottom of the screen.

Manual Mode
- Step 1: Select Start Application from mobile keyword and click on Input, a new window will open. In appFile, select Value Type as Variable. In value, pass the variable name as path.

- Step 2: Add a Wait For Element Present item.
- Step 3: Call Scroll To Text from mobile keyword and pass input as 'Views'. Scroll To Text accepts String type parameter (Text of the element to scroll to)

- Step 4: Tap on Views.
- Step 5: Use Get Device Height keyword to capture the height of the device and store it in a deviceheight variable. Select Get Device Width keyword to capture the width of the device and storing it in a deviceWidth variable.
- Step 6: Add a binary statement, and in the 'startX' value, store the device width divided by 2. In this illustration, the X-coordinates will stay constant.
- Step 7: Add a binary statement, assign 'endX' value to startX'.
- Step 8: Add a binary statement, in which the 'startY' variable is the device height multiplied by 0.30.
- Step 9: Add a binary statement, in which the 'endY' variable is the device height multiplied by 0.70.
- Step 10: Call the swipe method and select the Value Type as 'Variable'. Pass the startX, startY, endX, endY values to that method.

The same thing can be achieved from the Script mode (switch to Script Mode by clicking on Script tab).
Script Mode:
import static com.kms.katalon.core.testobject.ObjectRepository.findTestObject

import com.kms.katalon.core.configuration.RunConfiguration as RunConfiguration

import com.kms.katalon.core.mobile.keyword.MobileBuiltInKeywords as Mobile

import com.kms.katalon.core.model.FailureHandling as FailureHandling


'Path of the Apk File Store in path variable'

def path = RunConfiguration.getProjectDir() + '/Data Files/ApiDemos.apk'


'Start the application'

Mobile.startApplication(path, false)


'wait for element Present'

Mobile.waitForElementPresent(findTestObject('API Demos Objects/heading_API_Demos'), 45)


'\'Scroll to Text Views\''

Mobile.scrollToText('Views', FailureHandling.STOP_ON_FAILURE)


'\'Tap on Views\''

Mobile.tap(findTestObject('API Demos Objects/text_Views'), 20)


'Get Device Height and Store in device_height variable'

device_Height = Mobile.getDeviceHeight()


'Get Width Height and Store in device_Width variable'

device_Width = Mobile.getDeviceWidth()


'Storing the startX value by dividing device width by 2. Because x coordinates are constant for Vertical Swiping'

int startX = device_Width / 2


'Here startX and endX values are equal for vertical Swiping for that assigning startX value to endX'

int endX = startX


'Storing the startY value'

int startY = device_Height * 0.30


'Storing the endY value'

int endY = device_Height * 0.70


'Swipe Vertical from top to bottom'

Mobile.swipe(startX, endY, endX, startY)


'Swipe Vertical from bottom to top'

Mobile.swipe(startX, startY, endX, endY)
The source code is available here. For further instructions and help, please refer to Mobile Swipe guideline and join us on Katalon Forum.
Handling Horizontal Swipe in Mobile Automation in Katalon Studio
Swipe Horizontally from Left to Right
This tutorial illustrates Horizontal Swiping actions in the mobile app. This demonstration uses SwipeListView Demo, which you can download it here. We will be using Android O.S for this tutorial, so please make sure that your Android device API is greater than 18.
Scenario
The screenshot of the app contains a list of applications which are installed in the mobile device. We want to swipe horizontally from left to right on any application from this list.

Manual Mode
- Step 1: Select Start Application from mobile keyword and click on Input, a new window will appear. In appFile , select Value Type as Variable. In Value, pass the variable name as path.

- Step 2: After launching the application, call a Wait For Element Present method. Capture the status of an Alert presence in a variable 'alert_Status'. It returns true when an alert is present and false when alert is not present.
- Step 3: Adding an If statement, if 'alert_Status' is true, tap on "Don't show this message again" and tap OK.

- Step 4: Add another Wait For Element Present item to verify whether the mobile element pops up.
- Step 5: Use Get Device Height keyword to capture the height of the device and store it in a deviceheight variable. Select Get Device Width keyword to capture the width of the device and storing it in a deviceWidth variable.
- Step 6: Add a binary statement with the 'startY' divided by 2. Here, the y-coordinates are constant.
- Step 7: Add binary statement, here 'endY' and 'startY' values are the same for horizontal swiping, so re-assign 'startY' value to 'endY'.
- Step 8: Add binary statement and multiply device width with 0.30 to store it in 'startX' variable.
- Step 9: Add binary statement and multiply device width with 0.70 to store it in 'endX' variable.
- Step 10: Call the swipe method and select the Value Type as 'Variable'. Pass the startX, startY, endX, endY values to that method

The step-by-step guide above can be achieved through Script mode (switch to Script Mode by clicking on Script tab).
Note: Swiping horizontally from right to left can also be implemented similarly.
Script Mode
import static com.kms.katalon.core.testobject.ObjectRepository.findTestObject

import com.kms.katalon.core.configuration.RunConfiguration as RunConfiguration

import com.kms.katalon.core.mobile.keyword.MobileBuiltInKeywords as Mobile


'Path of the Swipe List View Demo APK File Store in path variable'

def path = RunConfiguration.getProjectDir() + '/Data Files/SwipeListView Demo.apk'


'Start the application'

Mobile.startApplication(path, false)


'Wait for Element Present of checkbox Don't Show this message again.\\r\\nif element present return true otherwise false.'

alert_Status = Mobile.waitForElementPresent(findTestObject('Swipe ListView Demos/checkbox_Dont show this message again'),

20)


'checking the if statement based on element present of alert check box'

if (alert_Status == true) {

'Tap on check box'

Mobile.tap(findTestObject('Swipe ListView Demos/checkbox_Dont show this message again'), 30)


'Tap on Ok'

Mobile.tap(findTestObject('Swipe ListView Demos/button_Ok'), 30)

}


'Wait for element Present of Heading API Demos'

Mobile.waitForElementPresent(findTestObject('Swipe ListView Demos/header_text SwipeListView Demo'), 45)


'Get Device Height and Store in device_height variable'

device_Height = Mobile.getDeviceHeight()


'Get Device Width and Store in device_Width variable'

device_Width = Mobile.getDeviceWidth()


'Storing the startX,endX values by dividing device height by 2 Because Y coordinates are constant'

int startY = device_Height / 2


'Here endY and startY values are equal for vertical Swiping for that assigning startY value to endY'

int endY = startY


'Storing the startX value'

int startX = device_Width * 0.30


'Storing the endX value'

int endX = device_Width * 0.70


'Here Y constant for Swipe Vertical Left to Right'

Mobile.swipe(startX, startY, endX, endY)
The source code is available here. For further instructions and help, please refer to Mobile Swipe guideline and join us on Katalon Forum.