[Mobile] Create and Run Android Test Case in Katalon Studio
This tutorial demonstrates how to create Android tests with Katalon Studio using Record and Playback.
Go through the following "Recording a scenario of sending a message via the APIDemos.apk application" to get familiar with these features. The basic steps are:
- Launch APIDemos.apk on the device.
- Tap on OS.
- Tap on SMS Messaging.
- Enter a phone number and a message.
- Tap on Send.
- APIDemos.apk and sample project code are available here.
Create and Run your first Android test case in Katalon Studio
Create a new project
-
In the Test Explorer on the sidebar > click New Project.
-
In the displayed New Project dialog:
- Input project Name.
- In project Type, select Mobile.
- In Project, select Sample Android..., the Repository URL is filled automatically.
-
Browse a Location to store your project, then click OK.

Record a test case
-
On the main toolbar, click Record Mobile > select Android Devices.

-
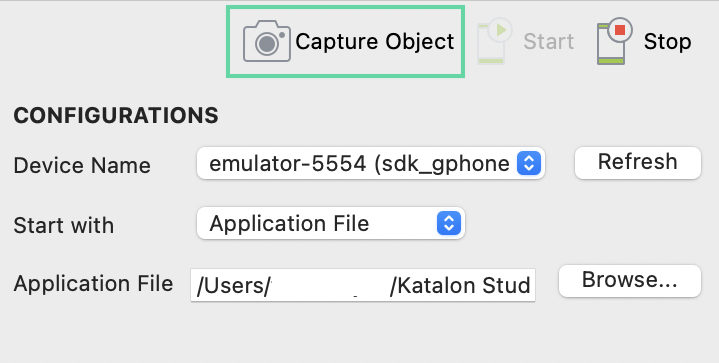
In the displayed Mobile Recorder dialog, specify the information at the Configurations section:

- Device Name: select one of your connected Android devices.
- Start with: Select Application File in the drop-down list.
- Application File: Browse APIDemos.apk.
-
Click Start to begin recording your test case:
- Wait until the AUT is launched.
- The Device View and All Objects are ready for you to interact with the application.
-
On the Device View > click OS, Katalon Studio selects OS in All Objects correspondingly.

-
Once OS is selected, Tap is enabled in Available Actions > click Tab, the tap action is performed as follows:
- The Device View is rendered with newly displayed elements.
-
In Recorded Actions, Tap is added to the list of recorded steps.

-
In Captured Objects, OS is captured with its properties.

Note:- The essential property of an object is its locator strategy and value. The default locator is a unique value in detecting that object.

- If you prefer another locator strategy, select your preferred one and generate a new locator > click Highlight to see if your newly updated locator can detect the target object on its screen correctly.
-
Similarly in Device View, click SMS Messaging > click Tap in Available Actions.
You can see another tap action is added to the list of Recorded Actions and Captured Objects.

-
In Device View, select the text input area right next to Recipient > click Set Text in Available Actions.

In the displayed Text Input dialog, enter a phone number > click OK. You can see a phone number is filled in the text field in Device View.
-
In Device View, select the text input area next to the Message Body > click Set Text in Available Actions.
In the displayed Text Input dialog, enter any message > click OK.
You can see the message is set in the text field in Device View and the Set Text is added to the Recorded Actions.

-
In Device View, click Send > click Tap in Available Actions.
Note:- If you launch the APIDemos.apk application on a real device with a carrier, the message can be sent successfully.

-
Click on the Stop button above the CONFIGURATIONS section to close the application and finish recording.
After finishing recording the desired interactions with the AUT, click Save script to save the captured objects.
In the displayed Folder Browser dialog, create a new folder or select an existing folder in Object Repository > click OK.
-
You can add the recorded test steps to a new test case, append to or overwrite an existing one.

Note:- Appium known limitation: You may get incorrect object highlighting when rotating the device to landscape view.
- Workaround: After rotating, you need to click on the Capture Object button to refresh the All Objects tree, then the highlighting will work normally.

Playback a test case
To playback the recorded scenario:
- Select the test case where you saved the recorded actions.
-
On the main toolbar, select Android device on the drop-down list next to Run.

-
In the displayed Android Devices dialog, select a device > click OK.

Katalon Studio executes the mobile test with the recorded steps accordingly.
View the test case in Script mode.
import static com.kms.katalon.core.testobject.ObjectRepository.findTestObject

import com.kms.katalon.core.configuration.RunConfiguration
import com.kms.katalon.core.mobile.keyword.MobileBuiltInKeywords as Mobile
import com.kms.katalon.core.model.FailureHandling as FailureHandling

'Start the Application'
Mobile.startApplication(RunConfiguration.getProjectDir() + '/APIDemos.apk', true)

'Tap on OK if this is the first time this application is launched on an Android 9+ device'
Mobile.tap(findTestObject('Object Repository/APIDemo/android.widget.Button - OK'), 0, FailureHandling.OPTIONAL)

'Tap on text "OS"'
Mobile.tap(findTestObject('Object Repository/APIDemo/android.widget.TextView - OS'), 0)

'Tap on text "SMS Messaging"'
Mobile.tap(findTestObject('Object Repository/APIDemo/android.widget.TextView - SMS Messaging'), 0)

'Enter a phone number in Recipient text box'
Mobile.setText(findTestObject('Object Repository/APIDemo/android.widget.EditText'), '+84345678910', 0)

'Enter a message in Body Message text box'
Mobile.setText(findTestObject('Object Repository/APIDemo/android.widget.EditText (1)'), 'Hello world! This is Katalon Mobile Recorder', 0)

'Send the message'
Mobile.tap(findTestObject('Object Repository/APIDemo/android.widget.Button - Send'), 0)

'Close the Application'
Mobile.closeApplication()
Next: Execute and Debug a Test Case.
Previous: Set up Android-mobile-tests.